Making Your Own Armorer In Minecraft: A Friendly Guide
Minecraft, a rather popular sandbox game, offers so many ways to build and explore a blocky, three-dimensional world, doesn't it? It's really full of possibilities and opportunities for exploration, and you can create just about anything you dream up. You might be wondering how to get better gear, or perhaps you're looking to just make your village more useful. Well, learning how to make an armorer in Minecraft is a pretty big step for anyone wanting to get top-notch protection for their adventures, you know?
For many players, finding good armor is a key part of staying safe from all the creatures that roam the land, or even from other players. While you can certainly make some armor yourself, having an armorer villager around makes getting strong gear a whole lot simpler. They offer a steady supply of metal pieces, and, in some respects, even enchanted items, which is quite handy.
This guide will walk you through the simple steps to create an armorer in your Minecraft village, helping you level up your gaming skills and, quite literally, dominate the virtual world with your armor crafting abilities. So, let's get into it, shall we?
Table of Contents
- What is an Armorer Anyway?
- Getting Ready: What You'll Need
- Crafting the Blasting Furnace
- Finding Your Villager
- Making Them an Armorer
- Trading with Your Armorer
- Sprucing Up Your Gear: Armor Trims
- Displaying Your Creations: Armor Stands
- Frequently Asked Questions
What is an Armorer Anyway?
As a Minecraft player, you might have encountered various professions and jobs in the game. There are, you know, different jobs that villagers can be assigned in Minecraft. A very important role in the game is the armorer, and it's quite valuable for getting strong protection. These special villagers are the ones who make and sell armor pieces, like helmets, chestplates, leggings, and boots, which is pretty neat.
Having different villagers work different jobs can be very useful for your village's overall well-being and your own progress. An armorer is, in fact, one of the most important and valuable villagers you can have. They are like your personal gear shop, always ready to trade their metal goods for your emeralds, or perhaps other items, which is pretty convenient.
They can provide you with iron, gold, chainmail, and even diamond armor as they gain more experience. Later on, they can even offer enchanted armor, which is a really big deal for staying safe in the game. So, having an armorer around is, you know, a pretty smart move for any player.
Getting Ready: What You'll Need
To make an armorer villager, first you need to make a specific workstation for them. This special block is called a Blasting Furnace. It's their tool, essentially, for doing their job. Without it, a villager can't become an armorer, you see.
The Blasting Furnace is, in some respects, a very important part of this whole process. It's where they do their work, where they process metals and prepare their wares. So, getting this item ready is your very first step, you know, before anything else.
To craft a Blasting Furnace, you will need a few common materials. You'll need five iron ingots, which you can get by smelting iron ore. You'll also need three smooth stones, which come from smelting cobblestone into stone, and then smelting that stone again. And finally, you'll need one regular furnace, which is fairly simple to make with eight cobblestones. So, gather these items first, and you'll be well on your way, as a matter of fact.
Crafting the Blasting Furnace
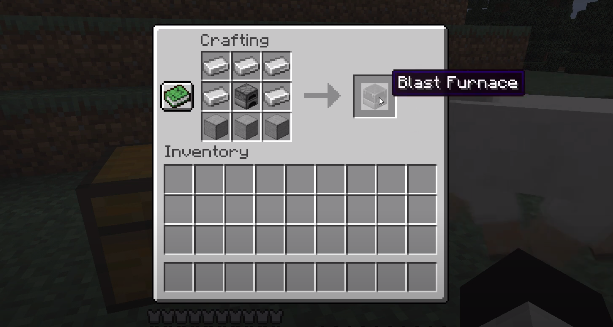
Once you have all the items ready – that is, your five iron ingots, three smooth stones, and one furnace – it's time to put them together. You'll need a crafting table for this step, of course. Just place your crafting table down, and then open up its crafting grid, you know, to begin.
To make the Blasting Furnace, you'll arrange the items in a particular pattern. Place the furnace in the very center square of the crafting grid. Then, put the three smooth stones across the bottom row, directly below the furnace. After that, place an iron ingot in each of the remaining empty squares. That means one in the top-left, one in the top-right, one in the middle-left, and one in the middle-right. So, it's almost like a pattern around the central furnace, you see.
Once you've arranged everything correctly, the Blasting Furnace item will appear in the output slot. Just take it out, and you've got your armorer's workstation! It's really quite simple when you know the recipe, isn't it? This block is pretty essential for your future armorer, so keep it safe for now.
Finding Your Villager
Now that you have your Blasting Furnace, the next thing you need is a villager who doesn't have a job yet. These villagers, you know, are usually dressed in plain brown robes. They are, in a way, ready to take on any profession you offer them. You can find them wandering around villages, or sometimes you might even breed them yourself if you have enough beds and food, which is pretty neat.
It's often helpful to find an unemployed villager and, perhaps, gently guide them to where you want your armorer to live. You can use boats, minecarts, or even just push them along, if you're patient enough. Make sure the area you choose for your armorer is safe and well-lit, so they don't get into trouble with hostile creatures at night, you know. That's a pretty important detail for their well-being.
Having a dedicated space for your villagers is a good idea, as a matter of fact. It helps keep them organized and makes it easier to manage their professions. So, pick a spot in your village or base where you want your armorer to set up shop, and then bring your chosen unemployed villager there. They are, after all, going to be a key part of your gear supply, so give them a good home, you know.
Making Them an Armorer
This is where the magic happens, so to speak. Once you have an unemployed villager in your chosen spot, and your Blasting Furnace ready, the process is incredibly straightforward. All you need to do is place the Blasting Furnace near the unemployed villager. It's that simple, honestly.
When you place the Blasting Furnace, the unemployed villager should, almost immediately, recognize it as a job site. You'll see green particles appear around them, and their plain brown robes will change to the armorer's outfit, which is typically a dark apron with some metal details. This means they have successfully taken on the armorer profession, and they are ready to work, you know.
Sometimes, if there are other job blocks nearby, or if the villager is already linked to another block, it might take a moment, or they might not change right away. If that happens, you can try breaking any other job blocks in the area, or perhaps moving the villager a little closer to the Blasting Furnace. But usually, pressing use on an adult villager with a Blasting Furnace nearby will, in fact, get them to pick up the job. It's a pretty satisfying moment when they finally change, honestly.
Trading with Your Armorer
Once your villager has become an armorer, you can start trading with them! Just right-click on them, and their trading interface will pop up. At first, they'll offer basic trades, like iron armor pieces for emeralds, or maybe some coal for emeralds. These initial trades are, in a way, just the beginning of what they can offer you, you know.
The more you trade with your armorer, the more experience they gain. As they gain experience, they will level up, and with each new level, they will unlock new trades. This means they will offer better and better armor, which is really quite exciting. You might find them offering diamond armor, or even enchanted diamond armor, as they get to higher levels. So, keep those emeralds ready, as a matter of fact!
They can also trade for bells, which is a rather interesting item, and sometimes even offer a shield. Their stock will refresh twice a day, usually at dawn and dusk, so you can keep checking back for new opportunities. It's a pretty reliable way to get your gear, you see.
Leveling Up Your Armorer
To get the best trades from your armorer, you really need to level them up. Every time you complete a trade with them, they gain a little bit of experience. You'll see green particles again, indicating their progress. There are five levels for a villager profession: Novice, Apprentice, Journeyman, Expert, and Master. Each level unlocks more valuable trades, which is quite useful.
At the higher levels, your armorer can offer some of the most powerful armor in the game. They can even sell enchanted diamond armor, which saves you the trouble of finding enchantments yourself. So, it's worth it to keep trading with them, even for their simpler items, just to help them gain experience. It's a pretty straightforward process, honestly, and the rewards are well worth the effort.
Remember that you can also lock a villager's trades by trading with them at least once. This means their trades won't change even if you break their workstation. This is a good trick if they offer a trade you really like and want to keep, you know. It gives you a bit more control over your village economy, which is pretty handy.
Getting the Best Armor
While armorers can provide diamond armor, you might be thinking about the very best protection available. Having been officially introduced to Minecraft in 1.16, Netherite armor and weapons are stronger than their diamond counterparts. Your armorer can't directly give you Netherite armor, but they can provide the diamond base that you'll need to upgrade. So, they are still very much a part of getting the top-tier gear, you see.
To get Netherite armor, you first need diamond armor, which your armorer can sell you. Then, you'll need to find Ancient Debris in the Nether, smelt it into Netherite Scraps, and combine those with gold ingots to make Netherite Ingots. Finally, you use a Smithing Table to combine a diamond armor piece with a Netherite Ingot to make it Netherite. So, your armorer is a pretty important first step in that process, you know, for getting that diamond base.
Speaking of the absolute best set of armor and enchantments, for your Netherite "god armor" in Minecraft, especially in updates like 1.21, the tricky trials update, the armorer helps by providing the diamond pieces you'll need. This is the most durable armor in the game, and having a reliable source of diamond gear from your armorer is, in a way, a big advantage. So, they truly help you gear up with the best armor in the game, honestly.
Sprucing Up Your Gear: Armor Trims
As part of the Minecraft Trails & Tales Update, which was, you know, introduced in 1.20, a brand new feature has been added in the form of armor trims. These trims can provide you with an even greater way to personalize your gear. Armor trims offer a uniquely distinct experience in Minecraft, adding a vibrant touch to otherwise plain armor pieces. They are purely cosmetic, meaning they don't add any protection, but they look really cool, you see.
You find these armor trim patterns in various structures throughout your Minecraft world, like desert temples, shipwrecks, or ancient cities. Each pattern is unique and lets you customize your armor with different designs and colors, using various materials like iron, gold, diamond, or even Netherite. So, it's a pretty fun way to make your armor truly your own, as a matter of fact.
While your armorer villager won't trade armor trims themselves, they are still key to getting the base armor pieces that you'll then decorate. So, having a steady supply of diamond or iron armor from your armorer means you'll have plenty of pieces to experiment with different trim designs. It's a pretty neat way to express your style in the game, you know, and really make your character stand out.
Displaying Your Creations: Armor Stands
After you've spent all that time getting great armor from your armorer, or maybe even making some iron armors yourself, you might want to show it off. That's where armor stands come in handy! Let's explore how to make an armor stand. They are, in a way, like mannequins for your gear, you see.
In Minecraft, armor stands can be used to hold and display your armor and other wearable items, like helmets, chestplates, leggings, boots, and even mob heads. You can also use it to display tools and weapons, which is pretty cool. They are a great way to decorate your base or show off your rare finds, you know.
To make an armor stand, you'll need six sticks and one smooth stone slab. You arrange the sticks in a specific pattern on a crafting table: one stick in the center of the top row, one in the middle of the middle row, one in the middle of the bottom row, and then one stick each in the left and right slots of the middle row, and one stick in the left slot of the top row. Then, place the smooth stone slab in the center of the bottom row. It's a bit of a tricky recipe, but once you get it, you can make as many as you need, as a matter of fact. They are pretty useful for organizing your gear, honestly.
Frequently Asked Questions
What does an armorer villager trade in Minecraft?
An armorer villager, you know, trades various armor pieces, like helmets, chestplates, leggings, and boots, made from iron, gold, or diamond, depending on their level. They also, in some respects, trade for bells and sometimes offer enchanted armor at higher levels. Their initial trades are usually for simpler iron items, but they get much better as you trade with them, which is pretty neat.
How do you get a villager to be an armorer?
To get a villager to be an armorer, you need to place a Blasting Furnace near an unemployed villager. The Blasting Furnace is, in a way, their job site block. Once the villager detects the Blasting Furnace, they will change their profession to an armorer, and their clothes will change to reflect their new job. It's a pretty simple process, honestly, just place the block and wait a moment.
What workstation does an armorer use?
An armorer villager uses the Blasting Furnace as their workstation. This block is, you know, essential for them to perform their job and offer trades. You craft a Blasting Furnace using five iron ingots, three smooth stones, and one regular furnace. It's their primary tool, as a matter of fact, for all their metalworking needs.
So, there you have it! Making an armorer in Minecraft is a pretty straightforward process, and it really adds a lot to your game. They are a great source for all your armor needs, from basic iron to strong diamond pieces, and they even help you get ready for Netherite. Remember, you can learn more about Minecraft villagers on our site, and also check out this page to build a great base to protect your new armorer. Happy crafting, and stay safe in your world!
How to Make an Armorer Villager in Minecraft (Best Tutorial!) - YouTube
How to Make an Armourer Villager in Minecraft

How to Make an ARMORER Villager in Minecraft - TUTORIAL (Easy & Quick
