How To Draw Fire: Simple Steps For Amazing Flames
Learning how to draw fire might seem like a tricky thing to do, but honestly, it's a lot more approachable than you might think. Many people feel a bit stuck when trying to capture something so lively and without a fixed shape, yet with a few simple approaches, you can truly bring those warm, glowing elements to life on your paper or screen. We're here to help you get past any worries and truly enjoy the creative process, so you can make a great looking fire that feels just right.
Fire, you know, holds a special place in our hearts; it's often a symbol of coziness, home, and even passion. But, trying to draw those flickering, dancing flames can be quite a challenge since they don't have one solid form or color, do they? They are, after all, very dynamic, which makes getting them right a bit difficult, but there are some simple tricks you can use to make it much easier, actually. We've put together some really helpful guidance for you.
This tutorial, or guide, is useful for anyone, really, whether you're just starting out with art or you're a younger kid picking up a pencil for the first time. We'll walk you through each stage, from basic shapes to adding those vibrant colors and subtle movements. You'll learn to draw a fire that looks fantastic, and we'll even show you how to draw a candle flame, a campfire, and a thrown flame using a few simple tools, too. Read on as we break down exactly how to draw flames in this fantastic tutorial.
Table of Contents
- Getting Started with Fire Art
- The Basics of a Single Flame
- Understanding Flame Dynamics
- Drawing Different Types of Fires
- Adding Color and Detail
- Digital Drawing with Sketchpad
- Tips for Practice and Improvement
- Frequently Asked Questions About Drawing Fire
Getting Started with Fire Art
You know, drawing fire can seem like an intimidating task, but it can be an enjoyable and rewarding experience once you get the hang of it. It's truly a symbol of coziness and home, isn't it? Capturing those lively shapes and vibrant colors of flames can be both fun and challenging, so, it's a good idea to start with some basic preparation, actually.
Before you even put pencil to paper, or stylus to screen, think about what kind of fire you want to draw. Is it a gentle candle flame, a roaring campfire, or something more energetic, like a thrown flame? Each has its own unique character and, you know, understanding that helps a lot. We'll cover a few types here, so you'll get a good range.
For tools, you don't need anything too fancy. A simple pencil and paper are perfectly fine for traditional drawing, or if you prefer digital art, a drawing tablet and a free online drawing application work wonderfully. Just having a few basic supplies really helps you get going, and that's the main thing, isn't it?
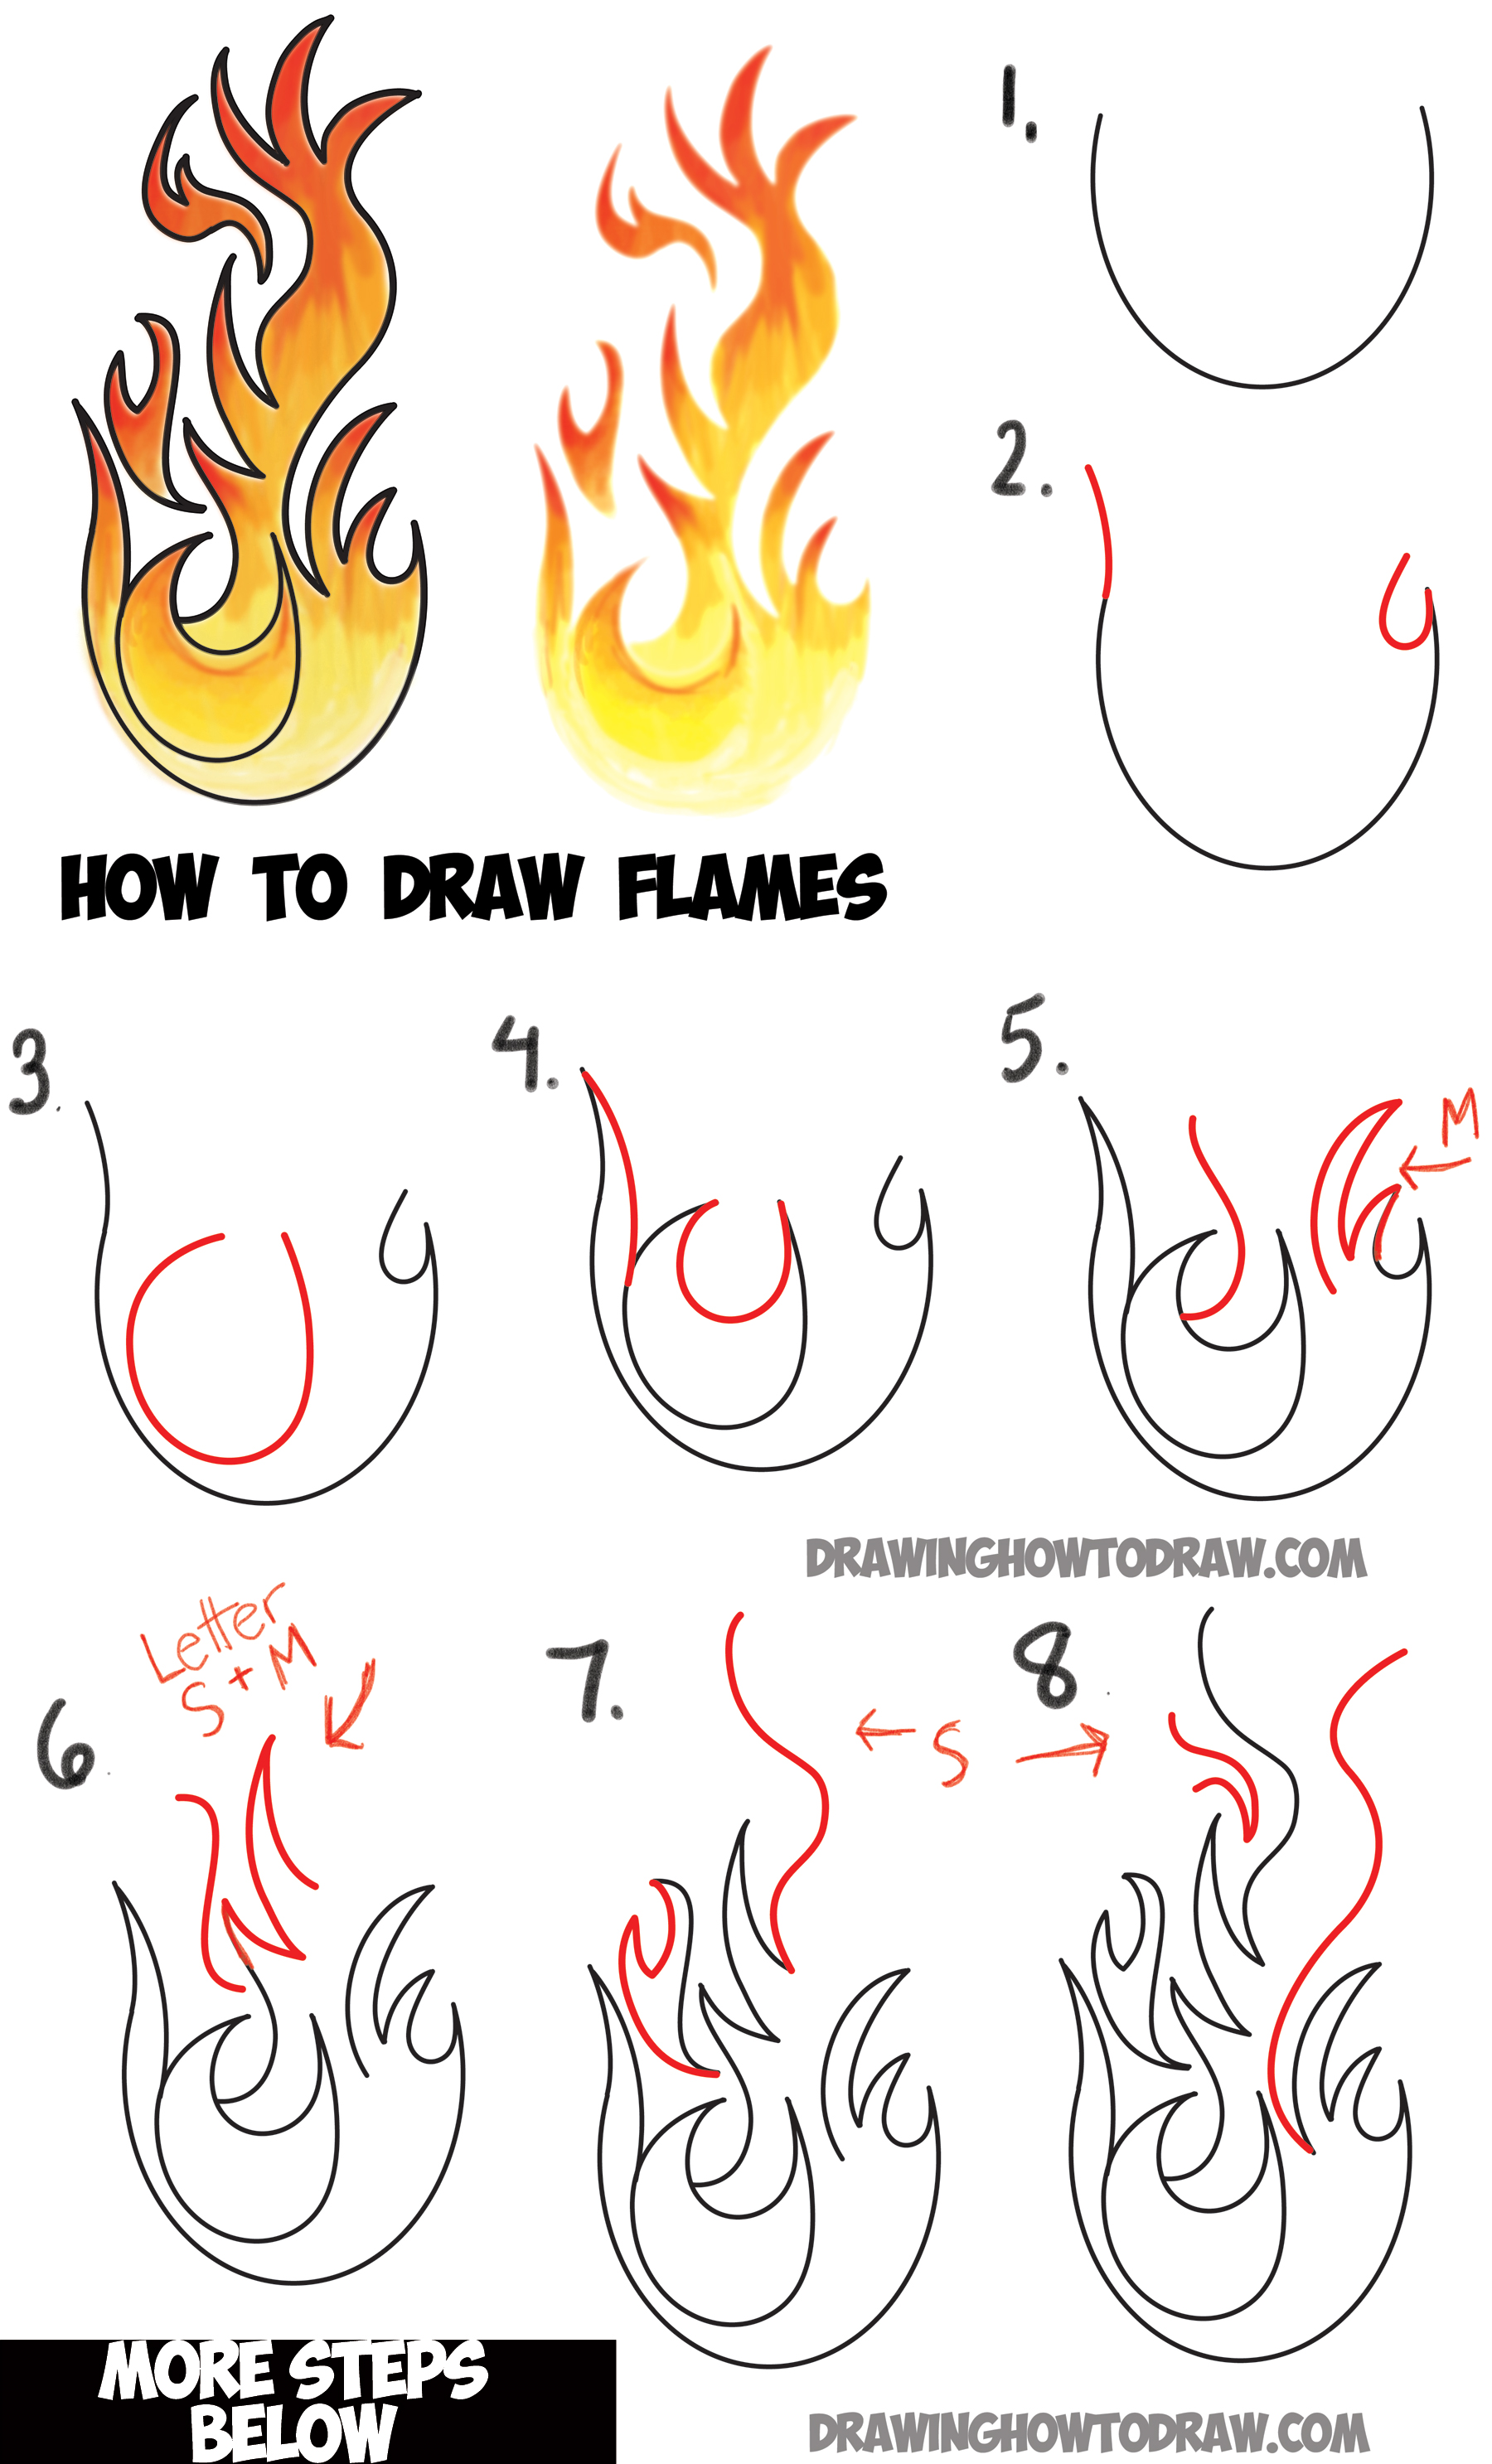
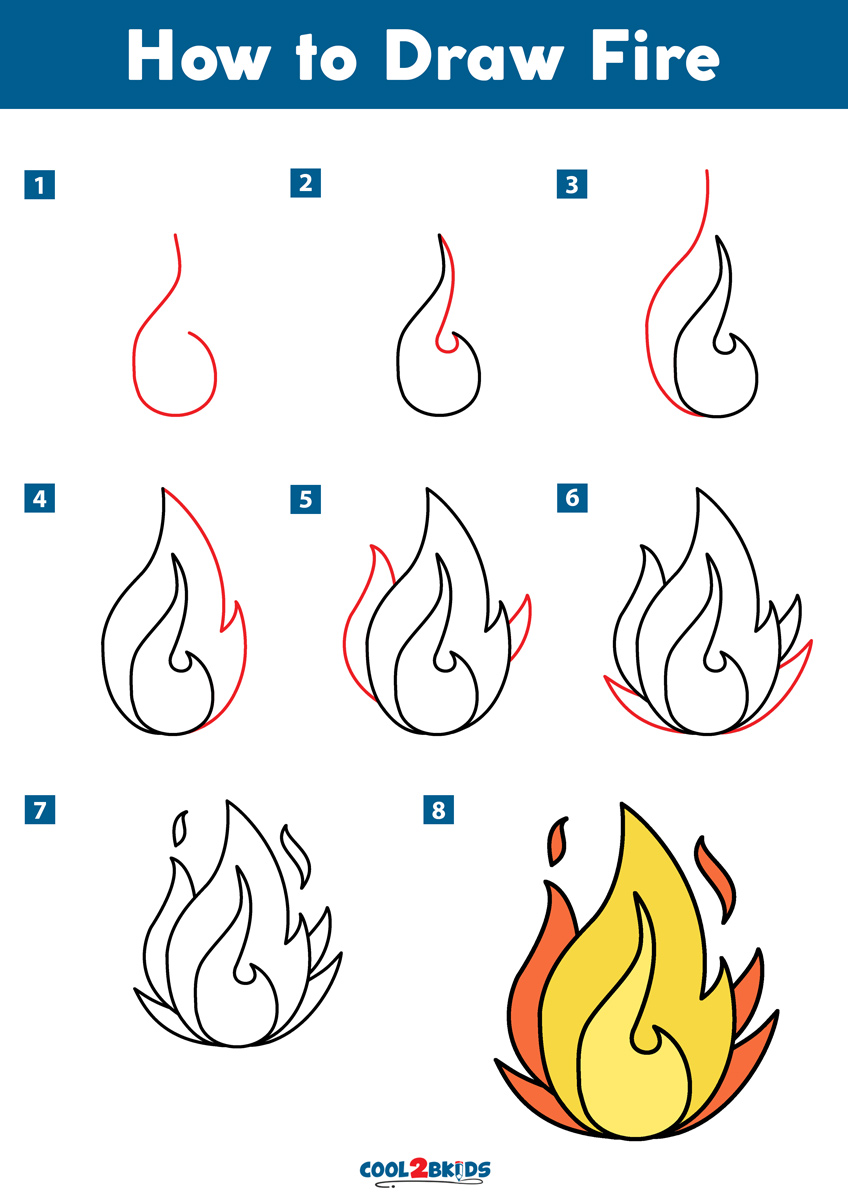
The Basics of a Single Flame
When you're first learning how to draw fire, starting with a single flickering flame is a really good idea, honestly. It helps you get a feel for the shape and movement without too much going on. This simple approach lets you build confidence before trying bigger, more complex fires, which is pretty helpful, you know.
To start learning how to draw fire, begin by sketching a smooth, curved line on the left side. This will form the outer contour of the flame, and the curve can be slightly irregular to give it that natural look. Think of it kind of like the side of a leaf, but more fluid, and maybe a bit wobbly, too.
Next, you'll want to mirror that curve on the right side, but make sure the top comes to a gentle point. It's not a sharp triangle, you see, but more like a soft, wavy teardrop shape. You can add a smaller, similar shape inside the first one, perhaps a bit lower down, to suggest the inner, hotter part of the flame, which is very important for realism.
Don't worry about making it perfect, because fire, as a matter of fact, is never perfectly symmetrical. Allow for some gentle wavering and unevenness, as this actually makes it look more alive and real. Just a little bit of imperfection can really make a difference, you know.
Understanding Flame Dynamics
Fires and their flames are dynamic, which can make drawing fire tricky, but we will help simplify exactly how to draw flames in this fantastic tutorial. The way fire moves, you see, is not random; it tends to flow upwards, twisting and turning as it goes, almost like a slow-motion dance. Thinking about this movement is really helpful.
Drawing flames can be tricky since they don't have one solid form or color, but there are some simple tricks you can use to make it easier. Consider how light passes through them, and how the colors shift from bright yellows and oranges at the core to reds and even dark, smoky tones at the edges. It's a bit like painting with light, in a way.
A good way to capture this movement is to use flowing, continuous lines rather than sharp, broken ones. Imagine the air currents pushing the flame around; that's the kind of feeling you want to convey with your strokes. So, try to keep your hand moving freely, just letting the lines flow naturally upwards, you know?
The base of the flame, where it meets its fuel, is often the most stable part, while the top is where it flickers and dances the most. Understanding this difference helps you create a more believable shape, and it's quite an important detail, honestly. Think of it like a plant growing, with roots holding it steady and leaves swaying.
Drawing Different Types of Fires
In this tutorial, I will show you how to draw a candle flame, a campfire, and a thrown flame using a few simple tools. Each type of fire, you know, has its own personality, and learning to capture that makes your drawings much more interesting. It's pretty cool how varied they can be, actually.
Drawing a Candle Flame
A candle flame is typically small, quiet, and very contained. It usually has a distinct teardrop shape, with a bright, almost white core at the very bottom, just above the wick. Then, it fades into yellow, then orange, and finally a reddish-orange at the very tips. The key here, you see, is its gentle, steady presence.
Start with a thin, straight line for the wick. Then, draw that classic teardrop shape around the wick, making sure it's a bit wider at the bottom and tapers smoothly to a point. You can add a very tiny, almost invisible, inner shape for the brightest part, which is a neat trick, honestly. Remember, it's quite a delicate thing.
The colors for a candle flame are usually softer, with less intense reds and more focus on the yellows and oranges. Think about how a real candle flickers gently; your lines should reflect that soft, almost quiet movement, so it doesn't look too harsh. It's a good exercise in subtle drawing, really.
Drawing a Campfire
A campfire, on the other hand, is much larger, more chaotic, and, you know, often has multiple flames dancing together. It's about warmth and gathering, and its drawing reflects that energy. This one, basically, involves a bit more layering and movement, which is fun.
Begin by sketching the logs or fuel at the base. Then, draw several overlapping flame shapes rising from the wood. These flames can be taller, wider, and more irregular than a candle flame, as a matter of fact. Don't be afraid to have some flames intertwine or lean into each other, as that's what real fire does.
For colors, you'll use a wider range, from deep reds and oranges at the base, where the wood is burning, to bright yellows and even hints of white at the hottest points. Smoke rising from the flames can also add to the effect, giving it more depth and a sense of movement, you know. It's pretty much a whole scene in itself.
Drawing a Thrown Flame
A thrown flame, like from a torch or a fire-breather, is all about motion and direction. It's often elongated and trails behind the source, showing the force of its movement. This is where the dynamic aspect of fire really shines, and it's a bit more advanced, but totally doable.
Start with the source of the flame, whether it's a hand holding a torch or a mouth. Then, draw a long, sweeping flame shape that extends away from the source, almost like a comet's tail. The lines should be very fluid and indicate speed, so, think about how wind would shape it.
The colors will be intense, with bright yellows and oranges at the front, fading into reds and even dark, wispy smoke towards the end of the trail. You might even add some sparks or embers flying off the main flame to emphasize its movement and heat, which, you know, makes it look really powerful. It’s quite a dramatic visual, isn't it?
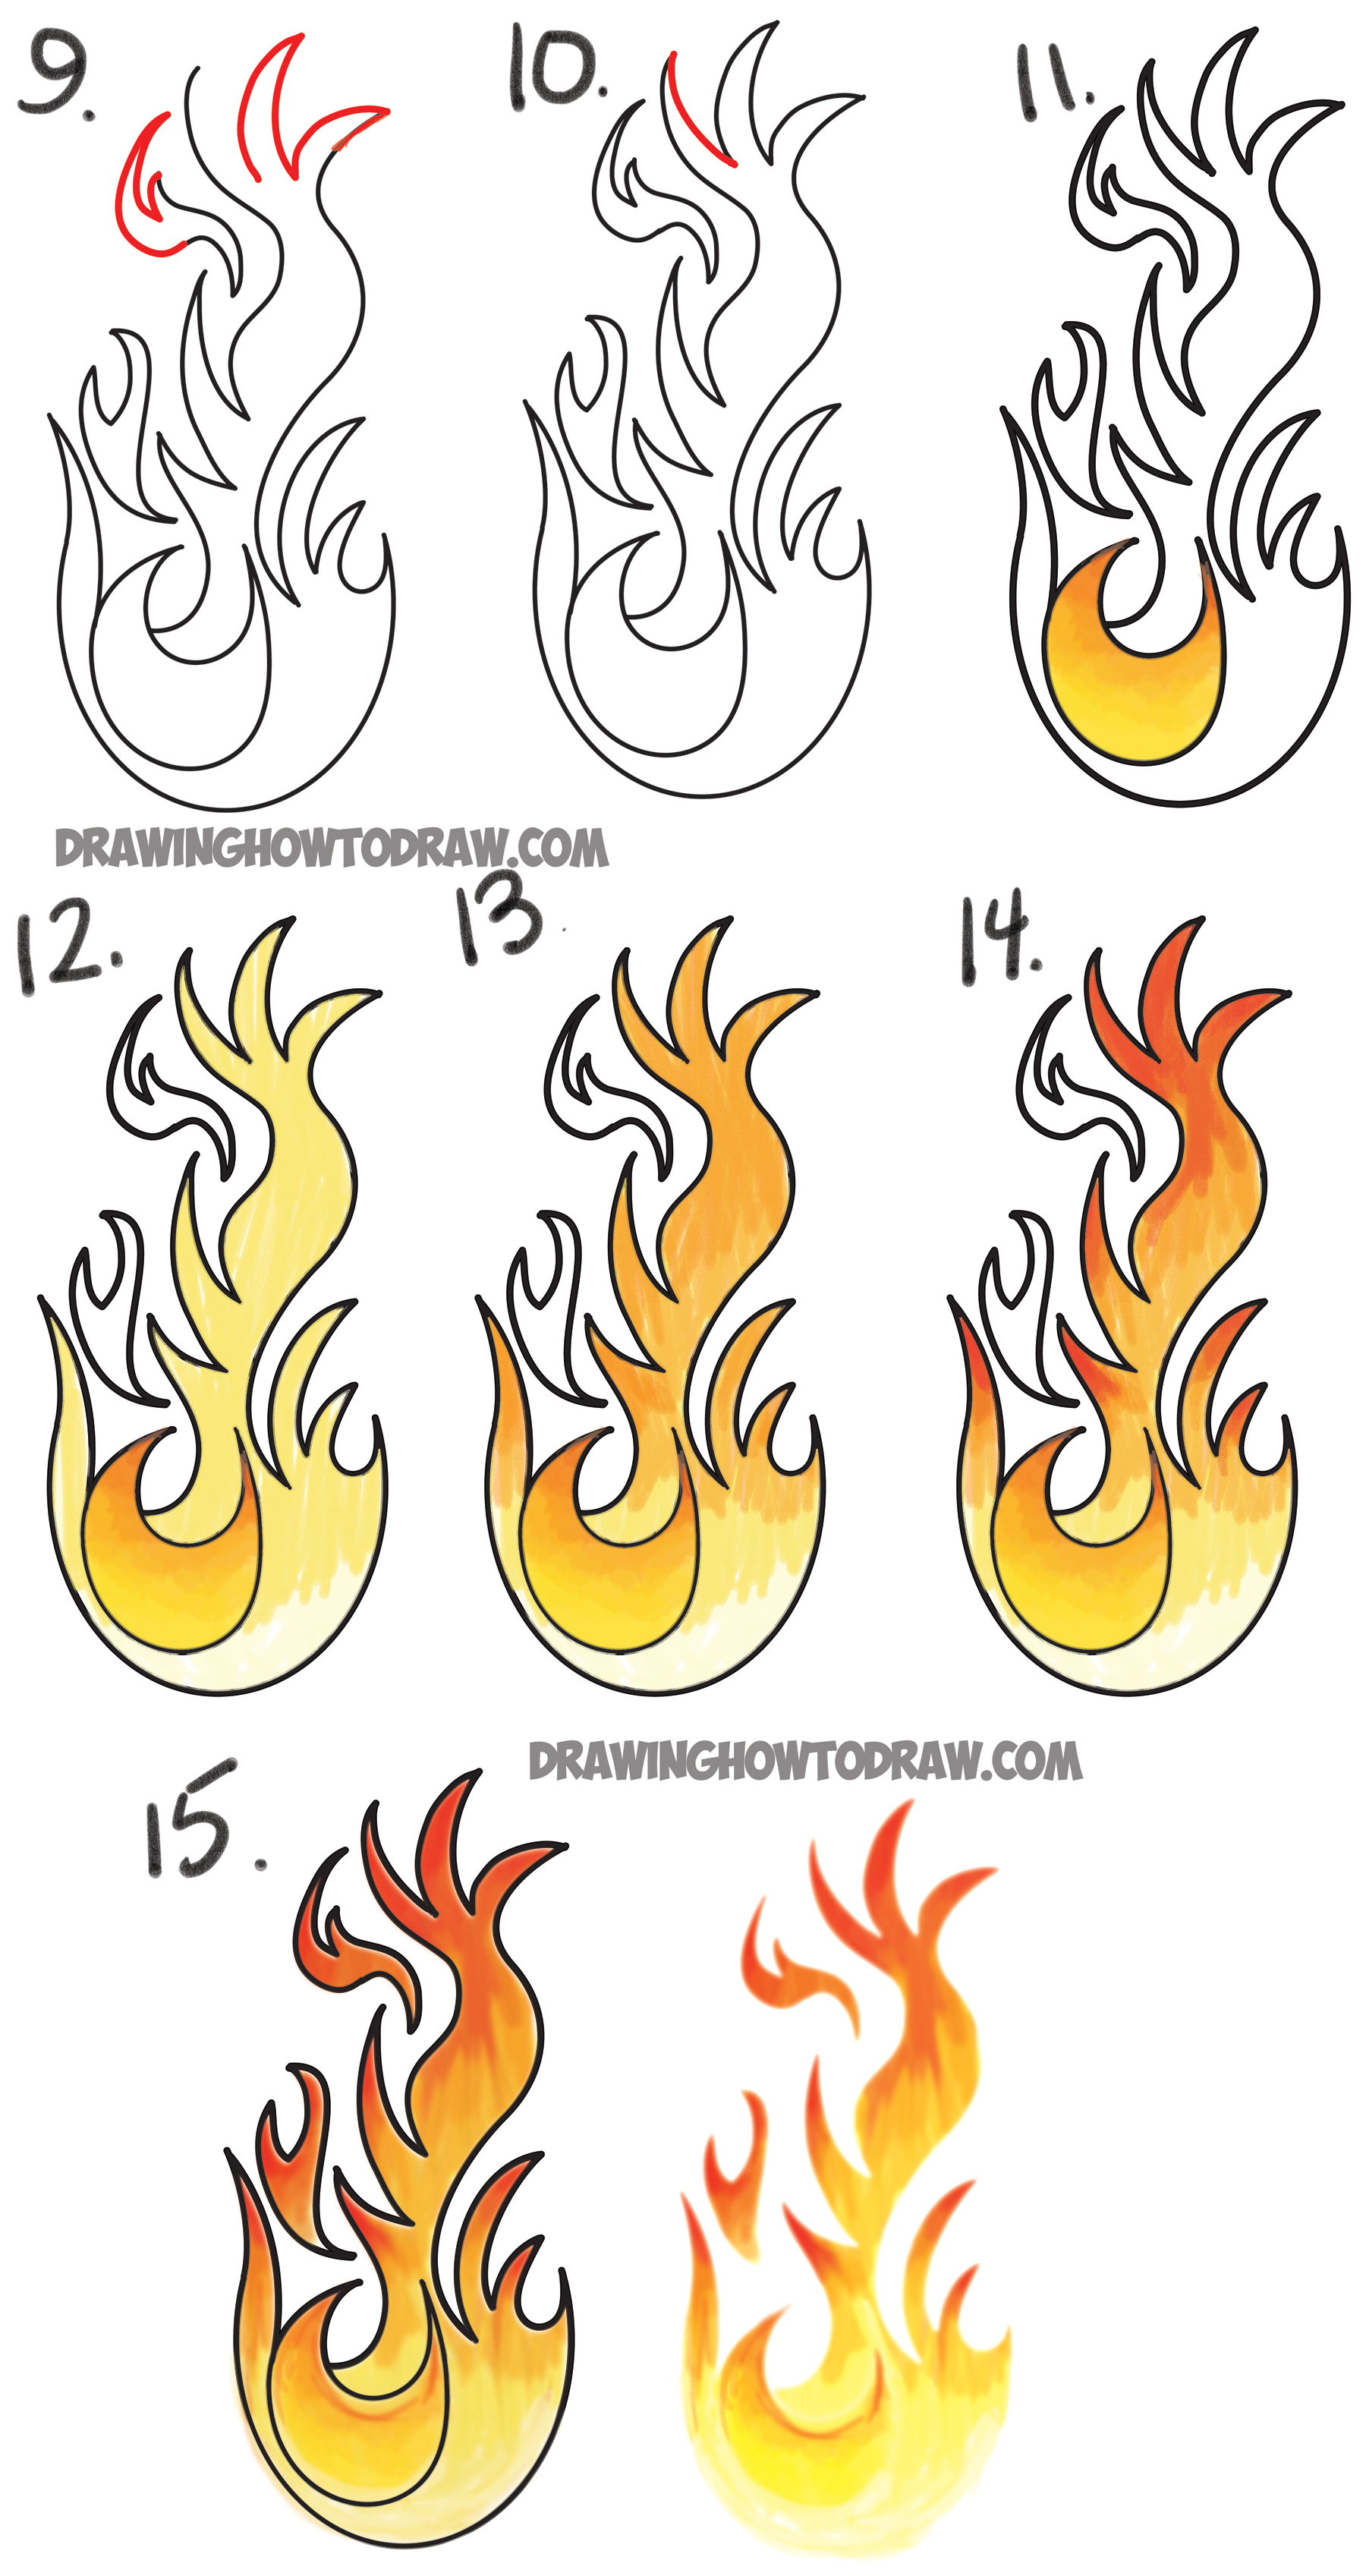
Adding Color and Detail
Once you have the basic shapes down, adding color is where your fire truly comes alive. The key to making fire look real is to use a range of warm colors and to blend them smoothly, so, it doesn't look flat. It's a bit like painting a sunset, but with more intense heat, actually.
Start with the lightest, brightest colors in the center of your flame, usually bright yellow or even a touch of white. Then, gradually work your way outwards with oranges, then reds, and finally darker, almost brownish-reds at the very edges. This creates a glow effect, which is very important for realism, you know.
For blending, whether you're using colored pencils, paints, or digital tools, try to make the transitions between colors soft and seamless. You can layer colors on top of each other, or use a blending tool to smooth them out. A time lapse of drawing a realistic fire can really show you the process in action, too, and how those colors build up.
Don't forget the subtle details. A little bit of smoke curling upwards from the flame, or a few tiny, glowing embers floating in the air around a campfire, can add so much to your drawing. These small additions, basically, give your fire more context and make it feel more present, which is pretty neat.
Digital Drawing with Sketchpad
If you prefer drawing on a computer or tablet, there are some really great tools available, and Sketchpad is one that comes to mind. It's a free online drawing application for all ages, letting you create digital artwork to share online and export to popular image formats like JPEG, PNG, SVG, and PDF. We just updated Sketchpad to version 4.1 and we think you’ll love it. If for any reason you want to use a previous version check out our version archive, too.
Sketchpad is very versatile, you know. You can easily draw, edit photos, or design your next business card, crafting images for social media posts, digital ads, paper, or even apparel. It's pretty much a one-stop shop for lots of creative projects, which is very convenient, honestly. Make a quick photo edit with the drag and drop feature, or even use some of its clever shortcuts.
For drawing fire specifically, Sketchpad offers a range of brushes and color options that make blending and layering colors quite simple. You can draw the letter "s" to take a shortcut to the style chooser, which is a neat little trick. While holding the button, tap the screen with different finger combinations to access tool presets that have been setup in the tool, which can speed up your workflow significantly, actually.
The application is available in multiple languages, too, which is great. It's an online drawing app for all ages, so you can create digital illustrations to share online and export them to popular image formats like JPEG, PNG, and SVG. Everything you need to know about Sketchpad, watch videos for tips and tricks on how to use Sketchpad and get the most out of the app! You can even draw on a blank canvas or provide starting templates for patrons to paint atop, and customize the tools and clipart to suit your needs, which is very flexible.
Tips for Practice and Improvement
Like any skill, getting better at drawing fire really comes down to practice, you know. The more you draw, the more comfortable you'll become with the dynamic shapes and vibrant colors. Don't be afraid to experiment with different styles and techniques, because that's how you find what works best for you, honestly.
One really helpful tip is to observe real fire whenever you safely can. Watch how the flames move, how the colors shift, and how the light interacts with its surroundings. Pay attention to the subtle variations, too, because those small details make a big difference in your drawings. A bit of observation goes a long way, actually.
Don't be discouraged if your first few attempts don't look exactly how you imagined. Drawing fire can be both fun and challenging, as it involves capturing the dynamic shapes and vibrant colors of flames, so it takes some time. Keep at it, and you'll see improvement with every drawing session, which is very rewarding.
I really hope this tutorial / guide is useful, as it’s something I worked on for a how to drawing video, featuring my method for drawing fire. Kids and beginners alike can now draw a great looking fire, and that's the whole point, isn't it? Remember, the goal is to enjoy the process and create something you're proud of. Learn more about drawing basics on our site, and you might also like to check out our tips for digital art for more ideas.
Frequently Asked Questions About Drawing Fire
How do you make fire look realistic when drawing?
To make fire look realistic, you should focus on its dynamic nature and color transitions. Use a range of warm colors, from bright yellows and whites in the hottest parts to oranges and reds at the edges. Blend these colors smoothly to create a glowing effect, and add subtle movements to your lines to show the flame flickering. Also, consider adding wisps of smoke or tiny embers for extra realism, as those details really help, you know.
What colors do you use to draw fire?
Typically, you'll use a palette of warm colors for fire. This includes bright yellows, various shades of orange, and different reds, from vibrant to deep, almost brownish-reds. Sometimes, a tiny touch of white can be used for the absolute hottest core of the flame, and dark grays or blacks for smoke, too. The key is to layer and blend these colors to show depth and heat, which is pretty important.
Is drawing fire hard for beginners?
Drawing a fire can seem like an intimidating task for beginners, but it can be an enjoyable and rewarding experience once you get the hang of it. While fires and their flames are dynamic, which can make drawing fire tricky, there are simple tricks you can use to make it easier. Starting with basic shapes and gradually adding detail, as shown in this tutorial, makes it very approachable for kids and beginners alike, so you can easily follow along and have a great time, actually.
Fire Flames Sketch
How To Draw Flames Step By Step
How to Draw Fire - Cool2bKids
