Contour Round Face: Simple Steps To Define Your Features
Do you ever feel like your face could use a little extra something, a touch of definition that truly brings out your natural beauty? For many, especially those with a lovely round face shape, finding ways to add structure and dimension can feel like a real puzzle. It's about creating the illusion of angles and shadows where the face naturally has softer, fuller curves. This process, often called contouring, is a wonderful technique that can help you feel more confident and put-together every single day.
The idea behind contouring, in a way, is very much like how an artist uses shading to give depth to a drawing, or how a map maker uses lines to show the shape of the land. It's about making an outline or a bounding surface appear to have more form. Just as the word "contour" itself can describe the smooth or curving shape of an object, like a mass of land, when we talk about personal aesthetics, it means defining the physical boundaries of your face.
This approach to makeup is not about changing who you are, but rather enhancing what you already have. It's a skill that, with just a little practice, can make a significant difference in how your features are perceived. We'll explore how to use this versatile term, "contour," which is used in fields from art to geography, right on your own face to bring out its very best. It's really quite simple, you know.
Table of Contents
- Understanding Your Round Face
- Why Contouring Works for Round Faces
- Choosing the Right Products
- Essential Tools for Contouring
- Step-by-Step Guide to Contouring a Round Face
- Common Mistakes to Avoid
- FAQ About Contouring a Round Face
- Tips for a Natural Look
Understanding Your Round Face
A round face is often characterized by its soft curves and a width that is nearly the same as its length. The widest part of the face is typically around the cheeks. There are no strong angles or sharp lines, which gives a youthful and friendly appearance. Understanding this shape is the first step in knowing how to apply makeup to enhance its features, you see.
For example, when we think about the "outline of a figure or body," a round face has a gentle, flowing edge. It's like the "edge or line that defines or bounds a shape or object," but without any abrupt turns. Recognizing this natural shape helps us figure out where to place shadows and light to create the illusion of more structure, which is rather important.
Why Contouring Works for Round Faces
Contouring is all about creating shadows and depth. For a round face, this means strategically placing darker shades to recede certain areas, making them appear narrower or more defined. It’s about giving the face more dimension, which can make it seem less full. This technique truly helps to sculpt the face, almost like how a sculptor works with clay, you know.
The term "contour" itself, as we know, represents the shape or outline of something, or a line that defines such a shape or outline. When applied to a round face, we use this idea to draw new lines, or rather, create the *appearance* of new lines. This helps to make the face appear more oval-shaped, or perhaps just a little longer and more chiseled. It’s a pretty effective way to play with light and shadow, actually.
Choosing the Right Products
Selecting the correct contour product is a very important step. You want something that blends well and looks natural on your skin. The wrong shade or formula can make your contour look muddy or too harsh. There are generally two main types of contour products to consider, so pay attention.
Cream Contour
Cream contour products are excellent for a more natural, skin-like finish. They are usually easy to blend and work well for dry or normal skin types. They can be applied with a brush, sponge, or even your fingers. Many people find cream contours give a very seamless look, which is quite nice.
These products often come in sticks, pots, or palettes. They offer a bit more control over placement before blending, allowing you to really work the product into the skin. If you are just starting out, a cream stick might be a good choice, as it's rather simple to use.
Powder Contour
Powder contour products are great for oily skin types or for setting cream contour. They offer a more matte finish and can be built up for a stronger effect. These are usually applied with a brush. Powder contour is often a bit quicker to apply once you get the hang of it, you know.
They come in pressed powder compacts or loose powder forms. Powder contour can be a little less forgiving than cream if not blended properly, but it offers a crisp, defined look. It’s also very good for those who prefer a completely matte finish to their makeup, which some people really like.
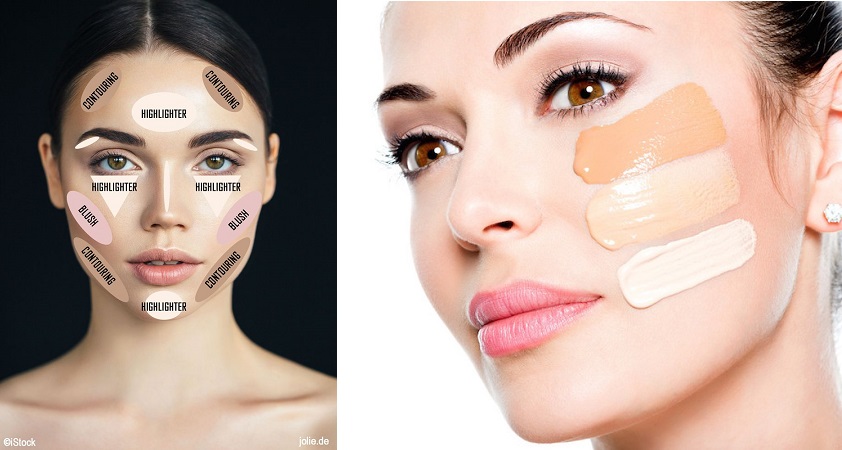
Contour Shades
The key to a good contour shade is that it should mimic a natural shadow. This means choosing a color that is about two to three shades darker than your skin tone. It should also have a cool or neutral undertone, not warm or orange. A warm shade will look more like bronzer than a shadow, so be careful there.
A good way to test a shade is to swatch it on your jawline or the side of your neck. It should blend in a way that looks like a shadow, not a streak of color. This is probably the most important part of choosing a contour product, actually.
Essential Tools for Contouring
Having the right tools makes all the difference in achieving a smooth, natural-looking contour. You don't need a huge collection, but a few key brushes or sponges will help immensely. The right tool helps you place the product just where it needs to go, and then soften it out.
For cream contour, a dense, angled brush or a damp beauty sponge works very well. These tools help to press the product into the skin for a seamless blend. A sponge, for instance, can help pick up excess product and really melt the contour into your base makeup, which is pretty handy.
For powder contour, an angled brush or a fluffy, tapered brush is ideal. These brushes allow for precise application and easy blending. A smaller brush might be good for more detailed areas, like the nose, while a larger, softer brush is better for wider areas, like the cheeks and jawline. It's about finding what feels right for you, in a way.
Step-by-Step Guide to Contouring a Round Face
Now, let's get into the practical side of things. This guide will walk you through each step to help you define your features and create a beautifully sculpted look. Remember, practice makes perfect, so don't be afraid to experiment a little. You'll get the hang of it, I promise.
Prepare Your Skin
Before you even think about contour, make sure your skin is prepped. This means applying your usual foundation and concealer. A smooth base allows the contour to blend seamlessly. Think of it like preparing a canvas for a painting, you know. A good base makes all the difference.
If your skin is well-hydrated and even-toned, your contour will look much more natural and last longer. This step is often overlooked, but it's very important for a polished finish. So, take your time with this part, it really helps.
Find Your Natural Shadows
To figure out where to place your contour, feel for your bone structure. Suck in your cheeks slightly or make a fish face. The hollows that appear are your natural shadow lines. This is where your contour product will go. It's a simple trick, but it works very well.
You can also look at your face in natural light. Where do shadows naturally fall? These are the areas you want to enhance with contour. This is about working with what your face already shows you, which is quite clever.
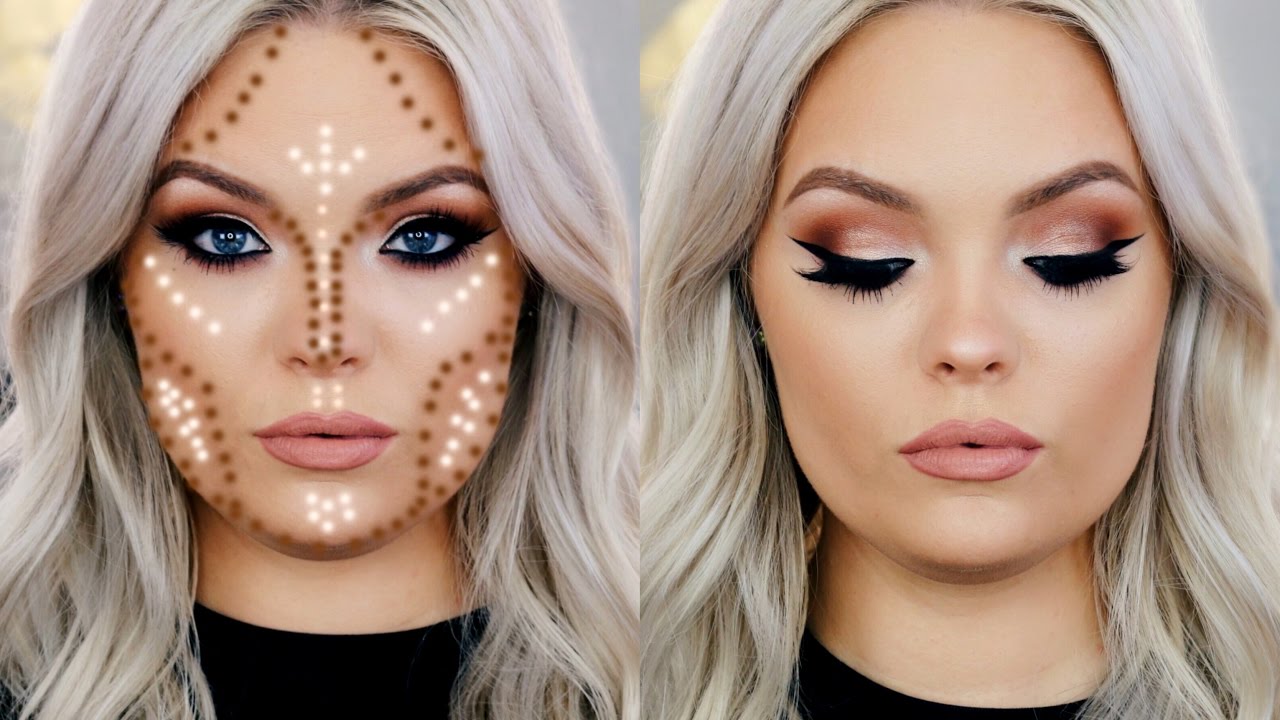
Cheekbone Contour
For a round face, the goal is to create the illusion of higher, more defined cheekbones. Apply your contour product in a diagonal line, starting from the top of your ear and going towards the corner of your mouth. Stop about halfway or two-thirds of the way down your cheek. Do not bring it all the way to your mouth, as this can make your face look drawn. This is a common mistake, so be mindful.
Remember, we are trying to create an "outline" that makes the face appear longer. This diagonal line helps to lift the face. It's about creating a subtle shadow that gives the appearance of a more sculpted cheek. Think of it as shaping the "mass of land" that is your cheek, you know.
Jawline Definition
To make your jawline appear more defined and your face look a little slimmer, apply contour along the very edge of your jawbone. Start from just below your ear and go down towards your chin. This helps to create a sharper line where there might be a softer curve. This step is particularly effective for round faces.
Blending this down onto your neck a little bit is very important to avoid a harsh line. This helps to create a seamless transition and makes the contour look much more natural. It's about defining the "edge or line that defines or bounds a shape or object," which in this case is your jaw. You can learn more about face shaping techniques on our site, actually.
Forehead Contour
If your forehead is wide or you want to make your face appear a little longer, apply contour along your hairline and temples. Blend it into your hair to avoid a noticeable line. This helps to make the forehead appear smaller and balances the overall shape of the face. It's a subtle but effective step.
This technique helps to push back the outer edges of the forehead, creating a more oval appearance. It's about using the "shape of a mass of land" idea to subtly reshape your face. Just a little bit of product here can make a big difference, you know.
Nose Contour (Optional)
For those who wish to make their nose appear narrower, a little nose contour can be very effective. Apply thin lines of contour down the sides of your nose, from the inner corner of your eyebrows to the tip. Then, connect these lines across the very tip of your nose. This creates the illusion of a slimmer bridge. This is a bit more advanced, so don't worry if you skip it at first.
The key here is to keep the lines very thin and blend, blend, blend. You want to create a shadow, not a stripe. This really helps to define the "outline" of your nose, making it appear more refined. It's a very precise application, so take your time.
Blending is Key
This is arguably the most critical step in contouring. Harsh lines will not look natural. Use your brush or sponge to blend the contour product seamlessly into your skin and foundation. Blend in small, circular motions or gentle tapping motions until there are no visible lines. This makes the contour look like a natural shadow. It's really, really important.
Blending ensures that the contour "represents the shape or outline of something" in a soft, believable way, rather than a painted line. The goal is to make it look like your face naturally has these shadows. Take your time here; it's what separates a good contour from a great one. You can find more tips on blending techniques by visiting this page.
Highlighting for Balance
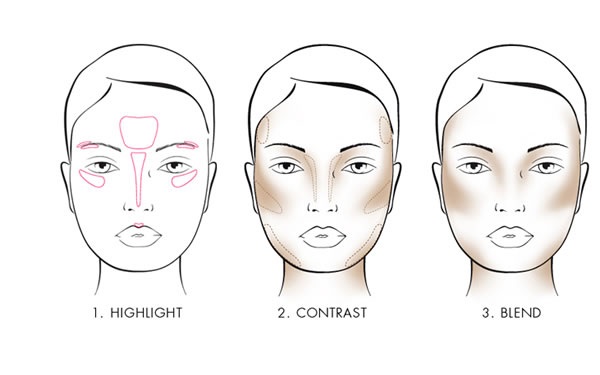
Contour works best when paired with highlighting. While contour creates shadows, highlight brings areas forward. For a round face, apply highlight to the center of your forehead, down the bridge of your nose, on your cupid's bow, and on the high points of your cheekbones (just above your contour). This helps to balance the contour and add a lovely glow. It's a wonderful finishing touch, too.
Highlighting helps to bring light to the center of your face, making it appear longer and drawing attention to your features. It's like the opposite of contouring, making certain areas stand out. Together, they create a beautiful, sculpted effect. This pairing is very effective, you know.
Common Mistakes to Avoid
Even with the best intentions, some common errors can make contouring less effective. Being aware of these can help you achieve a better result. Knowing what not to do is just as important as knowing what to do, you see.
One common mistake is using a contour shade that is too warm or orange. Remember, contour should mimic a shadow, which is cool-toned. Another error is applying too much product, which can make your face look muddy or dirty. Start with a little and build up if needed. This is often where people go wrong, so be careful.
Not blending enough is probably the biggest mistake. Visible lines of contour look unnatural and defeat the purpose. Also, contouring in the wrong places can make your face look wider or oddly shaped. Always remember the goal: to create the illusion of angles and definition for a round face. It's about precision and subtlety, really.
FAQ About Contouring a Round Face
How do I contour my face to make it look less round?
To make your face appear less round, focus on creating shadows along the hollows of your cheeks, along your jawline, and at your temples. This helps to create the illusion of more angles and length. Remember to blend well for a natural look. It's about drawing the eye upwards and inwards, you know.
What is the best contour for a round face?
The best contour for a round face is a product that is two to three shades darker than your skin tone and has a cool or neutral undertone. Both cream and powder formulas work well, depending on your skin type and preference. The most important thing is that it looks like a natural shadow. It's really about finding a shade that mimics a true shadow, you see.
Where do you put contour on a round face?
For a round face, you put contour in the hollows of your cheeks (from ear towards mouth, stopping halfway), along your jawline, and along your hairline/temples. If you want, you can also add a little on the sides of your nose. These areas help to create definition and make the face appear more sculpted. It's all about strategic placement, actually.
Tips for a Natural Look
Achieving a natural contour is the ultimate goal. It should look like your face naturally has these beautiful shadows and highlights, not like you've applied makeup. This requires a light hand and good blending. Less is often more when it comes to contouring, so start with a small amount of product.
Using sheer or buildable formulas can help prevent a heavy look. Also, always check your contour in different lighting conditions, especially natural light. What looks good under bright bathroom lights might appear too strong in daylight. A good contour should simply enhance your features without being obvious. It's about a subtle transformation, you know. For more beauty advice, you might check out a reputable source like Allure, which often shares great tips.
Finally, remember that contouring is a personal journey. What works for one person might need slight adjustments for another. Practice different techniques, try various products, and see what makes you feel the most confident and beautiful. It's about having fun with makeup and discovering what truly makes you shine. And that, in a way, is the most important part.
How To Contour Round Face – A Comprehensive Guide For You
How To Apply Full Face Makeup With Contour | Makeupview.co
How To Contour Round Face – A Comprehensive Guide For You
