Mastering Remote IoT Behind Your Router: A Raspberry Pi Example
Getting your Raspberry Pi to communicate with the outside world when it's tucked away behind your home router can feel a bit like trying to send a message across a vast, uncharted ocean. You see, most home networks have this invisible barrier, a kind of digital bodyguard, that protects your devices from direct contact with the wider internet. This setup, while good for security, makes it tricky for your Internet of Things (IoT) projects on a Raspberry Pi to send data or receive commands from afar. It's a common puzzle, really, for anyone wanting to build smart home gadgets or remote sensors. So, how do we bridge this gap, allowing your tiny computer to do its important work no matter where you are? That's what we'll explore together.
There are many reasons you might want your Raspberry Pi to be accessible remotely, perhaps to check on a plant sensor, control lights, or gather information from a weather station you built. Maybe you're building something for a friend and need to check on it from your own place. The challenge often comes down to your router's Network Address Translation, or NAT, which keeps internal network addresses private. It's a bit like having a secret handshake that only devices inside your house know. We need to teach the outside world that handshake, or, perhaps, find a clever way around needing one at all, which is, you know, a pretty neat trick.
Today, we're going to walk through some straightforward methods to make your Raspberry Pi-based IoT projects truly remote, even when they're sitting comfortably behind your router. We will look at different approaches, each with its own benefits, helping you pick the right path for your particular project. It's about giving your Raspberry Pi the freedom to connect, wherever you are, which, you know, is quite liberating for your creative ideas.
Table of Contents
- Why Remote IoT on Raspberry Pi Matters
- Common Methods for Remote Access
- Setting Up Your Raspberry Pi for Remote IoT
- A Practical Example: Cloud IoT Platform
- Security Considerations
- Troubleshooting Common Issues
- Frequently Asked Questions
- Conclusion
Why Remote IoT on Raspberry Pi Matters
Imagine your Raspberry Pi is monitoring your garden's soil moisture, and you're on vacation. You want to know if your plants need watering, or perhaps even trigger a sprinkler system. Without remote access, that information stays trapped within your home network, which, as a matter of fact, isn't very helpful for a green thumb far away.
Remote access gives your IoT projects real utility, allowing you to interact with them from anywhere with an internet connection. This means your smart home devices can truly be smart, reacting to your commands or sending you alerts even when you're miles away. It's a big step in making your projects more useful, you know, in the real world.
The Challenge of Being Behind a Router
Your home router acts like a gatekeeper, and it's a pretty good one at that. It assigns private IP addresses to all your devices inside your network, like your phone, laptop, and, yes, your Raspberry Pi. When something from the internet tries to connect to your home, the router doesn't know which specific device inside your network it should send the request to, so it usually just blocks it. This is a security feature, basically, preventing unwanted visitors from just waltzing into your digital living room.
This protective barrier is called Network Address Translation, or NAT. It translates your single public internet IP address into many private internal ones. For an incoming connection, without specific instructions, the router simply doesn't know where to direct the traffic, which, in a way, makes perfect sense for keeping things safe.
Common Methods for Remote Access
There are several clever ways to get your Raspberry Pi to talk to the outside world, even with that router standing guard. Each method has its own set of advantages and things to consider, so picking the right one often depends on your comfort level and what you're trying to achieve. We'll look at a few popular choices, you know, to give you a good overview.
Port Forwarding (and its considerations)
Port forwarding is perhaps the most direct approach, and it's a bit like telling your router, "Hey, if someone knocks on this specific door (a port number) from the internet, send them straight to my Raspberry Pi." You manually configure your router to direct incoming traffic on a chosen port to your Pi's internal IP address and a specific port on the Pi itself. This can be pretty straightforward, actually, for many people.
While it works, port forwarding does open a direct path from the internet to your Raspberry Pi. This means you need to be very careful about the security of your Pi. Make sure your operating system and any services running on it are fully updated, and use strong, unique passwords. It's like leaving a door open; you want to be sure you have good locks on the inside, which is, you know, just common sense.
VPN (Virtual Private Network)
Setting up a VPN server on your Raspberry Pi creates a secure, encrypted tunnel back to your home network. When you connect to this VPN from outside, your remote device essentially becomes part of your home network, even if you're physically far away. This means you can access your Pi as if you were sitting right next to it, which is pretty cool, if you ask me.
A VPN offers a high level of security because all traffic through the tunnel is encrypted. It's a bit more involved to set up than simple port forwarding, but it's often worth the extra effort for the peace of mind it provides. You might use software like OpenVPN or WireGuard on your Pi to achieve this, which, you know, are quite popular options.
Cloud IoT Platforms
This method avoids the need for direct incoming connections to your router altogether. Instead, your Raspberry Pi connects *out* to a cloud-based IoT platform, like AWS IoT, Google Cloud IoT Core, or Adafruit IO. Your remote device also connects to the same cloud platform. The platform then acts as a secure intermediary, relaying messages between your Pi and your remote device. This is a very popular choice for many, you know, modern IoT projects.
Cloud platforms are great because they handle much of the network complexity and security for you. Your Pi just needs to make an outbound connection, which routers typically allow without any special configuration. This makes it a very robust and often simpler solution for long-term projects, and it's a bit like having a central post office for all your IoT messages, which, apparently, works really well.
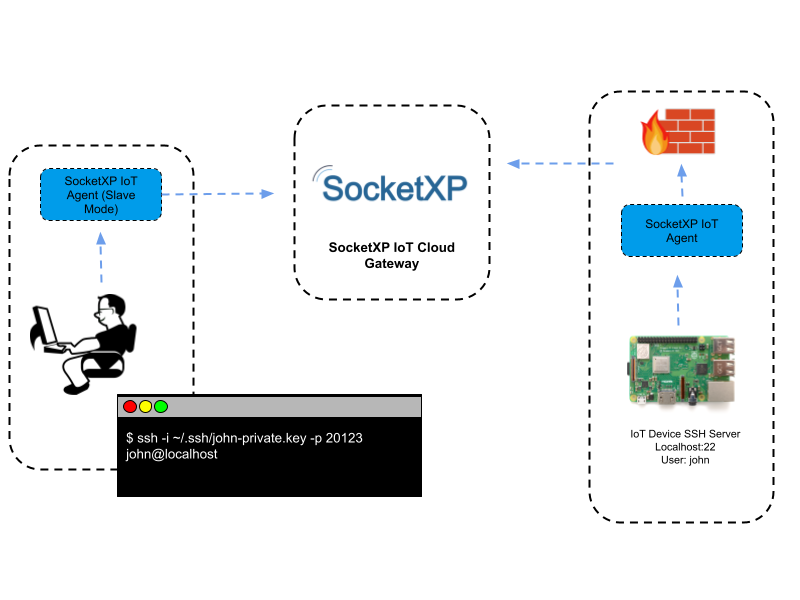
Reverse SSH Tunneling
Reverse SSH tunneling is a clever trick. Your Raspberry Pi initiates an SSH connection to a publicly accessible server (which you would need to own or rent). This connection creates a "tunnel" back to your Pi. Then, when you want to access your Pi, you connect to that public server, and the tunnel directs your connection back to your Pi. It's a bit like your Pi calling a friend outside your house and asking them to relay messages, which, you know, is quite resourceful.
This method is good for situations where you can't or don't want to configure port forwarding on your router. It requires a bit of command-line work and a reliable public server, but it's a very secure way to get remote access. You can even set it up to automatically re-establish the tunnel if the connection drops, which, you know, is pretty handy.
Ngrok or similar Tunneling Services
Services like Ngrok, LocalTunnel, or Serveo provide a quick and easy way to expose a local service running on your Raspberry Pi to the internet. You run a small client program on your Pi, which creates a secure tunnel to the service's cloud infrastructure. They then give you a public URL that anyone can use to access your Pi. It's really quite simple to get going, honestly.
These services are excellent for testing and demonstrations because they are so fast to set up. Some offer free tiers with limitations, while paid tiers provide more features like custom domains and persistent URLs. They handle the router's NAT for you, making it a very user-friendly option for getting started quickly, and you know, they really streamline the process.
Setting Up Your Raspberry Pi for Remote IoT
Before you jump into remote access, your Raspberry Pi needs some basic preparation. Making sure your Pi is ready for action is the first step, and it's pretty important, as a matter of fact, for everything else to work.
Initial Setup and Network Basics
First, ensure your Raspberry Pi is running the latest version of Raspberry Pi OS. Keep it updated by running `sudo apt update` and `sudo apt upgrade` regularly. This helps with security and stability, which, you know, is always a good thing. Also, it's a good idea to give your Pi a static IP address within your home network. This way, its internal address won't change, making it easier for your router or other services to find it consistently. You can usually configure this in your router's settings or directly on the Pi itself, which, you know, is fairly simple to do.
For any remote access, having SSH enabled on your Pi is almost always a good idea. You can enable it through the Raspberry Pi Configuration tool under "Interfaces" or by creating an empty file named `ssh` in the boot partition of your SD card. This allows you to connect to your Pi from another computer on your local network, which, you know, is pretty fundamental for remote work.
Choosing a Method: What's Right for You?
Deciding which remote access method to use depends on your specific needs. If you need full, secure access to your entire home network and are comfortable with a bit more setup, a VPN is a very strong choice. For simple data exchange with IoT devices and minimal router configuration, cloud IoT platforms are often the best bet, which, you know, are designed for this kind of thing.
If you just need to occasionally access a specific service on your Pi and don't want to mess with router settings, reverse SSH or a tunneling service like Ngrok can be incredibly useful. Port forwarding is direct but requires careful security practices. Consider your technical comfort, security needs, and the specific function of your IoT project when making your choice, because, you know, the right tool makes all the difference.
A Practical Example: Cloud IoT Platform
Let's consider a common and very effective way to get your Raspberry Pi to communicate remotely: using a cloud IoT platform with MQTT. This method is popular because it bypasses many router complexities and offers good scalability. It's a bit like how modern applications handle user logins, where a central service manages who can access what, like logging in with Apple, Facebook, GitHub, Google, LinkedIn, or Microsoft accounts, which, you know, provides a consistent way to manage access.
Setting Up MQTT (or similar)
MQTT, or Message Queuing Telemetry Transport, is a lightweight messaging protocol perfect for IoT devices. It uses a "publish/subscribe" model, where your Pi publishes data to a topic, and your remote application subscribes to that topic to receive the data. You'll need an MQTT broker, which can be hosted in the cloud. Many cloud IoT platforms offer this as a service, and it's pretty straightforward to use, honestly.
To get started on your Raspberry Pi, you'd typically install an MQTT client library, like `paho-mqtt` for Python. Then, you write a small script that connects to your chosen cloud MQTT broker, authenticating with credentials provided by the platform. This connection is outbound from your Pi, so your router usually won't block it, which, you know, makes things much easier for everyone involved.
Basic Device-to-Cloud Communication
Once your Pi is connected to the MQTT broker, you can start sending data. For example, if you have a temperature sensor connected to your Pi, your Python script would read the temperature and then "publish" it to a specific MQTT topic, say, `home/garden/temperature`. This message then goes to the cloud broker, which, you know, acts as a central hub.
On your remote device (like your phone or another computer), you would run another application that "subscribes" to the same `home/garden/temperature` topic on the same cloud broker. When your Pi publishes a new temperature reading, the broker immediately forwards it to your subscribed remote device. It's a very efficient way to pass information back and forth, and it's almost like a direct line, you know, for your data.
This setup allows for real-time monitoring and control. You could, for instance, publish a command like `home/garden/sprinkler/on` from your phone, and your Pi, also subscribed to that topic, would receive the command and turn on the sprinkler. This entire process happens without needing to open any ports on your router, which, you know, keeps your home network more secure.
Security Considerations
No matter which method you choose for remote access, security should always be a top priority. Just as astronomers keep detailed audit logs of course events or grade changes to understand unusual phenomena, you too should keep a close eye on your Pi's activity. Protecting your Raspberry Pi from unwanted access is really important, you know, for your peace of mind.
Keeping Your System Safe
Always use strong, unique passwords for your Raspberry Pi and any services you expose. Change the default `pi` user password immediately. Consider using SSH key-based authentication instead of passwords for even greater security. This is like having a very specific key that only you possess, which, you know, is much harder to guess than a simple password.
Keep your Raspberry Pi's operating system and all installed software updated regularly. Software updates often include security patches that fix vulnerabilities. If you're using port forwarding, only open the absolute minimum number of ports necessary, and consider using a firewall on your Pi to restrict access even further. It's about being proactive, you know, with your defenses.
For cloud IoT platforms, make sure you understand their security models, including authentication and authorization mechanisms. Use unique API keys and secrets, and restrict their permissions to only what's needed. This is similar to how Canvas LMS includes a REST API for accessing and modifying data externally, where you specify which attribute to use for user login lookup, like 'id', 'sis_id', 'email', 'student_number', or 'teacher_number', ensuring that only authorized access occurs. It's about careful management of access, which, you know, is a really good habit to have.
Troubleshooting Common Issues
Sometimes, things don't work perfectly the first time, and that's completely normal. Troubleshooting is part of the fun, actually, of working with these kinds of projects. If you're having trouble getting remote access to work, here are a few common things to check, which, you know, often solve the problem.
First, double-check your Raspberry Pi's local IP address and make sure it's static. If your Pi's IP changes, any port forwarding rules or local network configurations will break. You can usually find your Pi's IP with `hostname -I` on the command line. This is a very basic step, but it's often overlooked, you know, in the rush to get things working.
Next, verify your router settings. Are your port forwarding rules correctly configured to point to the right internal IP and port? Is your firewall on the router or Pi blocking connections? Sometimes, a simple typo in a port number or IP address can cause a lot of headaches. It's a bit like trying to find a tiny error in a massive log of events, which, you know, requires careful attention.
If you're using a cloud service, check your internet connection on the Pi itself. Can it reach the cloud platform? Are your API keys or credentials correct? Look at the logs provided by the cloud service; they often give clues about connection issues or authentication failures. These logs are a bit like the audit logs for course events, or grade change events, which, you know, help you understand what's happening.
Finally, remember to restart services or even your Raspberry Pi itself after making configuration changes. Sometimes, a fresh start is all that's needed for new settings to take effect. It's a simple step, but it's often surprisingly effective, which, you know, is pretty convenient when you're stuck.
Frequently Asked Questions
Here are some common questions people often ask about setting up remote IoT on a Raspberry Pi behind a router, which, you know, are pretty good questions to think about.
How can I access my Raspberry Pi remotely without port forwarding?
You can use several methods to access your Raspberry Pi without opening ports on your router. Cloud IoT platforms, reverse SSH tunneling, and services like Ngrok are all excellent choices. These methods typically involve your Pi making an outbound connection to a public server, which then acts as a relay for your remote access. This approach is often more secure and simpler to set up than port forwarding, which, you know, is a big plus for many people.
Is it safe to expose my Raspberry Pi to the internet?
Exposing any device to the internet carries some risk. However, you can significantly reduce this risk by following good security practices. Always use strong, unique passwords, keep your software updated, and only open necessary ports if using port forwarding. Using secure methods like VPNs or cloud IoT platforms with proper authentication adds layers of protection. It's like observing a strange new type of supernova; you need to be careful and use the right tools to understand it safely, which, you know, is pretty similar in principle.
What is the easiest way to remotely control my Raspberry Pi?
For quick and easy remote control, especially for testing or temporary access, services like Ngrok or VNC (Virtual Network Computing) combined with a tunneling solution are often considered the easiest. For more permanent IoT projects, a cloud IoT platform that handles messaging and device management can be very straightforward once initially configured. The "easiest" really depends on what you're trying to do, which, you know, makes sense if you think about it.
Conclusion
Getting your Raspberry Pi to operate remotely, even when it's behind your router, opens up a world of possibilities for your IoT projects. Whether you choose the direct path of port forwarding, the secure tunnel of a VPN, the flexibility of a cloud IoT platform, or the cleverness of reverse SSH or tunneling services, there's a solution that fits your needs. Just like scientists figuring out what caused one of the strangest explosions ever observed in our universe, understanding your network and choosing the right approach helps you conquer those tricky network barriers. It's about giving your little computer the ability to reach out and connect, which, you know, is pretty empowering for any maker.
Remember, the journey of building remote IoT projects is about experimentation and learning. Each method has its quirks and benefits, and finding the perfect fit for your project is part of the fun. So, go ahead, give your Raspberry Pi the freedom to communicate from anywhere, and see what amazing things you can create. For more detailed information on networking basics, you might find resources from the Raspberry Pi Foundation's official documentation very helpful. You can also learn more about secure remote access strategies on our site, which, you know, has a lot of good information.

Best Remote IoT Setup Behind Router With Raspberry Pi

Mastering Control Raspberry Pi Behind Router For IoT Free Android: A
Remote IoT Behind Router Example Raspberry Pi: A Comprehensive Guide
