Tie A Perfect Bow With Ribbon: Your Easy Guide For 2024
Ever find yourself staring at a beautiful roll of ribbon, yet feeling a bit stumped on how to make it into a really nice bow? You know, the kind that just makes a gift pop, or adds that special touch to a hairstyle or even a decorative piece? Well, you are not alone, actually. Many folks want to know how to tie a bow with ribbon, and it's a skill that can truly make a difference in how things look.
Making a neat bow with ribbon can seem a little tricky at first, that is, but it's really a simple process once you get the hang of it. Think about it: a well-tied bow can elevate a simple package into something quite elegant, or add a charming detail to a craft project. It's almost like a little flourish that shows you put in extra care, you know?
This guide is here to help you master that skill, so. We'll walk through the steps to tie a bow with ribbon, making it easy to follow along. Whether you are wrapping presents, decorating for a party, or just adding a pretty touch to something, knowing how to create a lovely bow will definitely come in handy, very.
Table of Contents
- Why Master Bow Tying?
- Getting Ready: Your Materials
- The Classic Shoelace Bow
- The Simple Loop Bow
- Making a Double Loop Bow
- Troubleshooting Common Bow Problems
- Different Ribbons, Different Bows
- Creative Ways to Use Your Bows
- Frequently Asked Questions
- Your Bow-Tying Journey Continues
Why Master Bow Tying?
Knowing how to tie a bow with ribbon is a pretty useful skill, in a way. It's not just for gifts, you see. You can use bows to decorate wreaths, make hair accessories, or even add a charming detail to clothing. It really helps you add a personal touch to so many things, you know?
A well-made bow shows care and attention to detail. It can make something look much more polished and inviting. For instance, a beautifully wrapped present with a crisp bow just feels more special, doesn't it? It's a small thing that leaves a big impression, basically.
Getting Ready: Your Materials
Before you start, you'll want to gather a few things. You need your chosen ribbon, of course. Scissors are also very helpful for neat cuts. Sometimes, a little bit of floral wire or a thin piece of string can help hold things in place, too. That is, if you are making a more complex bow.
Picking the right ribbon matters, quite a bit. Wide ribbons tend to make bigger, more dramatic bows, while thin ribbons are good for delicate touches. Wired ribbon is also very forgiving, as it lets you shape the loops easily. Unwired ribbon, on the other hand, gives a softer, more flowing look, so.
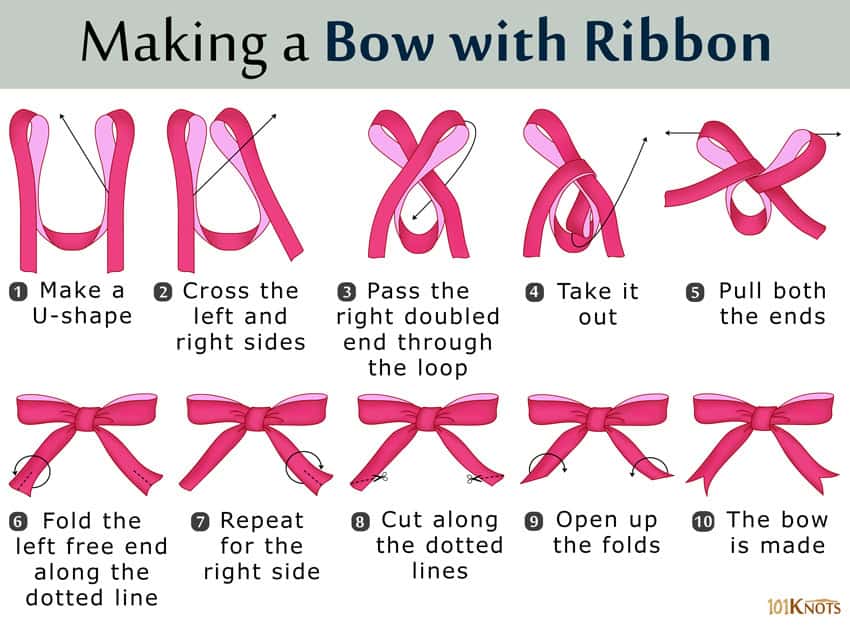
The Classic Shoelace Bow
This is probably the most common way to tie a bow with ribbon, actually. It's the same method you use to tie your shoelaces, which makes it very familiar for most people. This bow is great for gifts, hair ties, or any place you want a simple, neat bow, you know?
Step-by-Step Guide
Start by taking your ribbon and crossing one end over the other. Imagine you're beginning to tie a shoelace, more or less. Make sure you have enough ribbon on both sides for the loops you want to create.
Then, take the top piece of ribbon and tuck it under the bottom piece. Pull it through to make a single knot. This is the first step in securing your bow, so.
Now, make a loop with one side of the ribbon. This will be your first "ear" of the bow. Hold it gently between your thumb and forefinger, very.
Next, take the other piece of ribbon and wrap it around the loop you just made. Go over the front, then behind it, and bring it back towards the center. It's almost like you're creating a second loop around the first, you know?
Push this second piece of ribbon through the hole that formed at the center. This creates your second loop. You should now have two loops and two trailing ends, basically.
Carefully pull both loops to tighten the knot in the middle. Adjust the loops and the tails until your bow looks even and pretty. You can also gently tug on the tails to make the loops bigger or smaller, in a way.
Tips for a Neat Finish
To make your classic bow look really polished, try to keep the ribbon flat as you work. This helps prevent twists and bumps. Also, trimming the ends of your ribbon at an angle or with a V-cut can give a more professional look, too. It just adds a nice detail, you know?
Practice really helps here, very much. The more you tie this type of bow, the easier and quicker it will become. You'll also get a better feel for how tight to pull the knot for the best shape, basically.
The Simple Loop Bow
This type of bow is super easy to make and looks quite charming. It's perfect for when you need a quick decorative touch or are using a ribbon that's a bit stiffer. This is also a good choice for smaller items, arguably.
How to Make It
Start by making a loop with your ribbon, deciding how big you want one side of your bow to be. Hold this loop with one hand, basically.
Now, make a second loop of the same size with the other end of the ribbon. Bring it over the first loop, crossing them in the middle, you know?
Take one of the loops and push it through the center hole, just like you would when tying a knot. Pull it through to form a simple knot that holds both loops in place, very.
Gently pull on the loops to tighten the knot. Adjust them until they are even and the bow looks nice and full. You can also fluff the loops a little bit, too.
When to Use This Style
This simple loop bow is great for gift wrapping, especially if you want a quick and elegant finish. It's also good for tying around jars, candles, or even small bouquets. It gives a clean, understated look, basically. It's quite versatile, you know?
Making a Double Loop Bow
If you want a bow with a bit more fullness and flair, the double loop bow is a good option. It looks more complex than it is, actually, and adds a lovely dimension to your projects. This is sometimes called a "florist's bow" because it's often used in floral arrangements, so.
Start by leaving a tail of ribbon, then make a loop. This will be your first "ear." Hold it firmly where the ribbon crosses, very.
Now, make another loop on the opposite side, matching the size of the first. You should have two loops, one on each side, with the ribbon crossing in the middle, you know?
Continue by making two more loops, one on each side, just above the first set. These should also be about the same size. You'll now have four loops in total, two on each side, basically.
Take a small piece of thin ribbon, string, or floral wire. Wrap it tightly around the very center of your stacked loops, right where they all cross. Tie it securely to hold everything together. This is a crucial step, arguably.
Finally, fluff out each loop, gently pulling and shaping them to create a full, round bow. Trim the tails to your desired length and shape. This really helps the bow look finished, you know?
This bow style is perfect for larger gifts, wreaths, or any item where you want a significant decorative impact. It really adds a touch of luxury, so. It's a bit more involved, but the result is quite rewarding, basically.
Troubleshooting Common Bow Problems
Sometimes, bows just don't seem to cooperate, do they? One common issue is a lopsided bow. This often happens if you pull one loop tighter than the other. Try to apply even pressure when tightening your knot, you know? Practice helps here, very much.
Another problem is a floppy bow, especially with softer ribbons. If your ribbon isn't wired, you might need to use a stiffer ribbon or add a touch of fabric stiffener to the loops before tying. For gifts, sometimes taping the base of the bow to the package can help it stay put, basically.
If your knot keeps slipping, make sure you're pulling it tight enough in the first place. For some ribbons, a double knot might be necessary to really secure it. You can also use a tiny dot of hot glue on the back of the knot if it's for a permanent decoration, too.
Different Ribbons, Different Bows
The type of ribbon you pick really changes how your bow will look and feel. Satin ribbon, for instance, has a beautiful sheen and drapes softly. It's great for elegant bows, but can be a little slippery to work with, arguably. Velvet ribbon feels luxurious and makes rich, full bows, so.
Grosgrain ribbon is more textured and holds its shape well, making it easy to tie crisp bows. Wired ribbon, as mentioned, is probably the easiest for beginners because you can bend and shape the loops exactly how you want them. It's very forgiving, you know?
Consider the occasion when choosing your ribbon, too. A festive, patterned ribbon is perfect for birthdays, while a classic silk ribbon might be better for a wedding. Discover premium men's neckties in classic, bold and modern styles at a place like ties.com; they know a thing or two about quality fabric and tying, basically.
Creative Ways to Use Your Bows
Once you've mastered how to tie a bow with ribbon, a whole world of possibilities opens up, honestly. You can use your handmade bows to dress up plain gift bags or boxes, making them look much more thoughtful. They're also wonderful for decorating party favors, very.
Think about adding bows to home decor, too. A simple bow tied around a vase, a curtain tie-back, or even a chair can add a charming accent. For special occasions like weddings or baby showers, personalized bows can really tie a theme together, you know?
You can also create lovely hair bows for yourself or as gifts. Just attach a clip or elastic band to the back of your finished bow. This is a fun way to use up smaller pieces of ribbon, too. Learn more about accessories on our site, and perhaps link to this page for more style tips.
Frequently Asked Questions
People often have questions about tying bows. Here are some common ones, basically:
How do you tie a simple bow?
A simple bow, often called the shoelace bow, starts by crossing two ribbon ends. You then bring one end under and through to make a knot. Next, make a loop with one side, wrap the other end around it, and push it through the hole to make a second loop. Pull both loops to tighten and adjust, you know? It's quite straightforward, honestly.
What is the easiest way to tie a bow on a gift?
The classic shoelace bow is probably the easiest and most common way to tie a bow on a gift. It's familiar and creates a neat, symmetrical look. For an even quicker option, the simple loop bow also works very well, especially for smaller gifts, you know? It really depends on the look you want, so.
How do you make a perfect bow with ribbon?
Making a "perfect" bow really comes down to practice and attention to detail. Use wired ribbon if you want precise loops. Make sure your loops are even in size and that the knot in the middle is tight and centered. Trimming the tails neatly at an angle or a V-cut also helps a lot. And fluffing the loops gently at the end gives it that full, finished look, basically.
Your Bow-Tying Journey Continues
Learning how to tie a bow with ribbon is a very rewarding skill, truly. It opens up so many possibilities for adding personal touches to gifts, decorations, and even your own style. Remember, practice makes perfect, or at least, makes things much easier, you know? Don't get discouraged if your first few bows aren't quite what you hoped for, very.
Just keep trying different ribbons and different techniques. You'll find what works best for you and for the specific project you're working on, basically. Enjoy the process of creating something beautiful with your own hands, so. It's a nice feeling, really.

Tuesday Tutorial – How To Tie a Pretty Ribbon Bow | Crafts, Christmas

How to Tie a Double Bow With Ribbon | Tie bows with ribbon, Ribbon bows
How To Tie A Cloth Bow at Rafael Gilliam blog
