Unlocking Your Roblox Creations: Connecting Httpd To Your Dashboard And Experiences
Have you ever thought about how much more you could do with your Roblox creations if you could connect them to your own custom web services? That, is that, a pretty big question for many creators who are looking to push the boundaries of what's possible on the platform. We're talking about going beyond the built-in tools and adding features that make your games truly unique, perhaps even dynamic. This can involve hosting your own data, running custom APIs, or even creating external dashboards that interact directly with your experiences.
When you hear "httpd //create.roblox.com/dashboard/creations/experiences," it might sound like a mouthful, or a bit technical, but it points to a very exciting area for Roblox developers. It suggests a link between web server technology, like Apache's httpd, and the very heart of your creative work on Roblox: your dashboard and the experiences you build. Basically, you know, it's about making your Roblox projects talk to the outside web world, opening up a whole new set of possibilities for interaction and custom features.
Today, many Roblox creators are looking for ways to add more depth and functionality to their games. So, whether it's managing player data outside of Roblox, providing custom leaderboards, or even building tools to help you manage your creations, having your own web server can be a real game-changer. It's about taking more control over your project's backend, allowing for complex systems that might not fit neatly into Roblox's own environment. This kind of setup, you see, gives you a lot more freedom to design and innovate.
Table of Contents
- Understanding httpd and Its Place in Roblox Creations
- Setting Up Your Server: The Basics
- Virtual Hosts and Handling Multiple Projects
- Troubleshooting Common Server Issues: Like 403 Errors
- Securing Your Server with SSL
- Why Custom Servers Matter for Roblox Creators
- Frequently Asked Questions
- Conclusion: Expanding Your Roblox Horizons
Understanding httpd and Its Place in Roblox Creations
When we talk about "httpd," we're generally referring to Apache HTTP Server, which is, you know, a very popular piece of software. It's like a digital doorman for your computer, always listening for requests that come in over a network. These requests, you see, are typically expressed using something called the Hypertext Transfer Protocol, which is how web pages and other web resources get sent around. So, in the context of your Roblox creations, an httpd server could be the backbone for any external services you want to run, allowing your game to send and receive information from your own custom systems.
Imagine your Roblox experience needs to store complex player data that changes very quickly, or maybe it needs to pull information from a public database. Well, you know, Roblox's built-in services might not be the perfect fit for every single use case. This is where having your own httpd server comes into play. It provides a flexible platform for building custom APIs, hosting dynamic content, or even running a specialized backend just for your game. It's a way to extend the capabilities of your Roblox creation far beyond what's immediately available on the platform itself, offering a lot more control, too.
For example, if you're building a very intricate simulation or a game with a complex economy, you might want to manage parts of that system on your own server. This allows you to use programming languages and databases that aren't directly supported within Roblox's Lua environment. In some respects, it gives you the ability to create truly unique interactions and persistent worlds that are, perhaps, a bit more robust. This connection, then, is about bridging the gap between your Roblox game and the wider internet, enabling a wealth of new features and functionalities.
Setting Up Your Server: The Basics
Getting your httpd server ready to communicate with your Roblox creations starts with some fundamental setup steps. One key aspect, as a matter of fact, is how the server handles connections. For instance, if your server is mainly acting as an API, meaning it's just sending small bits of data back and forth, you might want to turn off something called "keepalive." Keepalive is typically useful for serving full web pages, where a browser might need to fetch many different files from the same server. But for a quick API call, keeping the connection open after each tiny request can actually be less efficient, so, you know, sometimes it's better to just close it.
Choosing Your Port and Firewall Rules
Every server needs a specific "doorway" to listen for incoming requests, and this doorway is called a port. The standard port for web traffic is 80, or 443 for secure traffic, but you can choose almost any available port for your custom services. For example, you might decide you want your Apache server to listen on port 8079. That's a pretty specific choice, but it keeps your custom service separate from typical web traffic, which can be useful. After you tell Apache to listen on this new port, you then have to make sure your computer's firewall, like iptables on Linux, also allows traffic through that port. If you open port 8079 in iptables and then restart iptables, it's like putting up a sign that says, "Come on in!" for that particular doorway.
Making sure your firewall is correctly configured is, you know, a very important step. If you set Apache to listen on port 8079 but forget to open that port in your firewall, no one will be able to reach your server, no matter how perfectly you've set up Apache itself. It's like having a great party inside your house but keeping the front door locked. So, you know, always remember to match your server's listening port with your firewall's allowed ports. This simple step can prevent a lot of headaches later on, honestly.
Reloading Your Configuration Without Disruption
Once you've made changes to your Apache configuration, like adding a new port or tweaking settings, you typically need to apply those changes. The good news is that you don't always have to completely shut down and restart your Apache server, which could interrupt any active connections to your Roblox game's custom services. There's a way, you see, to reload the new configuration without restarting Apache fully. This is often called a "graceful restart" or simply "reload."
Using a command to reload your server tells Apache to load the new configuration files while trying to keep existing connections alive. It's a much smoother process, allowing your server to continue serving requests while it updates its internal settings. This is especially useful for services that are constantly in use, like an API for a popular Roblox experience. So, you know, learning how to gracefully reload your configuration is a pretty handy skill for any server administrator, saving you from unnecessary downtime.
Virtual Hosts and Handling Multiple Projects
As you get more involved with creating custom services for your Roblox experiences, you might find yourself needing to host several different projects on the same server. This is where something called "virtual hosts" comes in very handy. A virtual host allows a single Apache server to host multiple websites or services, each with its own domain name or specific configuration. It's like having one big building but partitioning it into several separate offices, each for a different business. This is, you know, a really efficient way to manage your server resources.
When setting up a virtual host, there are some key pieces of information you'll need to specify. For example, you'll typically define an "admin email," which is where server-related messages might be sent. Then, there's the "server name," which is the domain name or IP address that this particular virtual host will respond to. You can also add "server aliases," which are alternative names for the same virtual host. These details, you see, help Apache figure out which set of files and configurations to use when a request comes in for a specific domain. It's all about making sure the right content gets delivered to the right place, every time.
Configuring virtual hosts properly is pretty important for organizing your projects. Imagine you have one Roblox experience that uses an API at `api.myrobloxgame.com` and another that pulls data from `data.myrobloxgame.com`. With virtual hosts, you can have both of these running on the same physical server, each pointing to its own set of files and configurations. This keeps things neat and tidy, and it makes managing multiple services for your Roblox creations much simpler. It's a foundational concept for running efficient web servers, honestly.
Troubleshooting Common Server Issues: Like 403 Errors
Even if you configure your Apache server by yourself, you might run into some common issues. One of the most frustrating, perhaps, is the "403 Forbidden" error. This message, "you don't have permission to access / on this server," means that your server received the request, but it's explicitly denying access to the resource you're trying to reach. It's not that the server is down; it's just saying "no entry" for that particular request. This can be a real head-scratcher when you're trying to get your custom Roblox services up and running, believe me.
A 403 error often points to problems with file or directory permissions. Your Apache server needs to have the right permissions to read and serve the files in the directory you've specified as your "document root" or where your virtual host points. If the server user doesn't have permission to access those files or the directory itself, it will simply refuse to serve them, giving you that 403 error. You know, it's a security measure, but it can certainly trip you up if you're not careful. Checking the ownership and permissions of your files and folders is usually the first place to look when you see this message.
Another common cause for a 403 error can be incorrect configuration within your virtual host or main Apache settings. For example, if you've tried to load something like phpMyAdmin on a virtual host, but the `Directory` or `Location` directives in your configuration are too restrictive, Apache will block access. It's almost like having a locked door inside your locked house. So, you know, always double-check your `Allow` and `Deny` rules, or `Require` directives, within your Apache configuration files. Making sure these are set correctly is pretty important for allowing legitimate access to your custom Roblox services.
Securing Your Server with SSL
In today's internet, security is a very big deal, especially when you're dealing with data for your Roblox creations or any kind of user interaction. This is where SSL (Secure Sockets Layer) comes into play, which, you know, is the technology behind HTTPS. HTTPS encrypts the communication between your server and the client (whether that's your Roblox game or a web browser), making it much harder for anyone to snoop on the data being exchanged. If your custom Roblox services are handling any sensitive information, like user IDs or game progress, setting up SSL is practically a must-do.
To enable SSL on your Apache server, you'll typically need to install a module called `mod_ssl`. For systems that use `yum` for package management, you might install it using a command like `yum install mod_ssl`. This command fetches and installs the necessary components for Apache to handle secure connections. After the installation, you then need to reload or restart your Apache server to make sure the new module is loaded and active. It's a bit like adding a new security system to your home; you have to turn it on for it to work.
Once `mod_ssl` is installed and active, you'll then need to obtain an SSL certificate. This certificate is what verifies your server's identity and enables the encryption. There are free options available, like Let's Encrypt, which many people use. Configuring your virtual host to use this certificate is the final step in securing your custom Roblox services with HTTPS. This adds a layer of trust and safety for anyone interacting with your server, which, you know, is very important for building a good reputation for your creations. Learn more about Apache HTTP Server on their official site, it's a great resource.
Why Custom Servers Matter for Roblox Creators
Connecting your Roblox creations to custom httpd servers opens up a whole new world of possibilities for developers. It means you're not just limited to the tools and features provided directly by the Roblox platform. You can, you know, build incredibly complex systems that handle data, run simulations, or even power external dashboards that give you deep insights into your game's performance. This level of control allows for truly unique experiences that stand out in the crowded Roblox marketplace.
For example, you could set up an API on your httpd server that manages a global leaderboard for your game, updating in real-time and storing far more data than Roblox's standard leaderboards might allow. Or, perhaps, you could create a system that lets players log in to a web portal outside of Roblox to manage their in-game inventory or customize their characters, with changes reflecting instantly in the game. These kinds of integrations, you see, make your Roblox experience feel much more expansive and connected to the wider internet. It's about giving your players a richer, more engaging experience, and that's pretty cool.
The ability to host your own services means you can also integrate with other web technologies or third-party APIs that aren't directly supported by Roblox. This could be anything from pulling live weather data into your game to connecting with external payment systems for unique monetization strategies. It gives you, you know, a lot of flexibility and creative freedom. This approach allows you to build features that are truly tailored to your specific vision, pushing the boundaries of what a Roblox game can be. You can learn more about custom development on our site, and link to this page for more advanced tools.
Frequently Asked Questions
Here are some common questions people often ask about connecting web servers to their creative projects:
What is the main purpose of httpd in relation to my online creations?
Basically, httpd is a piece of software that listens for network requests, like a web server does. For your online creations, it lets you host custom web services, APIs, or even external dashboards that can communicate with your projects. It's about extending your creation's capabilities beyond its native environment, allowing it to send and receive information from your own systems.
How can I make sure my custom server is secure when it's interacting with my projects?
Securing your custom server is very important, especially when it's interacting with your projects. You should definitely install and configure SSL (Secure Sockets Layer) using a module like `mod_ssl` for Apache. This encrypts the data moving between your server and your projects, keeping it private. Also, always make sure your firewall rules are tight, only allowing necessary ports, and keep your server software updated, too.
I'm getting a "403 Forbidden" error; what's the first thing I should check?
If you're seeing a "403 Forbidden" error, it means your server is refusing access to a resource. The very first thing you should check is the file and directory permissions where your content is located. Your server needs to have the proper permissions to read and serve those files. Also, check your Apache configuration files for any `Allow`, `Deny`, or `Require` directives that might be blocking access, as a matter of fact.
Conclusion: Expanding Your Roblox Horizons
Exploring the connection between httpd and your Roblox creations, specifically how it relates to `httpd //create.roblox.com/dashboard/creations/experiences`, really shows how much potential there is for advanced development. By understanding how to set up and manage your own web server, you gain a powerful tool to build more dynamic, interactive, and unique experiences for your players. From configuring listening ports and managing firewalls to setting up virtual hosts and securing your connections with SSL, each step gives you more control over your creative vision. It's a journey into more complex systems, but one that can lead to truly remarkable results.

Experiences & Developer Products on Creator Dashboard - Announcements - Developer Forum | Roblox
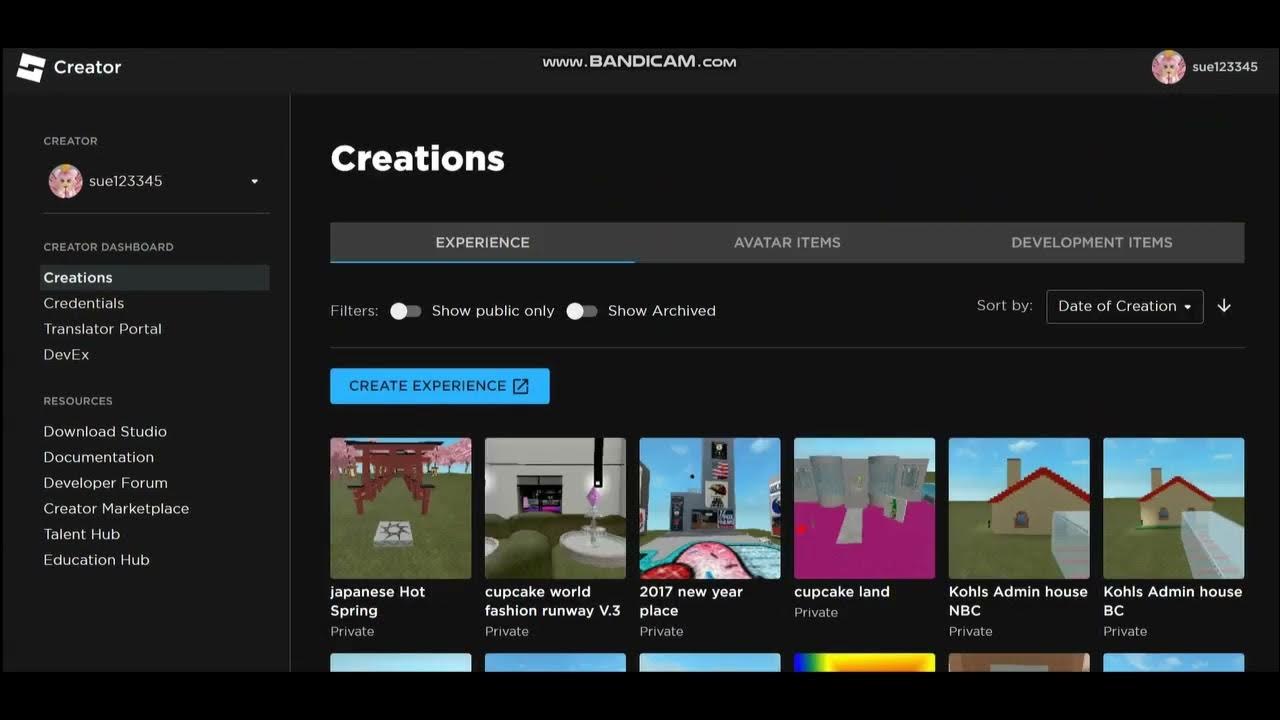
Create Roblox Dashboard Creations Creator
https //create.roblox.com/dashboard/creations Passes for Gaming
