Raspberry Pi Temperature Monitoring: Your Free IoT Path
Have you ever wished you could keep a close watch on the warmth or coolness of a particular spot in your home or perhaps a garden shed, all without spending a lot of money? Well, you know, the idea of having a smart system that tells you about the heat levels in different places is pretty cool. It’s something many folks think about for all sorts of reasons. Maybe you want to make sure your plants are happy, or you just want to check on a room that tends to get a bit chilly. This kind of project, so it turns out, is a great way to start with home automation.
People often wonder how to set up these kinds of smart systems without breaking the bank. They might feel like it needs special tools or a big budget. That is not the case here, as a matter of fact. The good news is that there's a really simple and cost-effective way to get into this world. It involves a tiny computer that many people already know about, and it lets you build something useful with very little cash. This is all about making your home a little bit smarter, and doing it on your own terms.
This article will show you how to get started with a system for **raspberry pi temperature monitoring iot free**. We will explore how this small device can become the heart of your very own heat-sensing network. You will learn about the components you need, the steps to put it all together, and how to access your readings from anywhere. It's a journey into making your surroundings more responsive to your needs, and honestly, it is quite a fun project to try.
Table of Contents
What is IoT Temperature Monitoring?
Why Raspberry Pi for Temperature Sensing?
Getting Started with Your Free Setup
- Choosing Your Sensor
- Connecting the Sensor
- Writing the Code
- Displaying and Storing Data
- Remote Access for Your Readings
Real-World Uses for Your System
Common Questions About Free IoT Temperature Monitoring
What is IoT Temperature Monitoring?
So, what exactly does "IoT temperature monitoring" mean? It stands for "Internet of Things" temperature monitoring. Basically, it means using connected devices to keep an eye on heat levels in different places. These devices can then send that information over the internet to your phone or computer. This way, you can check on things even when you are not right there, which is pretty handy.
Imagine you have a greenhouse and you want to make sure it stays at a certain warmth for your plants. Or maybe you have a server room and need to know if it's getting too hot. An IoT temperature system helps you with this. It uses small sensors that pick up the heat readings, and then a tiny computer sends those readings where you can see them. It's about getting data from the physical world into a form you can use, virtually anywhere you are.
The "free" part of **raspberry pi temperature monitoring iot free** often refers to the software and the general approach. While you do need to buy the physical parts, the tools for writing the programs and the resources for learning are usually available at no cost. This makes it a very approachable project for anyone interested in building their own smart solutions. It's a way to get quite a bit of usefulness without a huge financial outlay, which is rather appealing.
Why Raspberry Pi for Temperature Sensing?
The Raspberry Pi is a tiny computer that has become very popular for all sorts of projects. It's about the size of a credit card, but it has almost all the parts of a regular computer, like a processor and places to plug in USB devices. It can run different operating systems, usually a version of Linux. This makes it a very flexible tool for many jobs, and it is actually quite powerful for its size.
A big reason the Raspberry Pi is great for temperature sensing is its set of GPIO pins. These are special connections that let the computer talk to and control other electronic bits, like sensors. This means you can hook up a heat sensor directly to the Pi and have the Pi read the information from it. It's what makes physical computing projects, like our temperature monitor, so straightforward with this device. You can really make things happen in the real world with these pins.
The Raspberry Pi was developed in the United Kingdom by the Raspberry Pi Foundation. Their main goal was to make computing accessible and affordable for everybody. This mission really shines through in how easy it is to get started with a Pi, even for beginners. You can get a Raspberry Pi for less than $50, which is a very small price for a computer that can do so much. This low cost is a huge plus for anyone wanting to build their own IoT system without spending a fortune, you know.
Cost-Effectiveness and Accessibility
When we talk about **raspberry pi temperature monitoring iot free**, the cost is a big part of the appeal. A Raspberry Pi itself is quite inexpensive. You can find models like the Raspberry Pi 5 or Raspberry Pi 4, along with all the bits and pieces you need, at places like Micro Center. They also have other brands that work well with the Pi, like Arduino and Feather, giving you lots of choices. This affordability means more people can get involved with building their own tech.
The idea of making computing available to everyone is at the heart of the Raspberry Pi. From big companies to someone just tinkering at their kitchen table, or even kids learning to code in a classroom, the Raspberry Pi Holdings PLC aims to make it easy for all. This accessibility extends to the parts you need for a temperature monitoring system. Sensors are generally not expensive, and the wiring is simple. It means you don't need a huge budget to start your own smart home project, which is rather nice.
Think about it: for less than $50, you get a full computer that can run programs, connect to the internet, and talk to sensors. This is a very cost-effective way to get into the world of IoT. The "free" aspect really comes into play with the software. You can use free operating systems like Raspberry Pi OS, and free programming languages like Python, to write your code. This helps keep the overall project cost down significantly, making it truly approachable for anyone, honestly.
GPIO Pins and Physical Projects
The General Purpose Input/Output (GPIO) pins on a Raspberry Pi are what make it so special for physical computing. These little pins allow the Pi to send and receive electrical signals. This means you can connect things like buttons, lights, and, yes, temperature sensors directly to the Pi. It's how the computer interacts with the real world around it, which is actually quite neat.
When you want to do **raspberry pi temperature monitoring iot free**, you will connect your temperature sensor to these GPIO pins. The sensor will then send its readings, like how hot or cold it is, through these pins to the Raspberry Pi. The Pi then takes that information and can process it, store it, or send it over the internet. This direct connection is what makes building custom hardware projects so straightforward with the Pi, you know.
The ability to control electronic parts for physical projects is a key feature of the Raspberry Pi. It means you are not just using a computer for screen-based tasks. You are using it to build something that senses or controls things in your environment. This is a powerful concept for anyone interested in home automation or environmental tracking. It truly bridges the gap between software and the physical world, so it's a bit like magic.
Learning and Community Support
One of the best things about the Raspberry Pi is the huge community that supports it. If you are interested in **raspberry pi temperature monitoring iot free**, you will find tons of help online. The Raspberry Pi Foundation provides access to online coding resources and challenges that are free for everyone, anywhere. This means you can learn programming through fun, hands-on projects, which is really helpful.
The Raspberry Pi Foundation is a UK registered charity. They aim to make learning about computers and coding accessible to kids, teenagers, and young adults. They offer resources to help you create games, animations, and more with code. This focus on education means there are many guides and tutorials available for projects just like a temperature monitor. You are not alone in figuring things out, as a matter of fact.
Joining the global Raspberry Pi community means you have a network of people who can offer advice and share their own project ideas. There are forums, websites, and even local groups where you can get assistance. This support system is invaluable when you are building something new. You can get started with your Raspberry Pi computer for free, and write powerful programs with help from expert educators. This makes the whole experience much less intimidating, and honestly, a lot more fun.
Getting Started with Your Free Setup
Setting up your **raspberry pi temperature monitoring iot free** system involves a few simple steps. You will need a Raspberry Pi, of course, and a temperature sensor. The beauty of this project is that you can often use parts that are quite common and not hard to find. It's about putting these pieces together in a smart way to get the information you want, which is pretty satisfying.
The first step is to gather your components. This usually means your Raspberry Pi board, a power supply for it, and a memory card to hold the operating system. Then you will need your chosen temperature sensor. There are different kinds, but many are quite simple to use. You might also need a few small wires to connect everything. It's a bit like putting together a simple building block set, actually.
Once you have your parts, the next big step is to get the Raspberry Pi ready. This involves putting the operating system onto the memory card. The Raspberry Pi OS is free to download and use, which is great. There are many guides online that show you how to do this step-by-step. It's a straightforward process that gets your tiny computer ready for action, and it is usually done fairly quickly.
Choosing Your Sensor
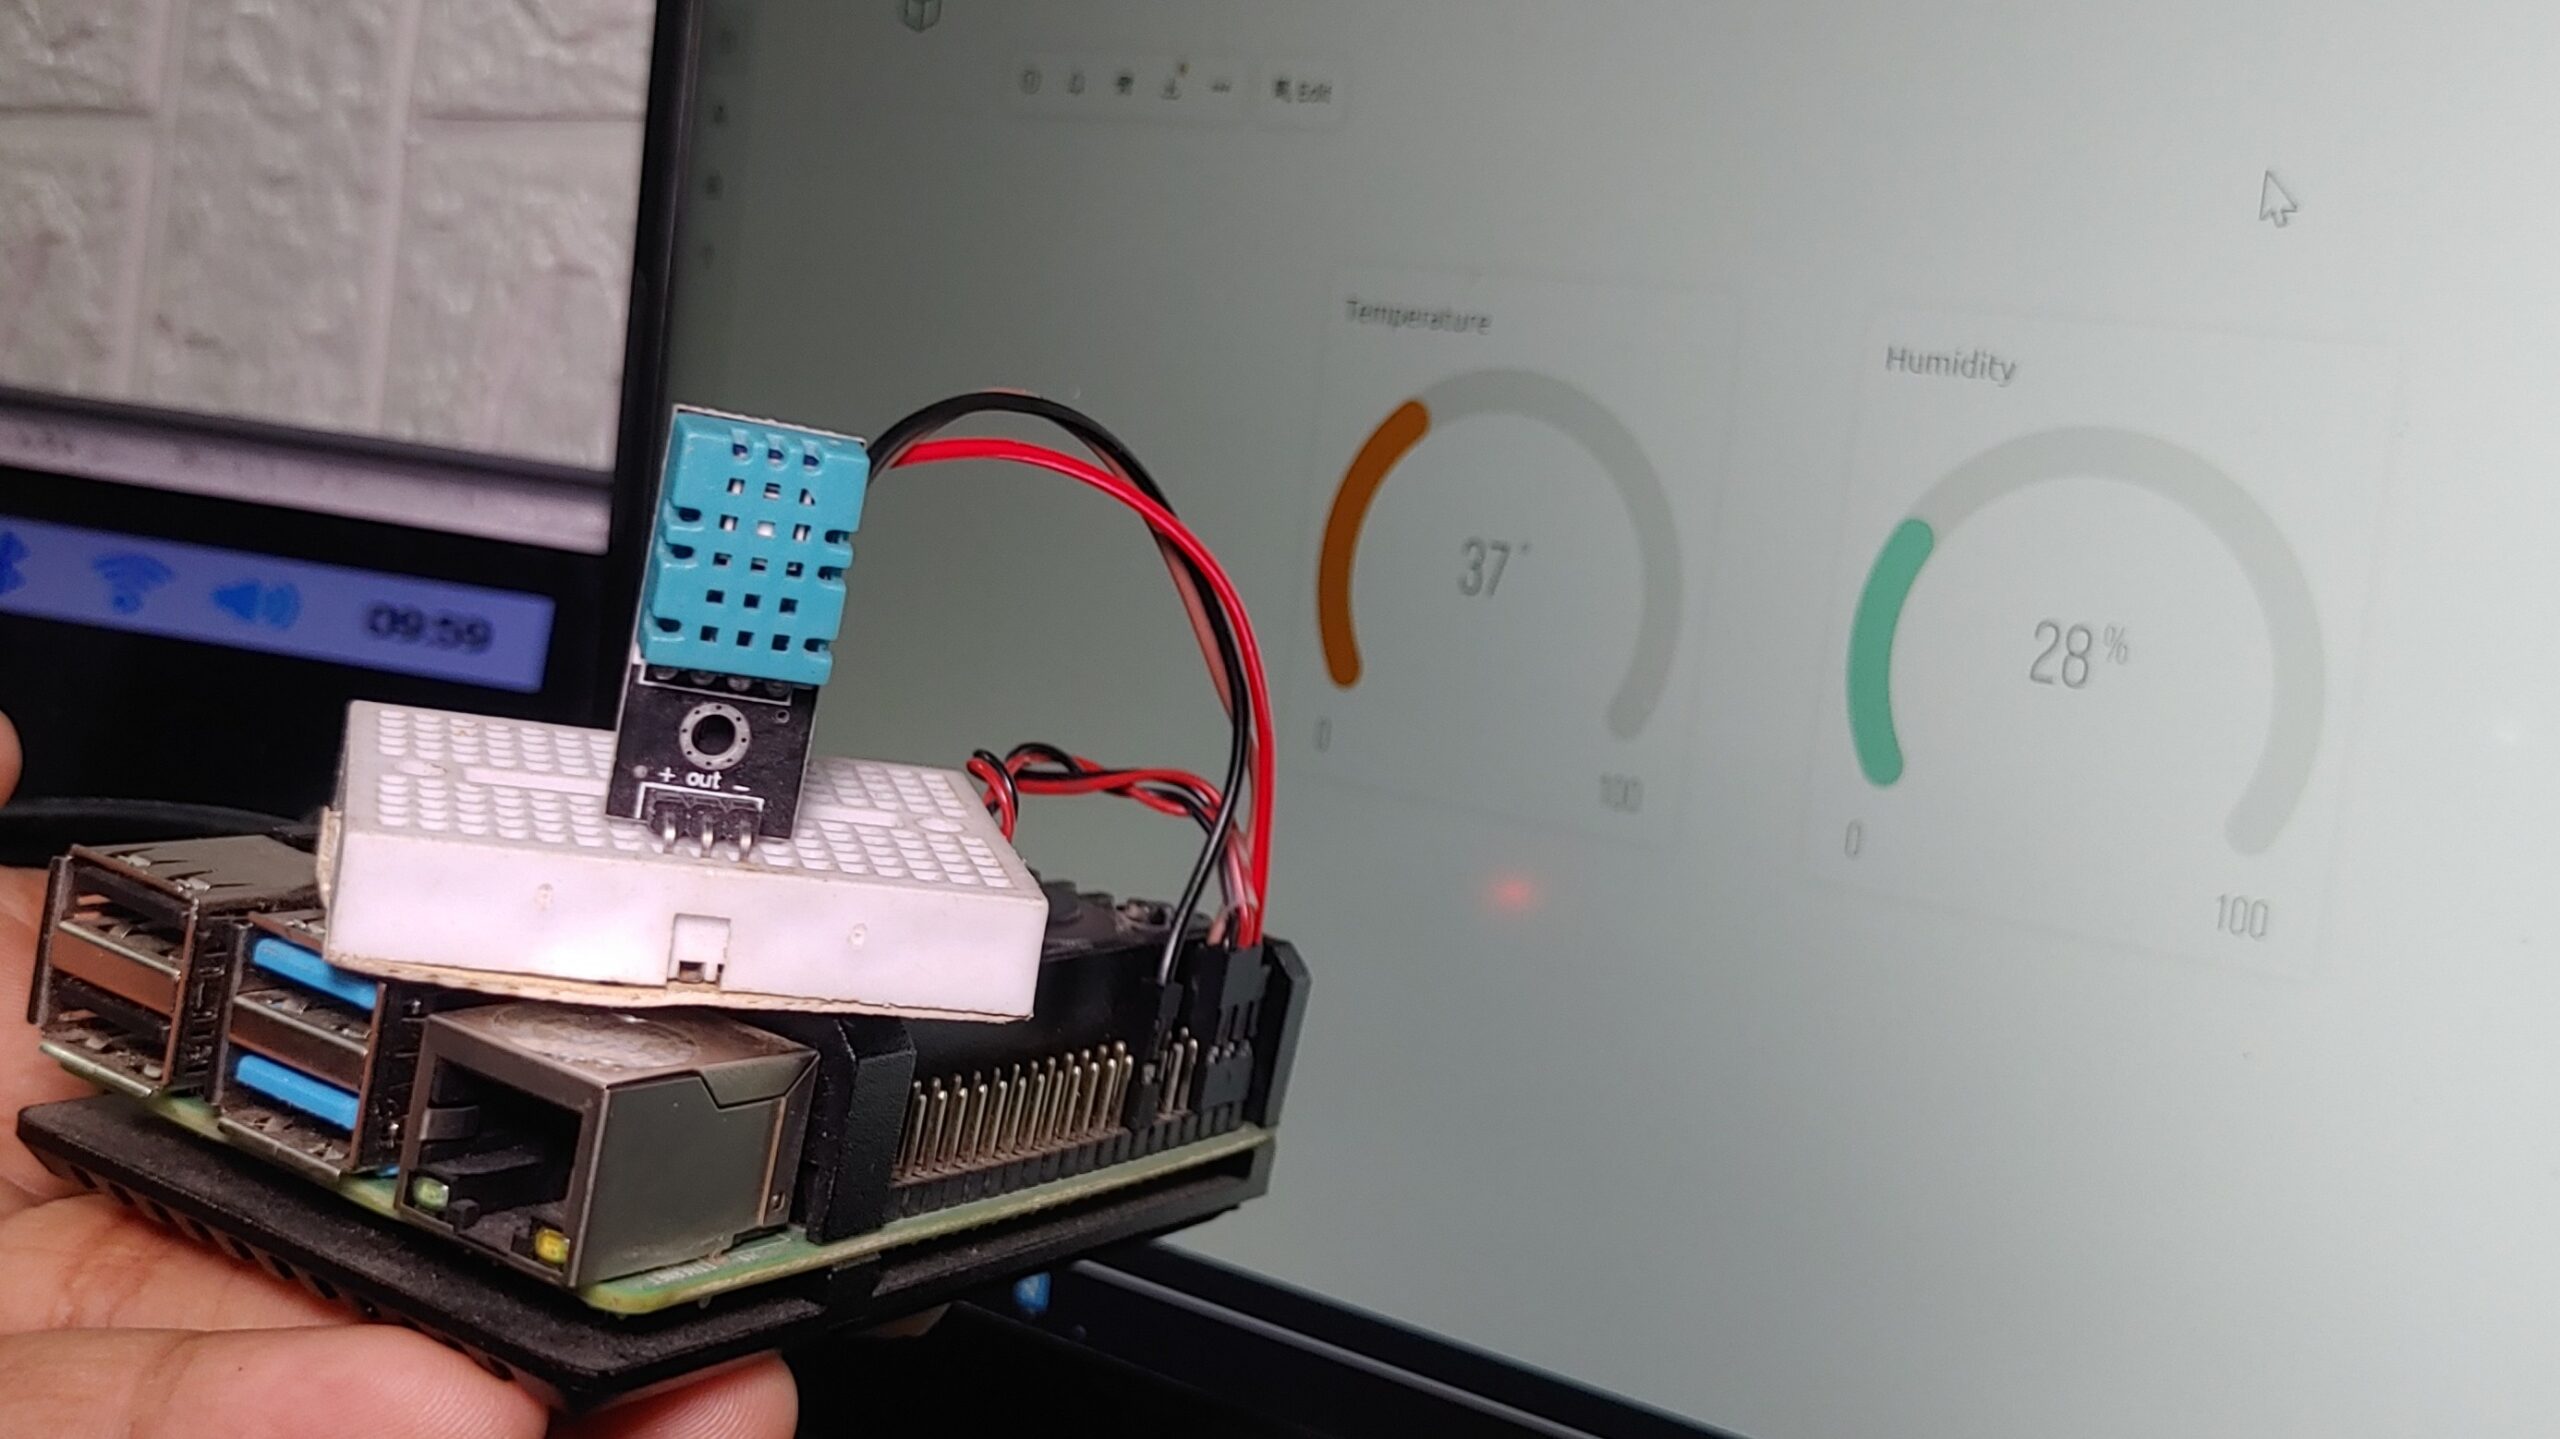
For **raspberry pi temperature monitoring iot free**, picking the right temperature sensor is important. One very common and easy-to-use sensor is the DHT11 or DHT22. These sensors are inexpensive and can measure both temperature and humidity. They are popular with beginners because they are simple to connect and there's a lot of code examples available for them. They are a good starting point, so to speak.
Another option might be a DS18B20 sensor. This one is known for being quite accurate and can even be waterproof, which is useful if you want to monitor outdoor temperatures or liquid temperatures. It uses a single wire for communication, making the wiring a little less complicated. Each sensor has its own little quirks, but they all serve the same basic purpose of telling you how warm or cool something is.
When you are choosing, think about where you want to measure the temperature. Do you need something very precise? Does it need to handle water? These questions will help you pick the best sensor for your project. Remember, the goal is to get reliable readings without spending a lot, and there are many good, low-cost options out there, honestly.
Connecting the Sensor
Once you have your sensor, you need to connect it to your Raspberry Pi. This usually involves just a few wires. You will connect one wire to a power pin on the Pi, another to a ground pin, and a third to one of the GPIO data pins. It's a pretty simple circuit, and there are many diagrams online that show you exactly which pins to use for different sensors. This is where the physical computing aspect really comes alive.
Before you connect anything, make sure your Raspberry Pi is turned off. This helps prevent any accidental damage. Carefully push the wires onto the correct pins on both the sensor and the Pi. It's a good idea to double-check your connections against a diagram to make sure everything is in the right spot. Getting the wiring right is a key step for your **raspberry pi temperature monitoring iot free** system to work properly, you know.
Some sensors might need a resistor in the circuit, which is a small electronic part that controls the flow of electricity. If your chosen sensor needs one, the wiring diagrams will show you where to put it. Don't worry if this sounds a bit technical; it's usually just one extra component to add. With the Pi, it's often about following clear instructions, and you can find lots of help if you get stuck, which is rather reassuring.
Writing the Code
Now comes the fun part: telling your Raspberry Pi what to do. For **raspberry pi temperature monitoring iot free**, you will write a small program, usually in Python. Python is a very popular language for Raspberry Pi projects because it's easy to learn and read. The Raspberry Pi Foundation even provides free resources for learning coding, making this step quite approachable.
Your program will tell the Raspberry Pi to read the data from the temperature sensor through the GPIO pins. It will then interpret that data, turning the raw electrical signals into a temperature reading you can understand, like degrees Celsius or Fahrenheit. There are many ready-made code examples online for common sensors like the DHT11 or DS18B20. You can often just copy and paste the basic structure and then make small changes to fit your needs, which is pretty convenient.
After writing the code, you will save it on your Raspberry Pi and then run it. You can set it up so the program runs automatically when the Pi turns on, allowing your temperature monitor to work continuously. This programming step is where you give your system its intelligence, and it is a very rewarding part of the project. It's where you make the Pi do exactly what you want it to do, so it's quite empowering.
Displaying and Storing Data
Once your Raspberry Pi is reading temperature data, you will want to see it. There are several ways to display and store this information for your **raspberry pi temperature monitoring iot free** setup. The simplest way is to just print the readings to the screen where your Raspberry Pi is connected. This gives you immediate feedback, which is helpful when you are first testing things out.
For more long-term tracking, you can have your Raspberry Pi save the data to a file on its memory card. This creates a record of the temperature over time. You could then open this file later to see how the temperature has changed throughout the day or week. This is a good way to gather information if you want to analyze trends, and it is a very basic form of data logging.
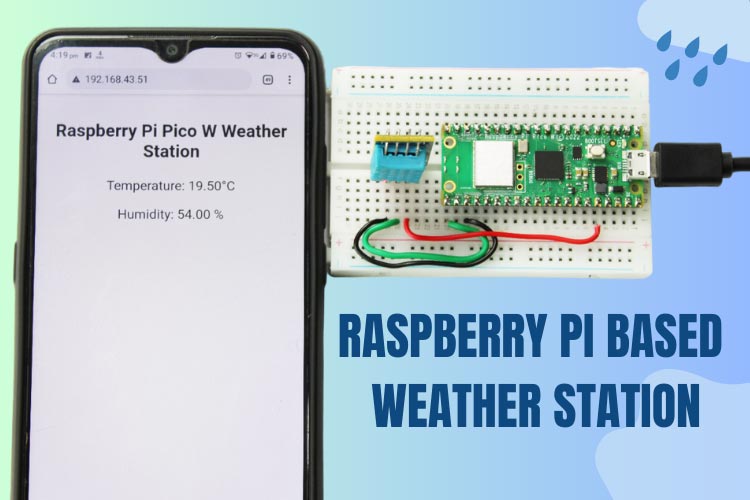
To make it truly "IoT," you can send the data to an online service. There are free services available that let you send sensor data and then view it on a dashboard from any web browser or phone. This means you can check your temperature readings even when you are far away from your Raspberry Pi. This online connection is what makes your project a real Internet of Things device, and it is quite powerful.
Remote Access for Your Readings
Being able to check your temperature readings from anywhere is a big part of the appeal of **raspberry pi temperature monitoring iot free**. The Raspberry Pi OS offers secure remote access solutions. This means you can connect to your Raspberry Pi over the internet, even if you are not at home. It's like having a direct line to your tiny computer, no matter where you are, which is pretty cool.
There are different ways to set up remote access. One common method involves using a service that creates a secure tunnel to your Pi. This lets you access the Pi's command line or even its desktop environment from another computer. So, you could log in and see the temperature readings as they come in, or even change the settings of your program. It's a very flexible way to manage your system, actually.
Another option, as mentioned before, is to send your data to a cloud service. These services are designed to receive data from IoT devices and display it in an easy-to-understand way. You just need an internet connection on your Pi to send the data, and then you can view it on your phone or computer through the service's website or app. This makes checking your temperatures very convenient, and honestly, quite simple to do.
Real-World Uses for Your System
A **raspberry pi temperature monitoring iot free** system has many practical uses in everyday life. For example, you could place a sensor in your refrigerator or freezer to make sure it stays at the right coolness. If the temperature goes too high, you could even set up an alert to tell you there's a problem. This helps prevent food from spoiling, which is rather useful.
In a garden or greenhouse, keeping an eye on the warmth is very important for plants. You could use your Raspberry Pi setup to track the soil temperature or the air temperature. This information helps you know when to water or if you need to adjust ventilation. The "My text" even mentions using a Raspberry Pi to capture plant health with NDVI, showing its environmental monitoring capabilities. It's a way to give your plants the best chance to grow, basically.
You could also use this system to monitor the temperature in different rooms of your house. Maybe one room always feels colder than the others, or you want to make sure a baby's room stays at a comfortable warmth. With a few sensors and your Raspberry Pi, you can get a clear picture of your home's climate. This helps you manage your heating and cooling more effectively, and it is a very practical application.
For those with hobbies, like brewing beer or fermenting kombucha, precise temperature control is key. A Raspberry Pi monitor can give you constant updates on the liquid's warmth, helping you ensure the process goes smoothly. It's about taking guesswork out of things that rely on specific conditions. This kind of project shows how versatile the Raspberry Pi truly is, and it is quite empowering to build something like this yourself.
Even for simple things, like making sure your pet's sleeping area is comfortable, a temperature monitor can be helpful. Or if you have a shed where you store sensitive items, you can check that it doesn't get too hot or too cold. The possibilities are really quite broad. This simple, inexpensive setup can provide peace of mind and valuable information for many situations, so it is a very good investment of your time.
Common Questions About Free IoT Temperature Monitoring
People often have questions when they start thinking about **raspberry pi temperature monitoring iot free**. One common question is about the accuracy of these homemade systems. Are they reliable? Generally, yes, with good sensors and proper setup, they can be quite accurate for most home and hobby uses. The quality of the sensor you pick plays a big part in how precise your readings will be, obviously.
Another question often comes up: "Can I monitor multiple locations with one Raspberry Pi?" Absolutely! You can connect several temperature sensors to a single Raspberry Pi. The number depends on the type of sensor and the available GPIO pins, but it is certainly possible to monitor several spots at once. This makes it very efficient if you have a larger area or multiple rooms to keep an eye on, which is rather convenient.
A third common inquiry is about the "free" aspect. "Is it truly free, or are there hidden costs?" While the software and many learning resources are free, you do need to buy the physical hardware: the Raspberry Pi itself, the sensor, wires, and a power supply. So, it's "free" in terms of ongoing subscriptions or expensive software licenses, but there's an initial small investment in the parts. It's a very low barrier to entry, though, and honestly, a great value for what you get.
Some people also ask about how long the battery lasts if they want to make it portable. If you power your Raspberry Pi with a battery pack, the life depends on the size of the battery and what model of Pi you are using. Newer models are more power-efficient. You can also program your Pi to sleep between readings to save battery life, which is a smart way to extend its operation. It's all about how you set things up, you know.
Finally, a question about data security often arises. "Is my temperature data safe when I send it to the cloud?" When you use reputable online services for IoT data, they usually have security measures in place. It's always a good idea to choose services that are known for their data protection. For personal use, the risk is generally low, but it's something to be aware of when setting up any internet-connected device. This is where a secure remote access solution for Raspberry Pi OS comes in handy, as a matter of fact.
So, there you have it. Setting up **raspberry pi temperature monitoring iot free** is a fantastic project for anyone looking to add a bit of smart tech to their surroundings without a big cost. It's a practical way to learn about computing, coding, and electronics, all while creating something truly useful. The Raspberry
IoT Temperature Monitoring System With Blynk 2.0 & Raspberry Pi

Raspberry Pi based temperature monitoring and alerting system with Grafana | IOT project - YouTube
Best SSH IoT Platform For Raspberry Pi Free: Unlock The Power Of Secure Remote Access
