Securely Connect Remote IoT: Raspberry Pi, AWS, And Your Windows Access Point
Connecting tiny computers, like a Raspberry Pi, to the vast internet, especially when they're out in the field, can feel a bit like setting up a secret club. You want to make sure only the right people get in, and that everything shared stays private. That's really what we're talking about today: making sure your remote IoT devices, say a Raspberry Pi, can talk to your cloud space in AWS, and that you can check on them from your Windows computer, all without any unwanted guests.
It's pretty important, you know, to have a good way to manage these smart little gadgets when they're not right next to you. Think about sensors gathering information far away, or maybe a tiny camera watching something important. You need to be able to get that data and, perhaps, even send commands back to the device, too. And doing all of that safely is a big part of the puzzle.
This guide is here to walk you through how you can achieve just that. We'll look at the different parts involved, from your Raspberry Pi device itself to the powerful cloud services AWS offers, and how your Windows machine fits into the picture for secure access. So, let's get into how to securely connect remote IoT VPC Raspberry Pi AWS download Windows, making sure your projects are both functional and safe, as a matter of fact.
Table of Contents
- Why Secure Remote IoT Connections Matter
- Understanding the Key Players
- Getting Your Raspberry Pi Ready
- Setting Up Your AWS Virtual Private Cloud (VPC)
- Integrating with AWS IoT Core
- Establishing Secure Connections
- Accessing From Your Windows Machine
- Best Practices for IoT Security
- Common Questions About Secure IoT Connections
- Getting Started with Your Secure IoT Project
Why Secure Remote IoT Connections Matter
When you have devices out there, gathering data or performing tasks, it's really easy to forget about how someone might try to get into them. Just like you wouldn't leave your front door wide open, you don't want your IoT devices to be easily accessible to anyone with bad intentions. A security slip-up could mean your data gets stolen, or worse, someone takes control of your device and uses it for something you definitely didn't intend, you know?
Having a solid, secure connection means your data travels safely, like in a protected tunnel. It also means that only authorized people or systems can send commands to your Raspberry Pi. This helps keep your projects running smoothly and keeps your information safe from prying eyes. It's a bit like having a very private conversation that only certain people can hear, so.
Plus, in today's world, there are more and more rules about keeping data safe. If your IoT project handles any kind of sensitive information, even just temperature readings from a private space, making sure it's secure helps you follow those rules and builds trust. It's just a good idea, honestly, to build security in from the very start.
Understanding the Key Players
Before we get into the "how-to," let's just quickly go over the main parts that make up this secure connection system. Each piece has a special job, and they all work together to keep things safe and running. It's pretty cool how they fit, too.
Raspberry Pi: Your IoT Device
The Raspberry Pi is basically a small, affordable computer that's perfect for IoT projects. It can connect to sensors, control other things, and send data over the internet. Because it's so small and uses little power, it's great for remote locations where a regular computer just wouldn't work. It's a very versatile little machine, that.
AWS VPC: Your Private Cloud Space
AWS Virtual Private Cloud, or VPC, is like having your own private, isolated section of the Amazon Web Services cloud. You get to decide who can get in and out, and how things communicate within that space. It's a really important layer for keeping your IoT data and services away from the general internet traffic. Think of it as your own secure building within a much larger city, sort of.
AWS IoT Core: The IoT Manager
AWS IoT Core is a service that helps you connect, manage, and scale your IoT devices. It makes it easier for your Raspberry Pi to send data to the cloud and for your cloud applications to send commands back. It also handles a lot of the security stuff, like making sure devices are who they say they are. It's like the central hub for all your IoT conversations, basically.
Windows: Your Control Center
Your Windows computer is where you'll be doing a lot of the setup and, later, where you'll monitor and control your remote Raspberry Pi. You'll use various tools and software on Windows to connect to AWS and your Pi, making it your personal command center. It's pretty convenient, actually, to have everything accessible from your familiar desktop environment.
Getting Your Raspberry Pi Ready
Before your Raspberry Pi can join the secure party, it needs a little preparation. This involves getting its operating system set up and putting some basic security measures in place. It's a good first step, honestly.
Installing the OS and Initial Setup
First, you'll want to get the Raspberry Pi OS onto a microSD card. You can download the Raspberry Pi Imager tool for Windows, which makes this process really simple. Just pick the right OS version for your Pi, select your microSD card, and let the tool do its work. It's quite straightforward, you know?
Once the OS is on the card, pop it into your Pi and boot it up. You'll go through some initial setup steps, like setting your country, language, and keyboard layout. It's also a good idea to change the default password right away; that's a very important security move. Make sure to enable SSH during this setup, too, as you'll need it for remote access later, as a matter of fact.
Basic Security for Your Pi
Beyond changing the default password, there are a few other quick things you should do to make your Pi more secure. First, update all its software. Open a terminal on your Pi and type `sudo apt update && sudo apt upgrade -y`. This fetches the latest security patches and improvements. It's like giving your Pi a fresh coat of armor, you know?
Consider setting up SSH key-based authentication instead of just passwords. This is much more secure. You generate a pair of keys – one public, one private. The public key goes on your Pi, and you keep the private key safe on your Windows machine. Then, to connect, you use the private key, which is significantly harder for someone to guess than a password. You can find many guides online about how to do this for Raspberry Pi and Windows, like this one for SSH on Raspberry Pi.
Setting Up Your AWS Virtual Private Cloud (VPC)
Your AWS VPC will be the secure home for your cloud resources that interact with your Raspberry Pi. Think of it as building a fortified compound in the cloud. This is where your cloud servers, databases, and other services will live, completely separate from the public internet unless you specifically allow connections, so.
Creating the VPC and Subnets
Log into your AWS Management Console and head over to the VPC service. You can choose to create a VPC from scratch or use the "VPC Wizard" for a quicker start. When creating it, you'll define a CIDR block, which is basically the range of IP addresses for your private network. It's a good idea to pick a non-overlapping range, for example, `10.0.0.0/16`.
Inside your VPC, you'll create subnets. These are smaller divisions of your VPC's IP address range. You'll typically want at least one public subnet (for things that need to talk to the internet, like an Internet Gateway) and one private subnet (for your more sensitive resources, like databases or backend services that your Pi might communicate with). This separation is a very important security layer, you know?
Configuring Security Groups and Network ACLs
Security Groups act like firewalls for your individual instances (like virtual servers) within your VPC. You define rules that say what kind of incoming and outgoing network traffic is allowed. For example, you might allow SSH access only from your home IP address. This is a very precise way to control access, basically.
Network Access Control Lists (ACLs) are another layer of security, working at the subnet level. They're stateless, meaning they don't remember previous connections, and apply to all traffic entering or leaving a subnet. While Security Groups are usually sufficient for most needs, ACLs provide an extra, broader layer of control if you need it. It's a bit like having a gate at the entrance to your entire neighborhood, in a way.
Integrating with AWS IoT Core
AWS IoT Core is where your Raspberry Pi truly becomes a "thing" in the cloud. It helps manage the connection, authentication, and communication between your device and other AWS services. It's pretty central to making this whole system work, honestly.
Registering Your Device as an IoT "Thing"
In the AWS IoT Core console, you'll create a "Thing" which represents your Raspberry Pi. This gives your device an identity in the cloud. During this process, you'll also generate a unique set of security credentials: a device certificate, a private key, and a root CA certificate. These are very important for your Pi to prove its identity to AWS IoT Core. Keep these files safe and download them to your Windows machine, because you'll need to transfer them to your Pi, too it's almost.
Managing Certificates and Policies
The device certificate and private key are what your Raspberry Pi uses to authenticate itself when it tries to connect to AWS IoT Core. The root CA certificate helps your Pi trust AWS's servers. You'll copy these files to your Raspberry Pi, typically in a secure directory. It's pretty crucial to protect these files on both your Pi and your Windows machine, you know?
Next, you'll create an IoT policy in AWS. This policy defines what your Raspberry Pi is allowed to do within AWS IoT Core. For example, it might allow your Pi to publish data to a specific MQTT topic (like `my/pi/data`) and subscribe to another topic (like `my/pi/commands`). Always follow the principle of least privilege here: only give your device the permissions it absolutely needs, nothing more. This is a very smart security move, that.
Establishing Secure Connections
Now that your Pi and AWS are somewhat ready, we need to think about the actual secure path for communication. There are a few good ways to do this, each with its own benefits. It's about picking the right tool for the job, in a way.
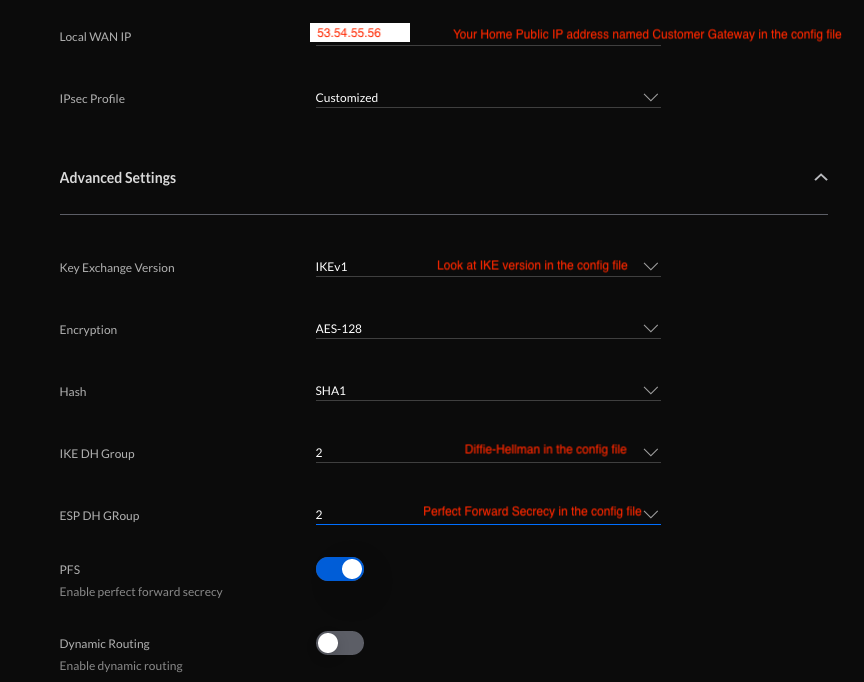
VPN for a Private Tunnel
A Virtual Private Network (VPN) creates a secure, encrypted tunnel between your Raspberry Pi and your AWS VPC. This means all traffic between them goes through this protected tunnel, making it very difficult for anyone to snoop on your data. You could set up a VPN server (like OpenVPN or WireGuard) on an EC2 instance within your VPC, and then install a VPN client on your Raspberry Pi. This is a really strong way to secure communications, you know?
When the VPN connection is active, your Raspberry Pi essentially becomes part of your private VPC network, even if it's physically far away. This allows it to communicate with other resources in your VPC as if it were right there. It's a very powerful setup for keeping things isolated and secure, as a matter of fact.
SSH Tunneling for Direct Access
SSH (Secure Shell) tunneling is another option, especially if you need direct access to your Raspberry Pi for troubleshooting or management. You can create an SSH tunnel from your Windows machine through a "jump box" or bastion host (a small, secure EC2 instance) in your public subnet, which then connects to your Raspberry Pi in a private subnet. This provides an encrypted path for your SSH connection. It's a bit more hands-on than a VPN but very effective for specific tasks, so.
While SSH tunneling is good for point-to-point secure access, it's generally not designed for continuous, broad network connectivity like a VPN. It's more for when you need to log in and do something specific. It's a pretty useful trick to have, though, you know?
AWS IoT Device Shadows and Jobs
For controlling your Raspberry Pi and getting its state, AWS IoT Device Shadows are a great, secure method. A device shadow is a persistent, virtual representation of your device in the cloud. Your Pi can update its shadow with its current state, and you can send desired state changes to the shadow, which the Pi will then pick up. This avoids direct, continuous connections and relies on MQTT, which is already secure with TLS. It's a very clever way to manage devices, honestly.
AWS IoT Jobs allow you to send commands to one or many devices for tasks like updating software or running scripts. This is also done securely through AWS IoT Core, leveraging the same authentication and authorization mechanisms. It's a really good way to manage your fleet of devices remotely and securely, you know?
Accessing From Your Windows Machine
Your Windows computer is your main interface for managing this whole system. You'll need some specific tools downloaded and set up to make the connections work. It's pretty straightforward, honestly, once you know what you need.
Installing Necessary Software
To connect to your Raspberry Pi via SSH, you'll want an SSH client. PuTTY is a very popular choice for Windows, or you could use the built-in SSH client that comes with Windows 10 and 11 (available through optional features). If you're using a VPN, you'll need the corresponding VPN client software for Windows (e.g., OpenVPN Connect or WireGuard client). These are pretty essential downloads, that.
You'll also interact with AWS through your web browser, using the AWS Management Console. For more advanced tasks, you might install the AWS Command Line Interface (CLI) on your Windows machine. The CLI lets you manage AWS services from your command prompt, which can be very powerful for automation. It's a good tool to have in your kit, you know?
Connecting via VPN or SSH
If you set up a VPN, you'll first connect your Windows machine to your VPC's VPN server. Once that connection is established, your Windows computer is virtually inside your VPC. From there, you can SSH directly to your Raspberry Pi's private IP address, as if it were on your local network. This is a very seamless way to access it.
If you're using SSH tunneling, you'll configure your SSH client (like PuTTY) to connect to your bastion host in AWS, and then forward a specific port to your Raspberry Pi's private IP and SSH port. This creates a secure tunnel for your SSH session. It's a little more involved to set up initially, but it works really well for direct access, too it's almost.
Best Practices for IoT Security
Building a secure connection isn't a one-time thing; it's an ongoing process. Following these best practices will help keep your IoT setup safe over time. It's about being smart and consistent, you know?
Following the Principle of Least Privilege
This means giving your Raspberry Pi, and any other AWS resources, only the minimum permissions they need to do their job, and nothing more. If your Pi only needs to publish data to one MQTT topic, don't give it permission to publish to all topics or to delete things. This limits the damage if a device is ever compromised. It's a very fundamental security concept, honestly.
Keeping Everything Updated
Regularly update your Raspberry Pi's operating system and software. Also, make sure your Windows operating system and any software you use for connecting (like SSH clients or VPN clients) are always up to date. Software updates often include important security patches that fix vulnerabilities. It's like patching holes in your security fence, basically.
Monitoring and Alerting
Set up monitoring for your AWS resources and, if possible, for your Raspberry Pi. AWS CloudWatch can monitor your VPC and IoT Core activities, and you can set up alerts for unusual behavior. For example, if a device tries to connect with invalid credentials many times, you'd want to know about it. Being aware of what's happening is a very big part of security, you know?
Strong Authentication and Encryption
Always use strong, unique passwords for any accounts, and wherever possible, use multi-factor authentication (MFA). For your Raspberry Pi, rely on SSH key pairs rather than just passwords. Make sure all data transmitted between your Pi, AWS, and your Windows machine is encrypted, which is typically handled by TLS/SSL protocols in AWS IoT Core and VPNs. This protects your data from being read by unauthorized parties. It's pretty essential, you know?
Common Questions About Secure IoT Connections
People often have similar questions when they start thinking about making their IoT projects more secure. Here are a few common ones, as a matter of fact.
Can I use a free VPN service to connect my Raspberry Pi to AWS?
While you technically could, it's generally not recommended for secure IoT connections. Free VPN services often have limitations, might log your data, or may not offer the level of security and reliability you need for sensitive IoT applications. Setting up your own VPN server within your AWS VPC gives you much more control and a higher level of trust, too it's almost.
What if my Raspberry Pi loses internet connection? How does it reconnect securely?
Good question! Your Raspberry Pi's IoT client software should be designed to handle connection drops gracefully. It typically includes logic to automatically try to reconnect to AWS IoT Core using its stored certificates and private key. AWS IoT Core is built to manage these intermittent connections. You might also implement retry mechanisms in your Pi's application code. It's pretty common for devices to go offline and come back, you know?
Is AWS IoT Core enough for security, or do I still need a VPC and VPN?
AWS IoT Core provides excellent security for the communication between your device and the cloud (authentication, authorization, data encryption in transit). However, a VPC and potentially a VPN add layers of network security. A VPC isolates your cloud resources, preventing unauthorized direct access to your backend systems. A VPN creates a private network tunnel for your device, which can be very helpful if your device needs to access other resources within your private AWS network that aren't exposed through IoT Core. They work together to build a very comprehensive security posture, honestly. Learn more about cloud security on our site, and link to this page for more details on secure networking.
Getting Started with Your Secure IoT Project
Building a secure connection for your remote IoT devices, like a Raspberry Pi, to AWS and accessing them from Windows might seem like a lot of steps. But by breaking it down into smaller parts, it becomes much more manageable. Remember, the goal is to create a system that's not just functional but also really safe from potential threats. It's about protecting your data and your devices, you know?
Start with the basics: get your Raspberry Pi ready, then set up your AWS VPC. After that, integrate with AWS IoT Core, and then choose your secure connection method. Always keep security in mind at every stage. You're building something pretty cool, and keeping it secure means it will serve you well for a long time. So, go ahead and give it a try!
This article was created on October 26, 2023, reflecting current best practices in secure IoT connectivity. We aim to keep our content fresh and
Securely Connect Remote IoT VPC Raspberry Pi AWS: A Comprehensive Guide

Securely Connect Your IoT Devices Using Raspberry Pi And AWS VPC

Remote IoT VPC: Raspberry Pi & AWS Setup Guide
