How To Make An Armorer In Minecraft: Your Guide To Powerful Gear
Getting the best protection in Minecraft can feel like a big deal, particularly when you are facing down some really tough creatures or exploring dangerous places. That's why knowing how to make an armorer in Minecraft is a skill that can truly change your gameplay. These special villagers are your go-to source for strong armor pieces, and they can even help you repair your worn-out gear.
So, if you are looking to keep yourself safe and sound during your adventures, setting up an armorer in your village is a pretty smart move. They offer a simple way to get some fantastic protective items without relying solely on finding them or hoping for lucky drops. It’s a bit like having a personal gear shop right there in your settlement, which is truly convenient.
This guide will walk you through everything you need to know about these helpful villagers, from getting them started to understanding their trades. We will cover what items you need, the steps to get them set up, and some clever ways to get the most out of their offerings. By the time we are done, you will be well on your way to equipping yourself like a true Minecraft champion, ready for whatever the blocky world throws at you, you know?
Table of Contents
- Understanding the Armorer Villager
- What You Need to Get Started
- Step-by-Step: Turning a Villager into an Armorer
- Leveling Up Your Armorer
- Getting the Best Trades: Tips and Tricks
- Frequently Asked Questions
- Equipping Your Minecraft Adventures
Understanding the Armorer Villager
An armorer villager, quite simply, is a villager who has taken on the job of crafting and selling armor. They are a pretty valuable friend to have in your Minecraft village, especially if you are serious about survival and exploration. Their main purpose is to trade armor pieces, from helmets to boots, and they can also offer some useful repair services for your damaged gear. This means you can keep your protective items in top shape without having to craft everything from scratch each time it breaks, which is a big help.
These villagers are easily recognized by their distinct brown apron and the black eye patch they wear, which is actually a piece of iron covering one eye. That unique look helps you spot them quickly among other villagers. You know, they are just there, ready to help you get the best protection available. Having one nearby really cuts down on the effort you put into getting ready for a big fight or a long journey into dangerous areas, so it's almost like they're a must-have.
The core of their work revolves around a specific block called the Blast Furnace. This block is their job site, and it is what allows them to take on the armorer profession. Without a Blast Furnace, a villager cannot become an armorer, no matter how much you might want them to. So, getting this special furnace ready is your very first step towards getting those amazing armor trades. It’s a bit like laying the foundation for a really important building, in a way.
What You Need to Get Started
To begin your journey of creating an armorer, you will need to gather a few specific items. The most important item is the job site block for the armorer, which, as mentioned, is the Blast Furnace. This is not just any furnace; it is a specialized block used for smelting ores, armor, and tools at double the speed of a regular furnace. Building one is pretty straightforward, but it does require some particular materials.
You will need three pieces of smooth stone, five iron ingots, and one regular furnace. Smooth stone is made by smelting cobblestone into stone, and then smelting the stone again. Iron ingots are obtained by smelting iron ore. The regular furnace is crafted using eight cobblestone blocks. So, you might need to do a bit of mining and smelting before you can even think about making your armorer, which is part of the fun, really.
Once you have all these components, you are ready to put together your Blast Furnace. This block is absolutely key because it is the item that will draw an unemployed villager to the armorer profession. Without it, your villagers will just keep doing whatever they were doing before, which probably isn't helping you get strong armor, you know? It's the central piece that makes everything else possible for your armorer villager.
Crafting the Blast Furnace
Crafting a Blast Furnace is a simple process once you have the necessary items. You will need a crafting table for this. Place the regular furnace in the center slot of the crafting grid. Then, surround the furnace with five iron ingots: one in each corner and one directly above the furnace. Finally, place the three smooth stone blocks in the bottom row of the crafting grid.
Once you arrange the items this way, the Blast Furnace icon will appear in the output slot. Simply take it, and you will have your armorer's job site block ready to go. It is a fairly simple recipe, so you should have no trouble making it, that's for sure. This is the item that holds the key to getting your armorer set up, and it is pretty satisfying to craft it yourself, you know?
This block is not only important for assigning the profession, but it is also quite useful for your own smelting needs. It smelts items much faster, saving you time when processing large amounts of ore or other materials. So, in a way, crafting a Blast Furnace helps you out twice: once for your armorer, and once for your own resource processing, which is a good deal.
Step-by-Step: Turning a Villager into an Armorer
With your Blast Furnace in hand, the next step is to find a suitable villager and get them to take on the armorer job. This process is quite easy, but there are a few things to keep in mind to make sure it goes smoothly. You want to pick the right villager, and place the job block in a spot where they can easily access it, and where it makes sense for your village layout, too.
The goal is to encourage an unemployed villager to claim the Blast Furnace as their job site. Once they do, they will change their appearance and start offering trades related to armor. It is a really cool transformation to watch, as they go from a plain villager to a specialist ready to help you with your gear. It feels like you are really building up your community, you know?
Remember that villagers need to be able to reach their job site block to perform their work and refresh their trades. If the block is too far away or blocked by something, they might not be able to claim it or use it effectively. So, pick a good spot, perhaps near other villager workstations, to keep things organized and efficient, which is usually a good idea in Minecraft.
Finding an Unemployed Villager
The first thing you need is an unemployed villager. These are villagers who do not have a specific profession. You can spot them because they will not have any special clothing; they will just wear plain brown robes. Baby villagers will also not have a profession, but they need to grow up into adults before they can take on a job. You can find unemployed villagers naturally spawning in villages, or you can breed them yourself.
If you are in an existing village, simply look for villagers without any unique outfits. They are usually wandering around, maybe chatting with other villagers or just standing about. If you are having trouble finding one, you might need to wait for a new villager to spawn or grow up. It is a bit of a waiting game sometimes, but they will show up eventually, that's for sure.
Another way to get unemployed villagers is by breaking the job site blocks of existing professionals. For example, if you break a Fletching Table, the fletcher who used it will become unemployed. However, be careful with this approach, as villagers will remember their last profession for a short time, and they will only change professions during certain times of the day. It is often easier to just find a truly unemployed one, in some respects.
Placing the Job Site Block
Once you have an unemployed villager, the next step is to place the Blast Furnace near them. It does not have to be right next to them, but it should be within a reasonable distance so they can pathfind to it. Villagers will usually claim the closest available job site block, so if there are other unclaimed job blocks nearby, your villager might choose a different profession instead.
Place the Blast Furnace on any solid block. You will typically see green particles appear around the villager and the Blast Furnace when they claim the job. This visual cue tells you that the villager has successfully taken on the armorer profession. Their appearance will also change, showing off their new, distinct armorer outfit. It is a pretty clear sign that you did it right.
If the villager does not claim the job right away, give it a moment. Villagers have a schedule, and they usually check for job sites during specific times of the Minecraft day, like during the morning. If it is nighttime or they are sleeping, they might not react immediately. Just be patient, and they will eventually pick up their new role, which is usually how it works.
Leveling Up Your Armorer
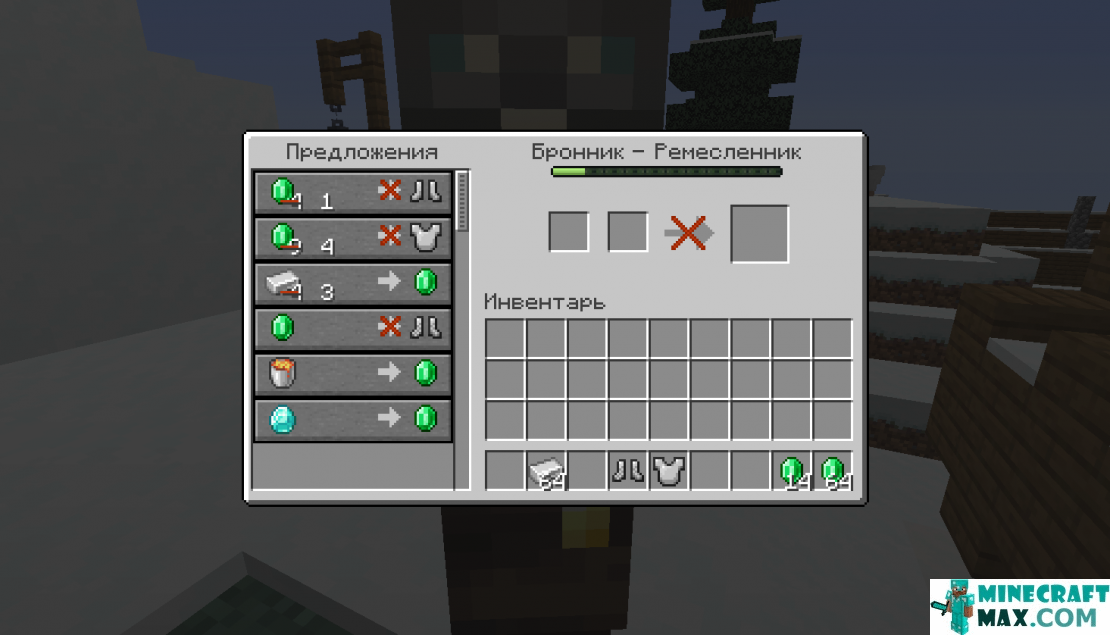
Once your villager becomes an armorer, they will start at the Novice level. To unlock more and better trades, you need to level them up. You do this by trading with them. Each trade you complete gives them experience points. As they gain enough experience, they will advance to the next level, unlocking new trade options. It is a straightforward process, really.
There are five levels for a villager profession: Novice, Apprentice, Journeyman, Expert, and Master. Each level brings a new set of trades, often including stronger armor pieces or more valuable enchantments. This means that the more you trade, the more useful your armorer becomes. It is a good idea to trade even if you do not immediately need the items, just to get them leveled up.
The trades an armorer offers can vary slightly from villager to villager, but they generally follow a pattern. You will typically trade emeralds for armor, or iron/gold/diamond for emeralds. Some of the best trades come at higher levels, so it is worth the effort to get your armorer to Master level. You might even find some really rare enchanted gear, which is pretty exciting.
Apprentice Level Trades
At the Apprentice level, your armorer will start to offer some basic armor pieces. These often include iron armor items like iron helmets, iron chestplates, iron leggings, and iron boots. They might also trade some iron ingots for emeralds, or vice versa. These early trades are useful for getting a basic set of protective gear, especially if you are just starting out or need quick replacements.
The prices at this level are usually quite fair, making it a good way to get a decent set of iron armor without spending too much time mining for iron. It is a step up from Novice, and you start to see the real benefit of having an armorer around. This is where your investment in setting them up really begins to pay off, so it's a good milestone.
You will need to complete several trades at the Novice level to get your armorer to Apprentice. Just keep an eye on their trade interface; it will show you how much experience they have gained. It is a steady climb, but each trade brings you closer to better gear, which is usually the goal for most players.
Journeyman Level Trades
Reaching the Journeyman level unlocks even better armor options. At this stage, armorers often begin to trade chainmail armor. While chainmail cannot be crafted directly by players, armorers can provide it. They might also offer gold armor pieces, which are less durable but can be useful for specific enchantments or simply for their unique look. It is a pretty neat way to get items you cannot make yourself.
You might also see trades for bells or shields at this level. Shields are incredibly useful for defense, making this a valuable trade for many players. The variety of trades expands, giving you more choices for equipping yourself or your friends. It is a good idea to check their inventory often, as their trades can sometimes surprise you with something useful.
To get to Journeyman, you will need to continue trading with your armorer. The experience needed increases with each level, but the rewards are well worth the effort. This is where your armorer starts to become a truly valuable asset in your village, offering more specialized items, you know?
Expert Level Trades
The Expert level is where armorers really start to shine. At this point, they often begin to offer diamond armor pieces. These are some of the strongest protective items in the game, and getting them from an armorer can save you a lot of diamond mining. They might also offer enchanted diamond armor, which is a fantastic bonus, giving you a head start on powerful gear.
Trades for iron blocks or diamond blocks might also appear, allowing you to convert your emeralds into valuable resources or vice versa. This level truly makes your armorer a central hub for high-end gear. It is a pretty big step up in terms of what they can provide, and it makes a huge difference in your survival chances.
Getting to Expert level requires a significant amount of trading, but the payoff is immense. Having access to diamond armor and enchanted items makes preparing for dangerous expeditions much easier. It is a good feeling when your armorer starts offering these top-tier items, you know, like they are really helping you out.
Master Level Trades
The Master level is the highest profession level for a villager, and it unlocks the best possible trades from your armorer. At this level, they will offer highly enchanted diamond armor pieces, often with powerful enchantments like Protection, Unbreaking, or Mending. Getting a Mending armorer is a dream for many players, as it allows you to repair your gear using experience points, making it last almost forever.
These top-tier trades can be expensive, but the quality of the armor is unmatched. You might find full sets of enchanted diamond armor, ready to equip you for the toughest challenges in Minecraft. This is truly the pinnacle of what an armorer can provide, and it makes them an invaluable part of your base. It is pretty amazing what they can offer when they reach this point.
Reaching Master level takes a lot of trading, but the effort is absolutely worth it. Having a Master armorer means you have a consistent source of the best armor in the game, making your adventures much safer and more enjoyable. It is a bit like having a secret weapon in your village, always ready to equip you for battle, that's for sure.
Getting the Best Trades: Tips and Tricks
While armorers offer great trades, there are ways to make them even better. Villager trading mechanics allow for discounts under certain conditions. Knowing these tricks can save you a lot of emeralds and get you even more powerful gear for less. It is all about being clever with how you interact with them, you know?
One of the most well-known methods for getting discounts is curing a zombie villager. If you find a zombie villager, you can cure them by throwing a Splash Potion of Weakness at them and then feeding them a golden apple. Once cured, they will turn back into a regular villager and offer significantly reduced prices for all their trades, often for just one emerald per item. This discount is permanent and applies to all their future trades, which is pretty amazing.
Another way to get temporary discounts is by successfully defending a village from a raid. If you defeat a raid, villagers will offer you discounts for a short period as a sign of gratitude. This is a good incentive to protect your village, as it directly benefits your trading. You can also get discounts if you have a good reputation in the village, which improves by trading often and not harming villagers. These little tricks can really add up to big savings.
Remember that villagers will only restock their trades twice a day, during their work schedule. If you trade all their available items
How to Make an Armorer Villager in Minecraft (Best Tutorial!) - YouTube
How to make Armorer in Minecraft | Minecraft-Max.com

How To Make an Armorer Villager in Minecraft | Full Guide! - YouTube
