Dryer Exhaust Repair: A Homeowner's Guide To Safety And Efficiency
A dryer is a truly helpful appliance, making laundry day so much simpler, yet it relies on a very specific process to get your clothes dry. It takes in electricity, turns it into heat, and then pushes that warm air through your wet clothes, gathering up moisture as it goes. This whole system, in a way, is like a machine that processes raw, wet clothes into the usable information of dry, fluffy items. Just as a data processing system needs clear inputs and defined outputs to work right, your dryer needs a clear path for the moist, warm air to leave your home.
When this vital exhaust system starts to have problems, it can throw off the whole operation. You might notice your clothes taking a very long time to dry, or perhaps your energy bills start to creep up. What's more, a blocked or broken dryer exhaust can create real safety concerns, as a matter of fact. It's not just about convenience; it's about keeping your home and family safe from potential hazards, like fires.
Learning a little about dryer exhaust repair can save you a good bit of worry and expense. Many common issues are things you can sort out yourself with just a few simple tools. This guide will walk you through what to look for, how to fix typical problems, and when it’s best to get help. We'll help you understand how to keep your dryer working its best, so you can enjoy consistently dry clothing, similar to how a well-maintained system provides valuable insights from raw data.
Table of Contents
- Understanding Your Dryer Exhaust System
- Identifying the Root of the Problem
- Getting Ready for Repair
- Step-by-Step Dryer Exhaust Repair
- Preventative Steps for a Long-Lasting System
- When to Call a Professional
- Frequently Asked Questions (FAQs)
Understanding Your Dryer Exhaust System
Your dryer, whether it's one you got from Lowe's, Amazon, or Best Buy, relies on a simple yet important system to get rid of hot, moist air. This system usually includes a flexible hose right behind the dryer, which connects to a more rigid duct running through your wall or floor, and then finally exits your home through an outside vent. It's a bit like a pipeline for air, moving the "waste" from the drying process out of your living space. If any part of this pipeline gets a problem, the whole operation slows down, or stops working as it should, you know?
Why a Healthy Exhaust is Important
A well-working dryer exhaust system does more than just help your clothes get dry. For one thing, it keeps your home safer. Lint, a very fine and fluffy material, comes off your clothes during drying. If this lint builds up in the exhaust duct, it can become a fire risk, especially since the air moving through is quite hot. Actually, many home fires start because of clogged dryer vents, so this is a serious concern. Beyond safety, a clear exhaust helps your dryer run more efficiently, which means your clothes dry faster and your energy bills stay lower. A dryer that works well also tends to last longer, which is good news for your wallet.
Common Signs of Exhaust Trouble
It's usually pretty clear when your dryer exhaust system needs some attention. One of the most common signs is that your clothes take much longer than usual to dry, sometimes needing multiple cycles. You might also notice your dryer feels very hot to the touch during or after a cycle, or that the laundry room feels unusually humid or warm. Another big clue is a burning smell, which often points to lint buildup getting too hot. If you see a lot of lint around the dryer or outside the vent, that's also a pretty good indication that something needs checking. Sometimes, the external vent flap might not open when the dryer is running, which is a clear sign of a blockage, you see.
Identifying the Root of the Problem
Finding out what's causing your dryer exhaust problem is the first step toward fixing it. It's a bit like diagnosing an issue in a data system; you look at the inputs and outputs to see where the process is failing. Most problems fall into a few main categories, and once you figure out which one it is, the solution becomes much clearer. So, let's look at the usual suspects.
Clogged Vents: The Usual Suspect
Lint buildup is by far the most frequent reason for dryer exhaust issues. Every time you dry clothes, tiny bits of fabric, or lint, come off. While your dryer's lint trap catches most of it, some still escapes into the exhaust duct. Over time, this lint collects, sticking to the inside of the ductwork and slowly narrowing the path for air. This is why clothes take longer to dry, and it also creates that fire risk we talked about. It's a very common problem, and frankly, it's often overlooked by homeowners until a noticeable issue pops up. Keeping your lint trap clean is a good start, but the vent itself needs attention too.
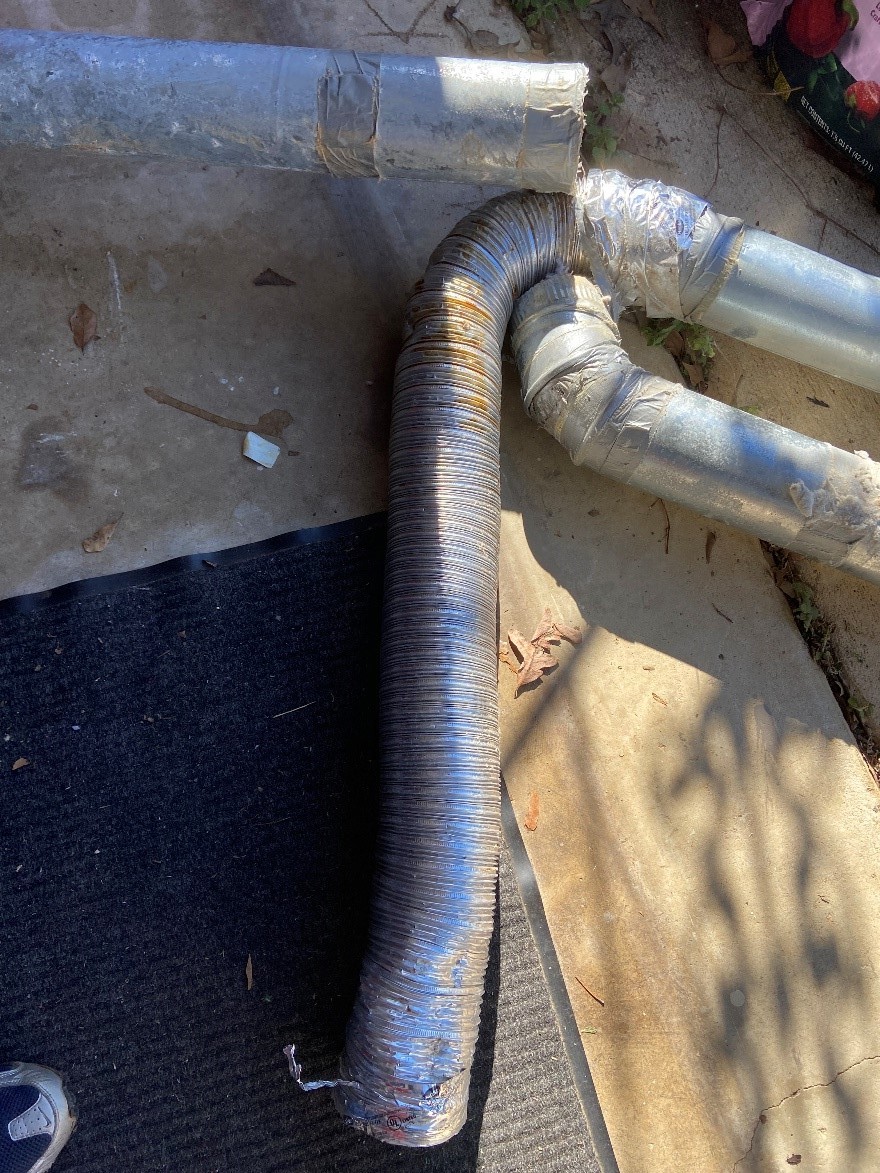
Damaged or Improper Ducting
Sometimes, the problem isn't just lint; it's the ductwork itself. The flexible hose right behind your dryer can get crushed if the dryer is pushed too close to the wall, or it might get kinks in it. This squashes the pathway for air, reducing airflow significantly. Also, some older homes or DIY installations might use plastic or vinyl flexible ducts, which are actually not recommended for dryers. These materials can sag, collect lint more easily, and are more likely to catch fire if lint ignites. Rigid metal ducts are much safer and more efficient, as a matter of fact. If your ductwork looks saggy, torn, or is made of plastic, it's a likely culprit.
External Vent Blockages
The very end of your dryer exhaust system, the vent cover on the outside of your home, can also become blocked. This might happen because of lint buildup right at the opening, or sometimes, small animals or birds might build nests inside the vent hood. Leaves, dirt, or other outdoor debris can also collect there, especially if the vent cover is damaged or missing its protective flap. It's easy to forget about this part of the system since it's outside, but it's a pretty important point of exit for all that hot, moist air. If the outside flap doesn't open freely when the dryer is running, or if you can see debris, that's your sign.
Getting Ready for Repair
Before you start any work on your dryer exhaust, it's really important to prepare properly. This means making sure you're safe and that you have all the necessary items on hand. You don't want to get halfway through a job only to realize you're missing a tool or a part. A little planning goes a long way, and frankly, it makes the whole process much smoother. So, let's get organized.
Safety First, Always
This is probably the most important step. Before you touch anything, you absolutely must unplug your dryer from the electrical outlet. If it's a gas dryer, you'll also need to turn off the gas supply to the appliance. Gas dryers are a bit more complex, and if you're not comfortable working with gas lines, it's genuinely best to call a qualified professional for those. For electric dryers, simply pulling the plug removes the risk of electrical shock. Wearing work gloves can protect your hands from sharp edges on ductwork or accumulated grime, and safety glasses are a good idea to keep dust and debris out of your eyes, you know.
Tools and Materials You Might Need
Having the right gear makes the job much easier. Here's a list of things you might want to gather:
- A screwdriver (Phillips and flathead, just in case)
- Duct clamps or zip ties (to secure the hose)
- Foil tape (for sealing metal duct connections, it's pretty strong)
- A new dryer vent hose (if yours is damaged or made of plastic/vinyl)
- A long vent cleaning brush kit (these often come with extensions)
- A vacuum cleaner (with a hose attachment)
- Work gloves and safety glasses
- A flashlight (to see into dark spaces)
- A utility knife or scissors (for cutting ducting, if needed)
Having these items ready before you start will help you move through the repair steps without interruption. Sometimes, you might find you need something else once you get going, but this list covers most common dryer exhaust repair situations, actually.
Step-by-Step Dryer Exhaust Repair
Now that you're prepared, it's time to get to the actual work. This process is fairly straightforward for most homeowners, but it does require a bit of patience and attention to detail. Remember, the goal is to create a clear, unobstructed path for that hot, moist air to leave your home. So, let's walk through the steps one by one, making sure each part of the "data flow" is working as it should.
Disconnecting and Inspecting
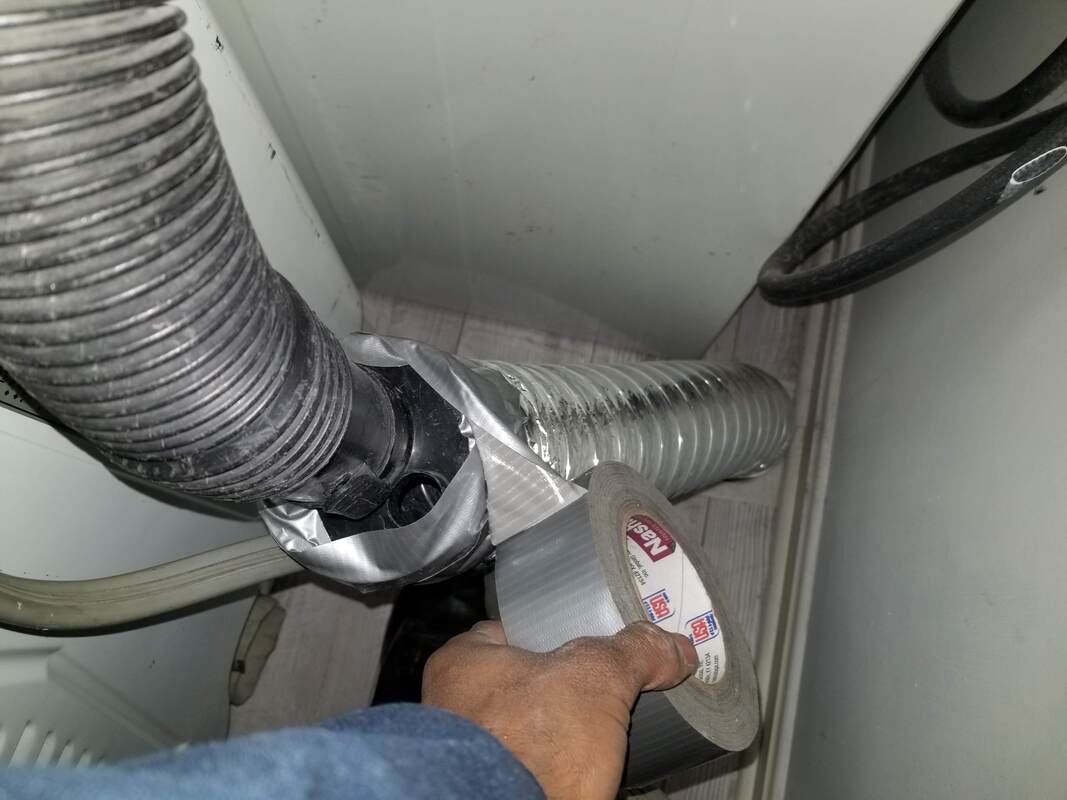
First, carefully pull your dryer away from the wall to give yourself enough room to work behind it. Be gentle so you don't damage the power cord or gas line. Once you have space, locate the dryer exhaust hose. It's usually a flexible tube connecting the back of your dryer to a vent opening in the wall or floor. You'll likely see clamps holding it in place. Use your screwdriver to loosen these clamps and carefully pull the hose away from both the dryer and the wall connection. Now, take a good look at the hose itself. Is it crushed, torn, or full of kinks? Is it made of flimsy plastic or vinyl? If so, it's probably best to replace it entirely, as a matter of fact. Also, shine your flashlight into the dryer's exhaust port and the wall vent opening to see if you can spot any large blockages right there.
Cleaning the Vent Path
This is often the most satisfying part of the repair, as you'll see a lot of lint come out. Start by using your vacuum cleaner's hose attachment to suck out any loose lint from the dryer's exhaust port and the wall opening. Then, grab your long vent cleaning brush kit. Push the brush into the wall duct, extending it as far as it will go. Rotate the brush and pull it back out, collecting all the lint. You might need to do this several times, adding extensions to the brush as you go, to clean the entire length of the ductwork that runs through your walls. It's amazing how much lint can build up in there, you know. Make sure to clean the flexible hose you just removed too, or if you're replacing it, just set it aside.
Repairing or Replacing Ductwork
If your old flexible hose was damaged or improper, now is the time to put in a new one. Opt for rigid or semi-rigid metal ducting if possible, as it's much safer and more efficient. If you're using a flexible metal hose, make sure it's rated for dryer use and avoid crushing it when you push the dryer back. Cut the new ducting to the correct length with a utility knife or tin snips, making sure it's long enough to connect easily but not so long that it sags or creates excessive bends. Use new duct clamps to secure the hose tightly to both the dryer's exhaust port and the wall vent opening. For any rigid metal duct connections in the wall, seal the seams with foil tape, not regular duct tape, as foil tape handles heat better and provides a truly good seal, you see.
Checking the Outside Vent
Once you've dealt with the inside connections, head outside to where your dryer vent exits your home. Inspect the vent cover. Is it clogged with lint, leaves, or even a bird's nest? Gently remove any debris you find. Make sure the flap on the vent cover opens freely. Sometimes, these flaps can get stuck with lint or simply break. If the vent cover is damaged or missing its flap, it's a good idea to replace it. You can usually find these at hardware stores like Walmart or Lowe's. A clear external vent allows for maximum airflow and helps prevent future blockages. It's a rather small part, but it plays a big role.
Reconnecting and Testing
With all the cleaning and repairs done, it's time to put everything back together. Carefully push your dryer back into place, making sure not to crimp or crush the newly installed or cleaned exhaust hose. Double-check that all connections are secure and that the clamps are tight. Then, plug your dryer back into the electrical outlet (and turn on the gas if it's a gas dryer). Run a small load of damp towels or a single wet item on a high heat setting. Go outside and observe the external vent. You should see a strong stream of warm, moist air coming out, and the vent flap should open fully. Inside, your dryer should feel less hot, and your clothes should dry much faster than before. If everything seems to be working well, you've successfully completed your dryer exhaust repair! Learn more about maintaining your home appliances on our site.
Preventative Steps for a Long-Lasting System
Fixing your dryer exhaust is a great step, but keeping it in good shape means taking a few ongoing preventative measures. Think of it as regularly processing your data to ensure continued valuable insights. A little effort now can prevent bigger problems and more costly repairs down the line, and it will help your dryer, like those Maytag® dryers or Samsung models you can find, keep performing at its best. So, let's talk about what you can do to maintain that clear path.
Regular Cleaning Habits
The simplest and most important thing you can do is to clean your dryer's lint trap after every single load. This catches most of the lint before it even gets into the exhaust duct. Beyond that, it's a good idea to clean the entire dryer exhaust duct at least once a year, or more often if you use your dryer a lot, or if you notice clothes taking longer to dry. This includes the flexible hose behind the dryer and the rigid ductwork inside your walls. You can use a vent cleaning brush kit for this. Also, don't forget to check and clean the outside vent cover regularly, perhaps every few months, to make sure it's free of lint, debris, or any unwelcome visitors like birds, you know.
Choosing the Right Materials
When it comes to your dryer's exhaust hose, the material truly matters. Always use rigid metal ducting or semi-rigid aluminum ducting. These materials are fire-resistant, much more durable, and create less friction for lint to stick to compared to plastic or foil accordion-style hoses. Avoid using plastic or vinyl ducts at all costs, as they are a significant fire hazard and can sag, creating lint traps. When installing, make sure the duct runs as straight as possible with minimal bends, as bends can restrict airflow and encourage lint buildup. If bends are necessary, use wide, sweeping turns rather than sharp 90-degree angles. This helps the air flow smoothly, a bit like a well-organized data stream, so to speak.
When to Call a Professional
While many dryer exhaust issues are DIY-friendly, there are times when it's genuinely best to bring in an expert. If you have a gas dryer and suspect an issue with the gas line or the dryer's internal components, always call a professional. Working with gas can be quite dangerous if you don't have the right training. Similarly, if your dryer exhaust duct runs through a very long or complex path, perhaps through multiple floors or hard-to-reach areas, a professional has the specialized tools and experience to clean or repair it safely and effectively. If you've tried the basic steps and your dryer is still not drying properly, or if you're just not comfortable doing the repair yourself, a professional can properly diagnose and fix the problem, offering peace of mind. For more insights, explore other ways to keep your laundry setup running smoothly, and link to this page explore other ways to keep your laundry setup running smoothly.
Frequently Asked Questions (FAQs)
How much does it cost to repair a dryer exhaust?
The cost to repair a dryer exhaust can vary quite a bit, depending on what needs doing. If it's just a simple cleaning you do yourself, the cost is basically just for a vent brush kit, which might be around $20-$40. If you need to replace a flexible hose, that could be another $15-$30 for the part. If you hire a professional for a cleaning, it typically runs anywhere from $100 to $200. For more complex repairs, like replacing long sections of rigid ductwork or dealing with wall damage, the cost could go up to several hundred dollars, you know. It truly depends on the specific problem and whether you do it yourself or hire someone.
Can I replace my dryer vent hose myself?
Yes, for most people, replacing a dryer vent hose is a very manageable DIY project. It involves pulling the dryer away from the wall, loosening a few clamps, removing the old hose, attaching a new one with new clamps, and then pushing the dryer back into place. The main thing is to make sure you get the right type of hose (rigid or semi-rigid metal is best) and that you connect it securely without kinks. It's a pretty straightforward process that many homeowners can handle without much trouble, actually.
What type of hose should I use for a dryer vent?
For a dryer vent, you should always use rigid metal ducting or semi-rigid aluminum ducting. These materials are durable, fire-resistant, and provide the best airflow. Avoid using flexible plastic or vinyl hoses, as they are prone to sagging, collecting lint, and pose a significant fire risk. While flexible foil-type hoses are better than plastic, they can still easily crush or kink, so rigid options are always the top choice for safety and efficiency. This is a very important safety consideration, as a matter of fact. For more information on dryer fire safety, you can check resources from organizations like the National Fire Protection Association.

Professional Dryer Vent Cleaning in Central and Northern Virginia | The
Dryer Vent Repair Service | Repair Now, Save
Dryer Vent Repair Charlotte NC - Dryer Vent Cleaning in Charlotte, NC
