Keep Your Ice Fresh: A Simple Guide To Frigidaire Ice Maker Cleaning Today
Have you ever grabbed a handful of ice, only to find it tastes a little off, or maybe even has a strange smell? It's a common issue, you know, and one that many folks experience without quite realizing the cause. Your Frigidaire ice maker, a very handy part of your kitchen setup, can actually get quite dirty over time, affecting the quality of your ice. Just like any other appliance, it needs a bit of care to keep things running smoothly and, well, to keep your drinks tasting great.
Thinking about how often we rely on ice for cold drinks, especially when it's warm outside, it's pretty clear why keeping that ice pure matters. A clean ice maker means fresh-tasting ice for your family and guests, and it also helps your appliance work better, longer. This guide is all about showing you how to give your Frigidaire ice maker the good cleaning it deserves, making sure every cube is as crisp and clean as you'd want it to be, you know?
We'll walk through the simple steps, so you can feel confident about tackling this important kitchen chore. After all, Frigidaire, a well-known American brand and a part of the multinational company Electrolux, really aims to shape living for the better, offering solutions for more enjoyable experiences in your home. And fresh, clean ice is certainly a part of that, isn't it? So, let's get your ice maker sparkling!
Table of Contents
- Why Clean Your Frigidaire Ice Maker?
- What You Will Need
- Step-by-Step Cleaning Guide
- How Often Should You Clean?
- Common Ice Maker Issues and How Cleaning Helps
- Frequently Asked Questions
Why Clean Your Frigidaire Ice Maker?
You might be wondering, "Why bother with this at all?" Well, a very common issue, as mentioned in "My text" about finding a block of ice in the bottom of a fridge or water accumulating, can sometimes link back to ice maker performance. A dirty ice maker can lead to all sorts of problems beyond just odd-tasting ice. It can slow down ice production, or even make your ice cubes look cloudy, which is not really what anyone wants, is it?
Over time, minerals from your water can build up inside the ice maker's parts. This mineral scale can clog lines and coat surfaces, making it harder for the machine to do its job. Also, little bits of food or dust can get into the ice bin, leading to unpleasant smells or even mold. Keeping it clean is just a good habit for appliance health, honestly.
A clean ice maker means a healthier home environment and less chance of needing a repair down the line. It's about keeping your appliances working their best, which is something Frigidaire, a company committed to quick and effective solutions, would certainly agree with. Regular cleaning helps prevent those annoying little issues before they become big headaches, you know?
What You Will Need
Before you start, gather up a few simple things. You won't need anything too fancy, just some basic cleaning supplies you probably already have around the house. This makes the whole process pretty straightforward, actually.
- Mild Dish Soap: Just a little bit for gentle cleaning.
- White Vinegar: This is your secret weapon for mineral deposits, it really is.
- Clean Cloths or Sponges: A couple of soft ones will do the trick.
- Warm Water: For rinsing and mixing.
- Soft Brush (optional): Something like a clean toothbrush can help get into small spots.
- Bucket or Large Bowl: To catch water and for soaking parts.
- Towels: For spills and drying.
Having everything ready beforehand just makes the cleaning go so much smoother. You won't have to stop halfway through to find something, which is always a plus, right?
Step-by-Step Cleaning Guide
Alright, let's get down to the actual cleaning. This process is fairly simple, but taking your time with each step will really pay off in the end. We're going to break it down into manageable parts, so you can follow along easily.
Prepare for Cleaning
First things first, safety and preparation are key. You want to make sure the ice maker is completely off before you start poking around inside. This is a very important step, so don't skip it.
- Turn Off the Ice Maker: Locate the power switch for your ice maker. This is often a small wire arm that you can lift up, or a button. Some models might require you to turn off the water supply to the fridge itself. If you're unsure, it's always a good idea to unplug the refrigerator from the wall outlet. This ensures no water will flow and no parts will move while you're working, you know?
- Empty the Ice Bin: Remove all the ice from the ice storage bin. You can either throw it out or, if it seems clean enough, put it into a cooler for later use. This bin will be the first thing we clean thoroughly, so getting it out of the way is the natural first step.
- Locate the Water Filter (if applicable): If your Frigidaire refrigerator uses a water filter, like the one mentioned in "My text" where water accumulates if the filter is used, it's a good time to check its condition. A clean filter helps ensure the water going into your ice maker is already good. You might want to consider replacing it if it's old, you know, as part of your overall maintenance.
Taking these initial steps makes the rest of the cleaning process much safer and more efficient. It’s a bit like preparing your workspace before starting any project, which is always a smart move, isn't it?
Empty and Clean the Ice Bin
The ice bin is where all your ice sits, so it can collect dust, crumbs, and other little bits over time. Giving it a good scrub is pretty important for fresh-tasting ice.
- Remove the Bin: Carefully pull the ice bin out of the freezer compartment. Some bins might just slide out, while others might lift up slightly before coming out. Be gentle so you don't crack anything, as these parts can be a bit delicate.
- Wash with Soap and Water: In your sink, wash the ice bin with warm water and a little bit of mild dish soap. Use a clean cloth or sponge to scrub all surfaces, inside and out. Pay attention to any sticky spots or discoloration. This step removes surface grime and any lingering odors, which is very helpful.
- Rinse Thoroughly: Rinse the bin completely under running water. You want to make sure there's no soap residue left behind, because that would certainly make your ice taste like soap, wouldn't it?
- Dry Completely: This is a crucial step. Let the ice bin air dry completely, or dry it with a clean, lint-free towel. Any moisture left in the bin can freeze and cause problems, or even encourage mold growth later on. So, really make sure it's bone dry.
A sparkling clean ice bin is the first sign of a well-maintained ice maker. It’s a rather satisfying feeling to see it clean, isn't it?
Clean the Ice Maker Components
Now, we move on to the actual ice-making parts. This is where the mineral buildup usually happens, so a good cleaning here is key. You'll be using vinegar for this part, which is a fantastic natural cleaner for hard water spots.
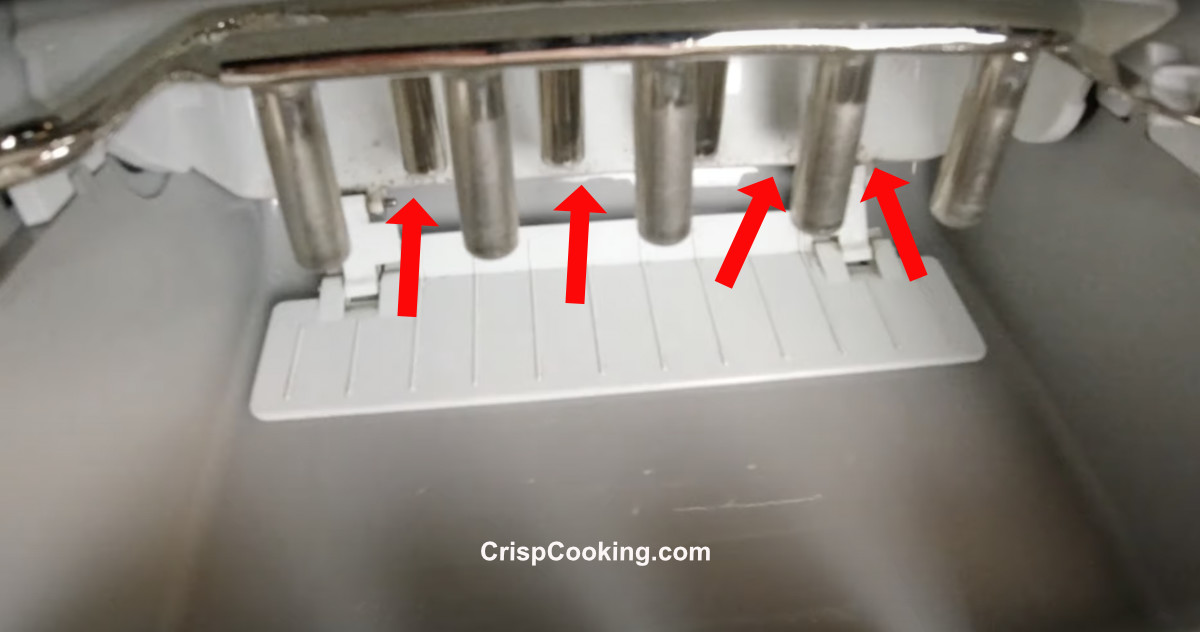
- Inspect the Ice Maker Unit: Look at the ice maker unit itself, the part that makes the ice. You'll see the ice mold, the arm that pushes the ice out, and maybe some sensors. Look for any visible mineral deposits, discoloration, or any strange gunk. Sometimes, you might even see a bit of mold if it's been a while since the last cleaning, you know?
- Prepare the Cleaning Solution: Mix equal parts white vinegar and warm water in your bucket or a spray bottle. This solution is gentle yet effective for dissolving mineral buildup. For instance, if you use two cups of water, add two cups of vinegar.
- Wipe Down Surfaces: Dip a clean cloth into the vinegar solution and carefully wipe down all accessible surfaces of the ice maker unit. This includes the ice mold (where the water freezes), the ejector arm, and the walls of the compartment. For tight spots, a soft brush, like a clean toothbrush, can be very useful. Be gentle around any wires or small moving parts, obviously.
- Address Stubborn Deposits: For heavier mineral buildup, you can soak a cloth in the vinegar solution and lay it over the affected area for about 10-15 minutes. The vinegar will work to break down the scale, making it easier to wipe away. You might need to gently scrub a little, but typically the vinegar does most of the work, you know?
- Clean the Water Inlet: The small tube where water enters the ice maker can also get clogged. If you can reach it safely, gently wipe around the opening with a vinegar-dampened cloth. This helps ensure water flows freely, which is pretty important for ice production.
This step really gets to the heart of the cleaning. Taking your time here will make a big difference in the taste and quality of your ice. It's about being thorough, you know?
Flush the System
After cleaning with vinegar, it's absolutely vital to flush out the system to remove any vinegar taste or remaining debris. This step ensures your first batch of ice is clean and pure.
- Restore Power and Water: Plug your refrigerator back in or turn the ice maker's power switch back on. Make sure the water supply to the fridge is also turned back on, if you disconnected it. The ice maker will typically go through a cycle to fill with water and start making ice again.
- Discard the First Few Batches of Ice: The first one or two batches of ice produced after cleaning might still have a faint vinegar smell or taste, or even contain some loosened mineral bits. It's really important to throw these batches away. Let the ice maker produce new ice, then discard it, and repeat this process at least once more. This ensures all traces of the cleaning solution are gone, you know?
- Repeat if Necessary: If you still notice any odd smells or tastes after discarding a few batches, just repeat the flushing process. It might take a few more cycles for everything to clear out completely. It's better to be safe than sorry when it comes to what you're putting in your drinks, isn't it?
Flushing is the final touch that makes all your hard work worthwhile. It means you can enjoy truly fresh ice without any lingering cleaning solution flavors, which is pretty much the goal here.
Reassemble and Test
Once you've flushed the system and are happy with the cleanliness, it's time to put everything back together and make sure it's all working as it should.
- Reinstall the Ice Bin: Carefully slide the clean and dry ice bin back into its spot in the freezer. Make sure it's seated properly so it can catch the ice as it's made.
- Check for Proper Functioning: Listen for the sounds of the ice maker refilling with water and starting its cycle. Within a few hours, you should start to see new ice cubes forming.
- Taste Test: Once a fresh batch of ice has been produced and you've discarded the initial "flushing" batches, try a cube. It should taste clean and fresh, without any strange flavors. This is the real test, obviously!
Seeing your Frigidaire ice maker producing perfectly clear, fresh-tasting ice again is very rewarding. It means your cleaning efforts have truly paid off, and you've got one less thing to worry about in the kitchen, which is always nice, isn't it?
How Often Should You Clean?
So, how often should you go through this cleaning routine? Well, it really depends on a few things, like how often you use your ice maker and the quality of your water. If you live in an area with very hard water, you might need to clean it more frequently.
Generally, a good rule of thumb is to clean your Frigidaire ice maker at least once every six months. If you use it a lot, or if you start noticing any funny tastes or smells, then cleaning it every three months would be a better idea. It's a bit like changing your water filter; regular maintenance keeps everything in tip-top shape. You can learn more about appliance care on our site, which often goes hand-in-hand with good ice maker habits.
Keeping a regular schedule for cleaning helps prevent major buildup and keeps your ice tasting great all the time. It's a small task that yields a very noticeable benefit, honestly.
Common Ice Maker Issues and How Cleaning Helps
Many common problems with ice makers can actually be traced back to a lack of cleaning. For example, if your ice crusher stopped working and is dispensing only whole ice cubes, as "My text" mentions for another appliance, a clogged or dirty ice maker component could certainly be a reason. Cleaning helps address these underlying issues.
- Bad Tasting or Smelling Ice: This is the most obvious sign that your ice maker needs a good cleaning. Mineral buildup, mold, or bacteria can cause these unpleasant flavors. A thorough cleaning with vinegar will usually clear this right up, you know.
- Cloudy Ice Cubes: If your ice isn't crystal clear, it's often due to mineral deposits in the water lines or on the ice mold itself. Cleaning helps remove these deposits, allowing for clearer ice production.
- Slow Ice Production: Clogged water lines or a heavily scaled ice mold can slow down the entire ice-making process. By cleaning these parts, you help the water flow freely and the ice maker cycle more efficiently, which is pretty important for consistent ice.
- Ice Clumping Together: Sometimes, if there's too much moisture or debris in the bin, ice cubes can stick together. A clean, dry bin helps prevent this, making it easier to scoop out ice.
Addressing these issues through regular cleaning saves you from bigger headaches, like needing to call for service. Frigidaire is committed to getting you quick and effective solutions, and sometimes, the solution is simply a good cleaning from you, the owner. It's a proactive step that keeps your appliance running smoothly, and you can find more tips on keeping your Frigidaire appliances in top shape by exploring this page .
Frequently Asked Questions
How often should I clean my Frigidaire ice maker?
You should aim to clean your Frigidaire ice maker every six months, at a minimum. If you use it very often, or if your home has hard water, cleaning it every three months would be a better choice. This helps keep mineral buildup and odors away, so your ice always tastes fresh, you know.
What can I use to clean my Frigidaire ice maker?
For cleaning your Frigidaire ice maker, a simple solution of equal parts white vinegar and warm water works very well. You can also use a little bit of mild dish soap for cleaning the ice bin. Avoid harsh chemicals or abrasive cleaners, as they could damage the parts or leave harmful residues, which is obviously not what you want.
Why does my ice taste bad from my Frigidaire ice maker?
If your ice tastes bad, it's usually a sign that your ice maker needs a good cleaning. Mineral deposits from your water, mold, or bacteria can build up inside the unit and affect the taste. Sometimes, old ice in the bin can also absorb odors from the freezer. Cleaning the unit and regularly emptying the bin should fix this problem, honestly.
Keeping your Frigidaire ice maker clean is a pretty simple way to ensure you always have fresh, pure ice for all your drinks. It's a small bit of maintenance that makes a big difference in your daily living experience, and that's something Frigidaire, a brand focused on superior performance and enjoyable living, would certainly approve of. So, go ahead and give your ice maker the attention it deserves, starting today!
How to Clean Frigidaire Ice Maker: STEP-BY-STEP GUIDE

How To Clean Frigidaire Ice Maker? - IceMakerBasics
How to Clean a Frigidaire Ice Maker - 20 Simple Steps with Pictures (2025) - Crisp Cooking
