Mastering The Z In Cursive: Your Guide To A Graceful Finish
Have you ever felt a little stuck trying to get that perfect "z in cursive" just right? It's a common feeling, you know. Many folks find this particular letter a bit of a puzzle, whether they're just starting out with handwriting or looking to polish up their penmanship. It’s like trying to get your website's header to stay put on every page; you want it to look good and be there consistently, every time.
This little letter, the 'z', holds a special spot in the world of joined-up writing. It’s often one of the last letters people truly feel confident about, and for good reason. It has some unique curves and loops that can sometimes feel a little tricky, a bit like aligning sushi in the center of an onigiri – you want it just so. But with a few pointers and some practice, you can certainly make your 'z' look quite elegant.
Learning how to write a smooth "z in cursive" can really make your handwriting stand out. It adds a touch of finesse, making your written words flow nicely. So, if you've been wondering how to get that double-struck capital ℝ symbol into an equation or how to fix a blurry text issue after zooming, think of this as a similar quest for clarity and precision, but for your handwriting. It's about getting every detail to appear just as you intend.
Table of Contents
- The Z in Cursive: A Brief Look Back
- Getting Started with the Lowercase Z in Cursive
- Tackling the Capital Z in Cursive
- Why the Cursive Z Matters Today
- Practice Makes It Better
- Frequently Asked Questions About Z in Cursive
- Putting It All Together
The Z in Cursive: A Brief Look Back
The history of cursive writing, you know, goes back quite a way. People started joining letters together to write quicker, making things more efficient. The letter 'z', being one of the less used letters in English, sometimes has a few different looks depending on the style of cursive you are learning. This means, in a way, it’s a bit like different versions of JavaScript code for a quiz game timer; they all do the job, but their exact structure can vary. This variety is actually quite interesting.
For a long time, learning cursive was just part of school for almost everyone. It was how you wrote letters, signed documents, and kept notes. The "z in cursive" always presented its own small challenge, a little like trying to get an animation to change smoothly without snapping back sharply. You wanted that flow, that natural movement. The way it connects to other letters is a pretty big part of its design, too.
Even though we use keyboards a lot these days, there is still a real charm and a practical side to knowing cursive. It connects us to older ways of writing and can even help our brains process information a bit differently. So, understanding how to form letters like 'z' is not just about handwriting; it's about keeping a skill alive, you know, a bit like keeping old coding methods in mind even with new ones around.
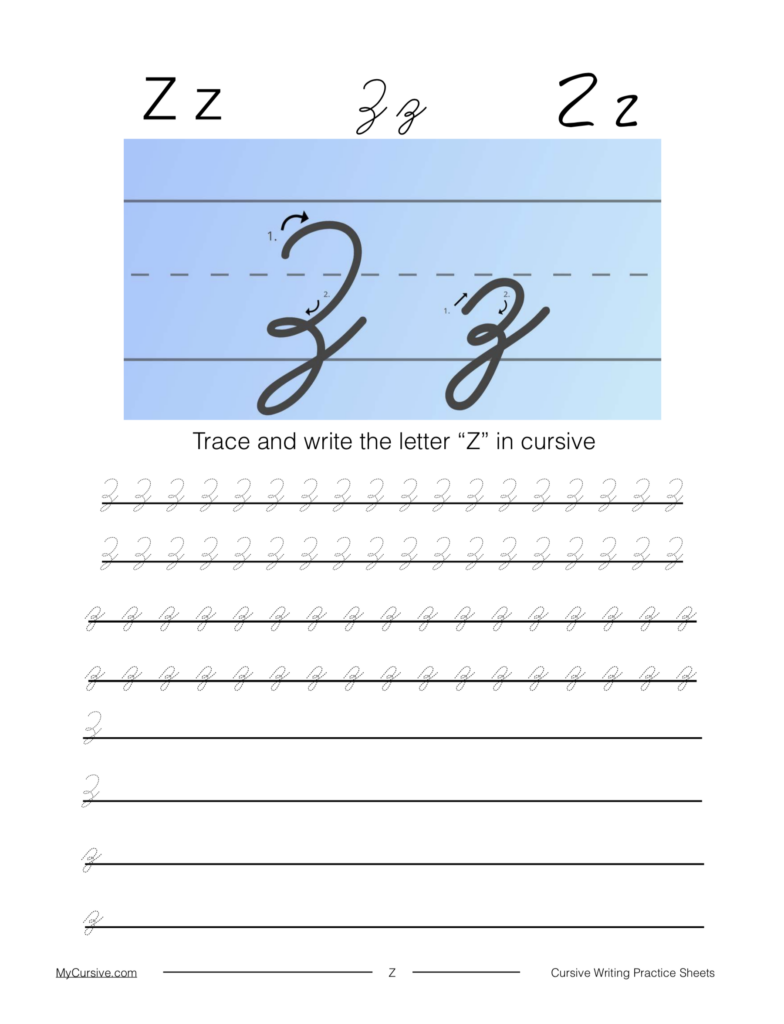
Getting Started with the Lowercase Z in Cursive
Writing the lowercase "z in cursive" is something many people find a bit tricky at first. It often looks like a number '2' with a tail, or perhaps a looping 'r' gone a bit wild. The main thing is to get the basic shape down before you worry too much about speed or flow. It’s like setting up your main page header perfectly before moving to other pages; you want that initial alignment to be spot on. A clear, distinct lowercase 'z' is definitely a good goal.
This letter often has a small loop at the bottom, which is where it often connects to the next letter. The way it sits on the line and dips below it is quite important. Some people find it easier to practice this letter by tracing it first, or by drawing it in the air. It really helps to get a feel for the motion. Just a little practice can make a big difference, you know, for getting the hand movements right.
Step-by-Step for Lowercase 'z'
Let's break down how you can make a good lowercase "z in cursive". First, you start at the mid-line, which is about halfway between the bottom line and the top line. From there, you go up a tiny bit, then curve down to the bottom line, making a small loop that goes below the line. It's almost like drawing a little fish hook that dips down. Then, you bring the line back up to meet the bottom line, and from there, you make a connecting stroke to join with the next letter. That is, if you are connecting it, of course.
You want to make sure the loop is not too big or too small. It should look balanced with the rest of the letter. Think about the overall shape. It's a bit like making sure your flexbox navigation bar looks good and doesn't let content scroll right through it; you want everything to fit together nicely and clearly. The line should be smooth, not jerky, so practice a gentle, flowing movement. Really, it's about finding that rhythm.
Practice writing a few 'z's on their own, then try connecting them to other letters like 'za', 'ze', 'zi', 'zo', 'zu'. This helps you get a feel for the connecting stroke. It’s important, you know, to see how the letter behaves when it's part of a word. This kind of practice is very helpful for building muscle memory in your hand.
Common Things to Watch Out For with Lowercase 'z'
One common thing people do is make the loop too small, or sometimes they forget the loop entirely, making it look like a printed 'z'. Or, in some respects, it might look like a '2'. Another thing is making the top part too narrow, which can make it hard to tell apart from other letters, you know, a bit like when text gets blurred after you zoom a div. You want it to be clear and easy to read.
Also, pay attention to the slant of your "z in cursive". Most cursive styles have a slight forward slant. If your 'z' is leaning too much one way or the other, it might look a little off compared to the rest of your writing. Maintaining a consistent slant across all your letters is pretty important for a neat appearance. So, keeping that in mind can really help.
Finally, the connection to the next letter is key. Make sure your connecting stroke starts from the right spot and goes smoothly to the next letter. A weak connection can make your words look disconnected. It’s like ensuring your logo stays above your navigation bar; the hierarchy and connection need to be solid. A strong, clear connection is something to aim for, basically.
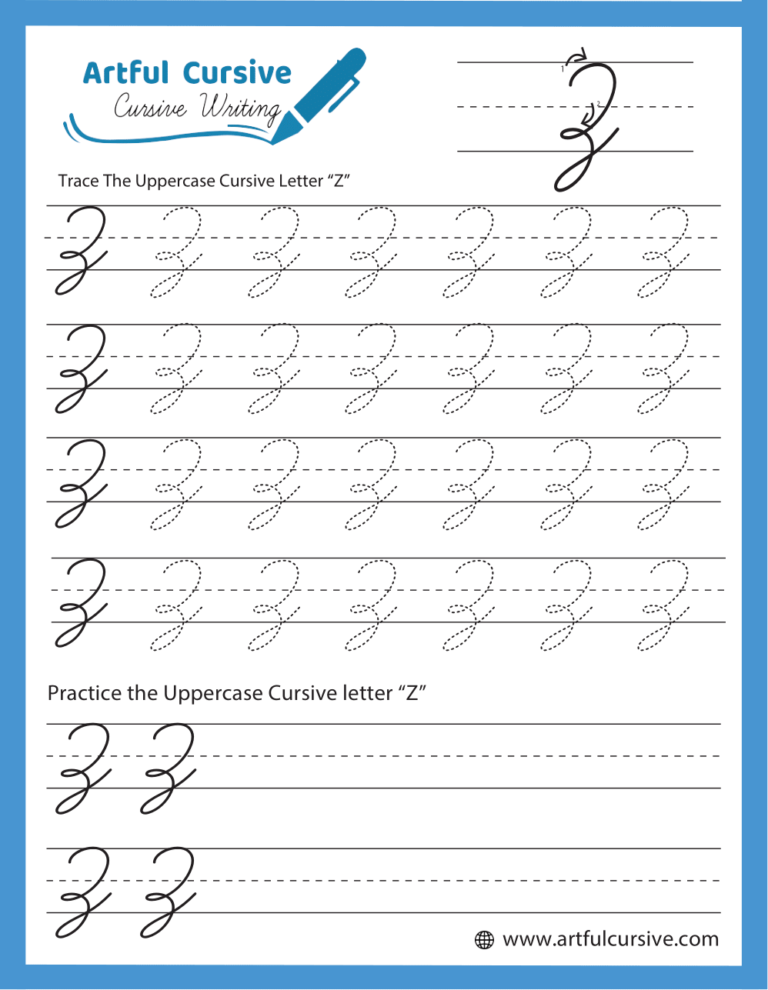
Tackling the Capital Z in Cursive
The capital "Z in cursive" often looks quite different from its lowercase friend. It usually has a more decorative, almost regal, appearance. Some versions might have a loop at the top, or a flourish at the bottom. It can be a bit more challenging than the lowercase 'z' because there's more room for personal style. It's like moving from a simple timer code to a more complex animation for a background; there are more elements to manage, you know.
This letter, the capital 'Z', starts at the top line and often sweeps down with a graceful curve. It can feel a bit like drawing a fancy ribbon. Because it's a capital letter, it doesn't usually connect to the next letter in the same way lowercase letters do. It stands alone, making a statement. So, you don't have to worry as much about the connecting stroke, which is a relief for some people.
There are a few main styles for the capital "Z in cursive", so you can pick the one that you like the most or that fits your handwriting style. Some are very simple, while others have more elaborate loops and swirls. It's really up to you and what feels right. You know, having options is always good.
Step-by-Step for Capital 'Z'
To write a good capital "Z in cursive", start at the top line. Make a small loop or a gentle curve to the left, then bring your pen down in a diagonal line towards the bottom line. As you get near the bottom, make a sweeping curve to the right, almost like the bottom of a 'G' or a fancy 'S'. Some styles will have a small loop at the very end, while others just finish with a flourish. It’s pretty much about making a smooth, continuous line.
The key here is to keep your hand moving. Don't lift your pen too much. The beauty of cursive, you know, is in its continuous flow. The capital 'Z' should look confident and clear, not hesitant. It's like making sure your JavaScript code runs smoothly without unexpected stops or errors. A fluid motion really helps with the overall look of the letter.
You might find it helpful to practice the capital 'Z' by itself many times before trying it in words. Focus on the curves and the overall balance of the letter. Try different sizes, too, to see what feels most comfortable for your hand. This kind of repetition, you know, can really help solidify the shape in your mind.
Making Your Capital 'Z' Shine
To make your capital "Z in cursive" truly stand out, pay attention to its size relative to other capital letters. It should be consistent with the height and general width of your other capital letters. This helps your writing look balanced and neat. A consistent appearance is very important, just like how you want your website's elements to be perfectly aligned across all pages, you know.
Also, consider the slant. Like the lowercase 'z', most cursive capital letters have a slight forward slant. Keeping this consistent helps your entire piece of writing look unified. A uniform slant can make a big difference in how polished your handwriting appears. It’s a small detail, but it makes a big impact, honestly.
Some people like to add a bit of flair to their capital 'Z', perhaps a slightly larger loop at the top or a more pronounced swirl at the bottom. This is where your personal style can really come into play. Just make sure it doesn't make the letter hard to read. Clarity is always the main goal, after all. You know, like ensuring your real numbers symbol is clear in Microsoft Equation 3.0.
Why the Cursive Z Matters Today
Even in our very digital world, knowing how to write the "z in cursive" and other letters still holds value. It’s a skill that connects us to tradition and can even help with brain development. Studies sometimes suggest that writing by hand can improve memory and creative thinking. So, it's not just about pretty letters; it's about keeping our minds active, too, you know.
For some, cursive is a way to sign documents, or to read old letters and historical papers. The "z in cursive" might not be the most common letter, but when you encounter it in an old diary or a family recipe, being able to read it is pretty neat. It opens up a window to the past, in a way.
And let's be honest, there's something really satisfying about writing a beautiful letter. It’s a personal touch that digital text just can't quite replicate. A handwritten note, especially one with a nicely formed 'z', can feel very special to the person receiving it. It shows care and effort, which is really something valuable today.
Practice Makes It Better
Like any skill, getting good at the "z in cursive" means practice. You won't get it perfect on your first try, and that's totally fine. Think of it like building a quiz game in HTML, CSS, and JS; you start with separate parts, then you bring them together, and you keep tweaking things until it works just right. Consistency is key, you know.
Set aside a little time each day, even just ten minutes, to practice. Use lined paper, or even special cursive practice sheets if you can find them. Focus on making each 'z' look better than the last. Don't rush. The goal is smooth, clear letters, not speed at first. Speed will come with time, honestly.
You could even try writing words that use the letter 'z' often, like 'zebra', 'blizzard', or 'amazing'. This helps you practice the connections to other letters. It’s like testing your timer code with different parts of your quiz game; you see how it behaves in real-world use. The more you write, the more natural it will feel, basically.
For more general tips on improving your cursive handwriting, you could check out resources from organizations that promote penmanship. For example, the International Association of Master Penmen, Engrossers and Teachers of Handwriting (IAMPETH) has some great materials that could help you further refine your skills. It’s a very good place to find more information.
Frequently Asked Questions About Z in Cursive
Is the cursive 'z' hard to write?
Many people find the "z in cursive" a little challenging, yes. Its unique loops and angles can take a bit more practice compared to some other letters. But, with consistent effort, it becomes much easier. It's like learning any new skill; it takes some repetition, you know, to get the hang of it.
What are the common mistakes when writing a cursive 'z'?
People often make the loop too small, or they don't make it go below the line enough. Sometimes, the top part can look too much like a printed 'z' or even a number '2'. Also, connecting it smoothly to the next letter can be a point where people struggle a bit. It’s about getting all the parts to work together, you know, just right.
How can I make my cursive 'z' look better?
To make your "z in cursive" look better, focus on consistent sizing and slant. Practice the loops and curves slowly at first, ensuring they are fluid. Pay attention to how it connects to other letters. Regular practice, even for just a few minutes each day, really helps improve its appearance. You know, small steps can lead to big improvements.
Putting It All Together
Getting comfortable with the "z in cursive" is a truly rewarding part of handwriting. It's about precision, flow, and adding a personal touch to your written words. Just like making sure your website elements are perfectly aligned and clear, or that your animations are smooth, the effort you put into your cursive 'z' shows. It really does.
Keep practicing those curves and connections. Remember, every little bit of effort helps your handwriting become more beautiful and consistent. It's a skill that can bring a lot of personal satisfaction, and it keeps a lovely tradition alive. You know, it’s a pretty neat thing to be able to do.
To learn more about cursive handwriting on our site, you can visit our homepage. And for specific guides on other tricky letters, you can link to this page our detailed letter guides. There's always more to discover, you know, about making your handwriting truly yours.
Cursive Z: Learn to Write the Cursive Letter Z - My Cursive
Cursive Alphabet: Letter "Z" Worksheet

How To Write Cursive Writing A To Z - Infoupdate.org
