Mastering The Cursive Z: Your Guide To A Tricky Letter
Learning cursive can feel like uncovering a hidden talent, and for many, the cursive letter "z" presents a special kind of puzzle. This particular letter, you see, often stands out from its print version quite a bit, which can make it a little less straightforward to learn. Yet, getting a good handle on the cursive "z" is absolutely possible, and it really helps you complete your cursive alphabet skills. It’s a rewarding feeling, too, when you can write this unique character with a smooth, flowing motion, truly making it your own.
It’s true, in some ways, the lowercase cursive "z" is actually one of the more difficult cursive letters to learn, and that's partly because it isn’t intuitively written from the print version. It just looks quite different, so it calls for a fresh approach. But don't you worry, with the right guidance and a bit of steady practice, you can definitely make this letter look beautiful on the page. We have some great tools to help you, apparently.
This guide will walk you through everything you need to know about writing the cursive "z," both in its capital and lowercase forms. We'll share clear steps, helpful connection tips, and even point you to some free, printable worksheets that will make your practice sessions much easier. You’ll find, for example, that breaking it down into smaller parts really helps. So, let’s get ready to make that "z" shine!
Table of Contents
- How the Cursive Z Stands Apart
- Why Cursive Z Can Be a Challenge
- Writing the Lowercase Cursive Z
- Step-by-Step for Lowercase Z
- Connecting Lowercase Z
- Crafting the Uppercase Cursive Z
- Step-by-Step for Uppercase Z
- Connecting Uppercase Z
- Practice Makes Perfect: Free Worksheets
- Getting Your Free Cursive Z Worksheets
- Tips for Daily Cursive Practice
- Beyond the Z: Learning the Whole Alphabet
- Common Questions About Cursive Z
- Ready to Write?
How the Cursive Z Stands Apart
The cursive "z" has a very distinct appearance, which sets it apart from many other letters in the cursive alphabet. When you look at a printed "z," it’s usually quite angular and straight, but the cursive version takes on a much more fluid and rounded shape. This difference is what often makes it feel less familiar to people who are just starting out with cursive, you know.
Because it doesn't look like its print counterpart, the cursive "z" requires a little extra attention to learn the correct strokes. It’s not simply a matter of adding a few curves to the familiar print shape. Instead, you're learning a brand new form for this letter, which is actually kind of exciting in its own way. This unique design is part of what makes cursive so elegant, too.
Why Cursive Z Can Be a Challenge
It’s often said that the lowercase cursive "z" is one of the most difficult cursive letters to learn, and there’s a good reason for that. As a matter of fact, its shape isn’t intuitively written from the common print version. You might find yourself wanting to draw it like the print "z" with some added loops, but that's not how it works in cursive. This lack of intuitive connection can make it a bit tricky at first.
The challenge comes from needing to learn a completely new set of motions for this letter. Unlike some letters that share a lot with their print form, the cursive "z" demands a different approach. It requires specific curves and loops that are unique to its cursive design, and getting these just right takes some dedicated effort. That said, with clear instructions, anyone can get it.
Writing the Lowercase Cursive Z
Getting the hang of the lowercase cursive "z" is a big step in mastering your cursive handwriting. This letter, as we've talked about, can be a little bit of a hurdle, but breaking it down into simple steps really helps. It’s all about getting the feel for the right flow and curves, which you can absolutely do. You’ll be surprised, too, how quickly it starts to feel natural.
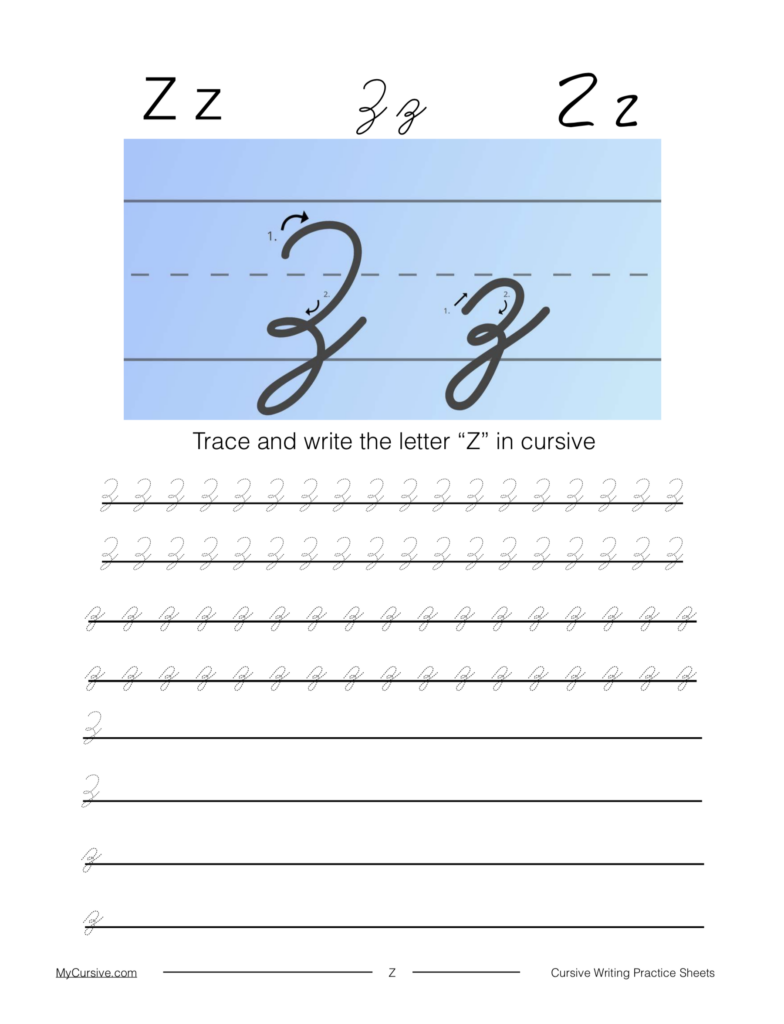
Step-by-Step for Lowercase Z
To write a lowercase cursive "z," you typically start with a small loop, then move into a descending stroke, and finish with another loop. Here’s a way to think about it:
Begin slightly below the middle line. Make a small, gentle loop upwards and to the right, touching the middle line. This first part is quite important, you see, as it sets up the rest of the letter.
From the top of that first loop, bring your pen down in a curving line towards the bottom line. This stroke should have a nice, smooth flow, almost like a graceful descent. It’s a pretty crucial part of the letter’s overall look.
Once you reach the bottom line, curve back up and to the left, making a loop that goes below the baseline. This loop should be open and flowing, not too tight. It adds a lovely finish, in a way.
After completing the loop below the baseline, bring your pen up and to the right, crossing through the descending stroke you just made. This crossing point is important for the letter's structure. You want it to be neat, you know.
Continue upwards to prepare for connecting to the next letter. This final stroke is what links the "z" to whatever comes after it, making your writing flow together beautifully. It's a very practical part of the letter.
Connecting Lowercase Z
Connecting the lowercase cursive "z" to other letters is a key part of fluent cursive writing. The final stroke of the "z" naturally extends upwards and to the right, making it quite ready to join with the beginning stroke of the next letter. You just want to make sure your ending stroke is long enough to meet the following letter comfortably, actually.
When you connect, think about maintaining a consistent slant and spacing between letters. This helps your words look neat and readable. Practice connecting the "z" to various letters, like "za," "ze," "zi," "zo," and "zu," to get a feel for the different joins. It's really about getting a smooth, continuous line from one letter to the next, and stuff.
Crafting the Uppercase Cursive Z
The uppercase, or capital, cursive "z" has its own distinct flair. It often looks quite different from its lowercase counterpart, showing a bit more flourish and elegance. While it might seem a little intimidating at first, it follows a logical path, and you can absolutely learn to write it with grace. It really is a beautiful letter, too, once you get the hang of it.
Step-by-Step for Uppercase Z
Writing the capital cursive "z" usually involves a flowing top loop, a descending body, and a final, elegant tail. Here’s a simple way to approach it:
Start slightly below the top line. Make a gentle, upward curve that touches the top line, then loop back down and to the left, crossing your initial upward curve. This creates the decorative top part of the letter, which is quite characteristic.
From the point where you crossed, bring your pen down in a graceful, curving line towards the bottom line. This stroke should be smooth and controlled, forming the main body of the letter. It’s a very important part of the overall shape, you know.
As you approach the bottom line, curve to the left, making a loop that dips below the baseline. This loop should be open and flowing, giving the letter its distinctive lower portion. It’s a pretty elegant finish, basically.
After completing the loop below the baseline, bring your pen back up and to the right, crossing through the descending stroke you made earlier. This creates a neat intersection, which really defines the letter’s structure. You want this to look clean, you know.
Continue upwards and to the right, finishing with a small flourish or a connecting stroke if the capital "z" is part of a word. This final touch adds character and prepares the letter for any connections. It’s almost like a little bow on top.
Connecting Uppercase Z
Connecting the uppercase cursive "z" to the next letter in a word is usually straightforward, as its final stroke naturally extends to the right. The capital "z" often serves as the first letter of a word, so its connection point is important for smooth writing. You want the flow from the "z" to the following letter to be seamless, which is pretty much the goal of cursive.
Make sure the connecting stroke from the capital "z" is long enough to reach the starting point of the next letter without looking strained. Practice writing words that begin with "Z," such as "Zebra" or "Zachary," to get a feel for how the connections work. This will help you achieve a consistent and attractive look in your writing, honestly.
Practice Makes Perfect: Free Worksheets
Consistent practice is truly the secret to mastering any cursive letter, and the "z" is no exception. Daily practice helps build muscle memory, making your strokes smoother and more controlled over time. It’s like building any other skill, you know; the more you do it, the better you get. And we have some great tools to help you along, too.
Getting Your Free Cursive Z Worksheets
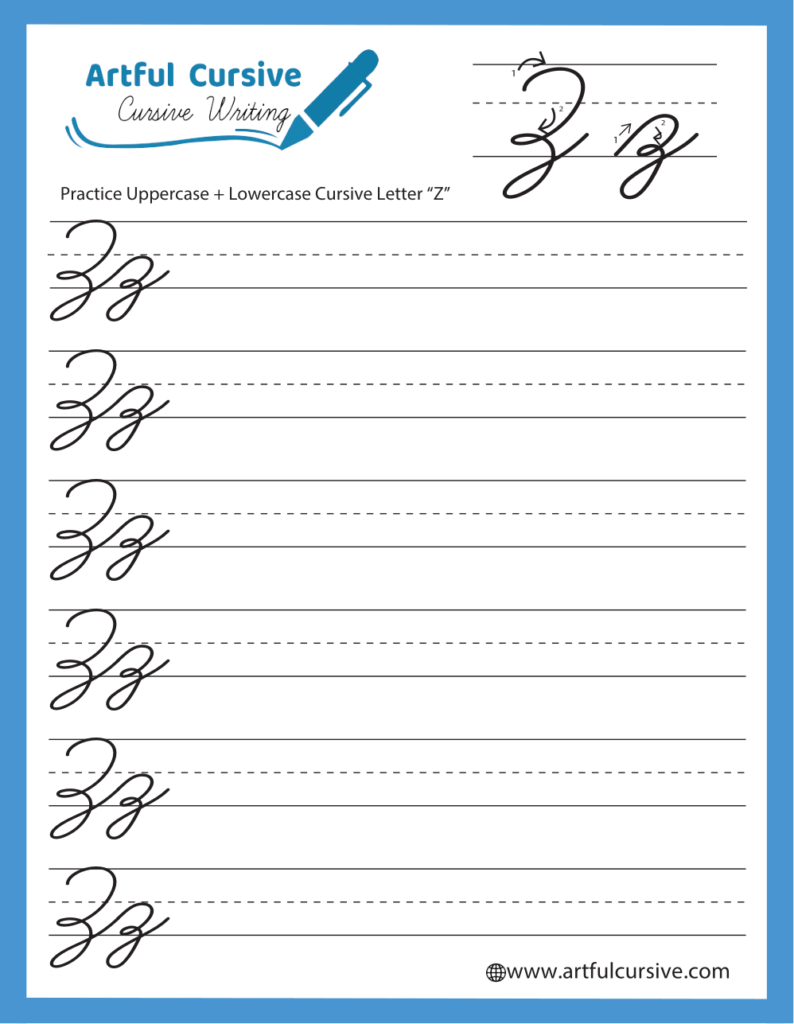
To help you along your way, we offer free printable cursive "z" writing worksheets. These resources are designed to help students practice writing the letter "z" in both its upper and lower case forms. You’ll find, for instance, that having lines and guides makes a big difference. These worksheets are part of a larger set, one of 26 sets of cursive alphabet worksheets, covering the entire alphabet from A to Z. Each worksheet comes with a short visual tutorial, which is really helpful, apparently.
You can download these free cursive worksheets to improve your writing control and fluency. They provide a structured way to practice, ensuring you cover all the necessary strokes and connections. Just click and print, and you’re ready to begin your practice. It’s a very easy way to get started, basically.
Tips for Daily Cursive Practice
To make the most of your practice sessions, consider these tips. First, find a comfortable writing position and hold your pen or pencil correctly. This helps reduce strain and allows for more fluid movements. You want to be relaxed, you know, when you write.
Next, focus on the strokes rather than just the final shape. Pay attention to where your pen starts, where it curves, and where it lifts off the paper. Take your time with each letter, especially when you're just starting out. It’s not a race, after all. Also, practice connecting the "z" to different letters to get a feel for how it links within words. Remember, consistency is more important than speed when you're building this skill. You’ll find, for example, that even short, regular practice sessions are more effective than long, infrequent ones.
Beyond the Z: Learning the Whole Alphabet
While mastering the cursive "z" is a fantastic achievement, it's just one part of learning beautiful cursive handwriting. Our collection includes tutorials and worksheets for the entire cursive alphabet, from "a" to "z." Each letter has its own short visual tutorial and a worksheet link, making it easy to learn step by step. It's a comprehensive way to learn cursive writing from scratch, which is pretty neat, you know.
Whether you're a beginner looking to learn cursive writing from the very start or someone who wants to brush up on their skills, these resources are here to help. You can learn how to write the cursive letter "z" with ease, and then move on to conquer the rest of the alphabet. It’s a complete system, in a way, designed to help you develop beautiful handwriting. Learn more about cursive writing on our site, and link to this page for more cursive letters.
Common Questions About Cursive Z
People often have questions about the cursive "z," especially since it can be a bit tricky. Here are some common things people ask:
Why is cursive Z so hard to write?
The cursive "z" is often considered challenging because its shape is quite different from the printed "z." It isn’t intuitively written from the print version, which means you have to learn a completely new set of strokes and movements for it. This can feel a little bit like learning a new symbol, which requires more focused practice. You really have to train your hand, you know.
Does cursive Z look like a print Z?
No, the cursive "z" does not look much like the print "z." The print "z" is typically made with sharp, straight lines, while the cursive "z" features flowing curves and loops. This visual difference is a major reason why it can be a bit tricky for beginners to grasp, as it doesn't offer a familiar starting point. It’s a very unique letter, in fact.
Where can I find free practice sheets for cursive Z?
You can find free printable cursive "z" writing worksheets right here! We offer a free PDF worksheet specifically for the cursive "z," covering both uppercase and lowercase forms. These worksheets are designed to help you practice writing the letter "z" with clear steps and guides, which is pretty helpful, you know. Just look for the download links within our cursive alphabet section.
Ready to Write?
The cursive "z" might seem like a small hurdle, but it's a very rewarding letter to master. With the clear steps, connection tips, and free practice worksheets we've provided, you're well on your way to writing it beautifully. Remember, daily practice truly helps you gain control and fluency in your handwriting. It’s a skill that builds over time, you know, with consistent effort.
So, why not download our free printable cursive "z" worksheet today? You can begin to master this unique letter step by step, and then move on to complete your cursive alphabet skills. It’s a simple way to start, and you’ll be amazed at your progress. You can find more helpful resources for learning cursive at Cursive Writing Organization, for example.
Cursive Z: Learn to Write the Cursive Letter Z - My Cursive

Cursive Z
Cursive Alphabet: Letter "Z" Worksheet
